
用户手册
user manual
滚筒干衣机
Tumble Dryer
EDC78550W

Electrolux. Thinking of you.
在 www.electrolux.com 上分享更多我们的思维
目录
重要安全信息 2
环境 3
安装 4
产品说明 5
首次使用之前 5
程序表 6
日常使用 7
清洁和保养 8
如果……应该如何处理 10
技术数据 11
干衣机设置 11
服务 12
如有更改恕不另行通知
重要安全信息
重要事项! 为了您的安全起见和确保正确使
用,安装和初次使用干衣机之前,请仔细通
读本用户手册,包括其中的提示以及警告。
为了避免不必要的错误和意外,必须确保所
有使用本干衣机的人员完全清楚其操作和
安全性能。 请妥善保管说明书并在搬迁或
转售干衣机时一并附上说明书,以便使用该
干衣机的所有人都能够正确了解干衣机的
使用和安全信息。
- 请在使用本干衣机之前阅读说明书。
常规安全事项
• 不管以任何方式改变本产品规格或改造
本产品都非常危险。
• 本干衣机不可由肢体伤残、感觉障碍以及
缺乏相关经验和知识的人员(包括儿童)
使用,除非在其安全负责人的看管或指导
下才可使用。
• 确定儿童和小动物没有爬入烘干槽内。
为避免发生此情况,请在使用之前检查烘
干槽内部。
• 任何物体,如硬币、安全别针、钉子、螺
丝钉、石头或任何其他坚硬、尖锐的材料
都会导致重大损害,因此切勿将这些物体
放入干衣机内。
• 为了避免过量烘干导致的火患危险,请不
要使用本干衣机来烘干下列物品:垫子、
棉被等物品(这类物品会累积热量)。
• 如泡沫塑料(乳胶泡沫)胶乳泡沫、浴
帽、防水纺织品、胶底物品和衣物或装有
泡沫橡胶的枕头等物品都不应放在滚筒
干衣机内烘干。
• 使用、清洁和维护之后务必拔下干衣机的
电源插头。
• 不论在任何情况下都不应该尝试自行维
修干衣机。没有经验的人员执行维修工
作会导致受伤或严重故障。请联系您当
地的服务中心。始终坚持使用原装备件。
• 被烹饪油丙酮、汽油、煤油、污迹去除
剂、松节油、蜡和蜡去除剂等物质污染的
衣物,应该先用额外数量的洗衣剂在热水
中洗涤,然后才放入滚筒干衣机内烘干。
• 爆炸危险:切勿用干衣机来烘干沾有易燃
溶剂(汽油、甲基化酒精、干洗液和类似
物品)的衣物。因为这些物质是挥发性的
并可导致爆炸。仅使用干衣机来烘干用
水洗过的衣物。
• 火灾危险:被植物油或烹饪油脏污或浸湿
的衣物会导致火灾危险,请不要用干衣机
来烘干这类衣物。
• 如果您使用污迹去除剂洗涤衣物,必须执
行额外的漂洗程序之后才将衣物放入滚
筒干衣机。
• 如果要将衣物装入干衣机,请确定衣物的
口袋中没有意外遗留的打火机或火柴。
警告!
• 火灾危险! 切勿在烘干程序结束之
前停止滚筒干衣机,除非迅速取出所
有衣物并摊开使热消散。
• 切勿使滚筒干衣机四周积聚棉绒。
• 触电危险!请勿对干衣机喷水。
• 滚筒烘干程序的最后部分在不加热的情
况下进行(冷却程序),以确保衣物保持
在一个可保证衣物不会受损的温度。
• 请不要在使用工业化学物品进行清洁工
作后使用滚筒干衣机。
• 确定您安装本产品的室内通风良好,以避
免从干衣机回流的气体燃烧其他燃料,包
括明火。
安装
• 本电器很重。搬动时请务必小心。
2 electrolux

• 当您拆开干衣机的包装时,请检查并确定
产品没有损坏。如有疑问,请勿使用干衣
机并联系服务中心。
• 使用干衣机之前,必须拆除所有的包装。
若不遵循此指示,会导致产品和财产严重
损坏。请参阅《用户手册》中的相关部
分。
• 安装本干衣机所需的任何电气工作都应
该由合格电工或有能力的人员进行。
• 如果将干衣机放置在有地毯的地面上,请
调整机脚,使干衣机底下的空气可以自由
流通。
• 安装干衣机后,检查并确保干衣机没有压
住或阻碍电源线。
• 如果将干衣机放置在洗衣机的上面,就必
需使用堆叠套件(可选附件)。
使用
• 此干衣机设计为在家庭中使用。切勿将
本产品用于设计以外的用途。
• 仅洗涤可使用机器烘干的织物。请遵循
衣物标签上的说明。
• 请勿在滚筒干衣机中烘干未洗涤的衣物。
• 请勿超载干衣机。请参阅《用户手册》中
的相关部分。
• 请勿将还在滴水的衣物放入干衣机内。
• 请勿将沾有挥发性石油产品的衣物放入
机器内烘干。如果使用挥发性清洁液,请
小心确保去除衣物上的清洁液再将衣物
放入机器内。
• 请勿通过拉动电源线将插头从插座上拔
出,务必要握住插头。
• 如果电源线、控制面板、工作台面或底座
损坏而可以接触滚筒干衣机的内部,切勿
使用滚筒干衣机。
• 使用衣物柔顺剂或类似产品时,必须按照
衣物柔顺剂说明书的指示进行。
• 小心 - 表面高温:打开照明时,请勿碰触
机门灯罩表面。
(仅限于配备内部烘干槽照明的干衣机)
儿童安全要求
• 本烘干机不可在没有看管的情况下由儿
童或体弱人士使用。
• 儿童通常不会意识到与电气设备有关的
危险。 应该看管儿童以确保他们没有玩
耍干衣机。
警告!
• 窒息危险!包装部件(例如塑料袋、
聚苯乙烯)可能会对儿童造成危险 -
将其存放在儿童无法触及的安全地
方。
• 将所有洗洁剂它们存放在儿童无法触及
的安全地方。
• 确定儿童或小动物没有爬入烘干槽内。
环境
产品上或其包装上的 标记表示不能把本
产品作为家庭垃圾般处理,而是应该将其送
至适当的电气和电子设备回收站点。通过
确保本品得到正确处理,您可以帮助避免由
于本产品废弃后处理不当而给环境和人类
健康带来的潜在负面效果。如需了解更多
有关本产品回收的详细信息,请联系您当地
的废品回收部门、您的家庭垃圾处理服务点
或您购买本产品的商店。
旧器具
警告!
如果您不要再使用该机器,请从插座拔下电
源插头。 剪断电源线并和插头一起废弃。
销毁装载门钩。 这样儿童就不会将自己锁
在机器内而危及生命。
包装材料
包装材料符合环保并可回收利用。 塑料部
件都使用标记识别,例如 >PE<, >PS< 等。
请将包装材料丢弃在社区废物处理设施的
适当容器内。
环境提示
• 在干衣机内,衣物会变得蓬松和柔软。 因
此在洗涤时不需要使用衣物柔顺剂。
• 如果您遵循下列说明进行,您的干衣机将
能够以最经济的方式操作:
– 始终保持干衣机底座上的通风槽通畅
无阻;
– 使用程序概观中指定的装载容量;
– 确保安装室内的通风良好;
– 完成每个烘干程序后,清洁微细过滤器
和细微滤网;
– 烘干之前妥善使衣物脱水。
能源的消耗将取决于洗衣机上设置的脱
水转速。 较高脱水转速 - 较低能源消
耗。
electrolux 3

安装
放置干衣机
• 为了您的方便,建议将干衣机放置在靠近
洗衣机的地方。
• 必须将滚筒干衣机安装在一个干净、不会
累积尘埃的地方。
• 干衣机周围的空气必须能够自由流通。
请勿阻挡前端的通风栅,或干衣机背面的
通风口栅。
• 若要保持使用干衣机时最低的震动和噪
音,应该将它放置在一个平稳的表面上。
• 放置在永久工作位置后,使用水平仪帮助
检查并确定干衣机绝对水平。若不是,可
升高或降低机脚直到其水平为止。
• 切勿卸下机脚。请勿使用深入的地毯、木
条或类似物体来限制与地面的间隙。这
样可能会导致热积聚而影响干衣机的操
作。
重要事项!
• 滚筒干衣机排出的热风温度最高可达
60°C。因此切勿将干衣机安装在不能耐
高温的地面上。
• 操作滚筒干衣机时,室温必须不能低于
+5°C 和高于+35°C,因为这样会影响干衣
机的性能。
• 若要移动干衣机,必须直向搬运。
• 切勿将干衣机安装在可锁定的门、 拉门或
干衣机对面具有铰链的门后面,这样会使
干衣机无法完全打开。
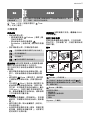
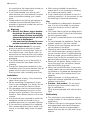
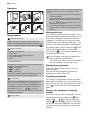
拆除运输防护包装
小心!
使用运输的所有部件之前,必须拆除包装。
1
1. 打开机门
2. 从干衣机内部烘干槽顶部撕下胶带。
3. 从机器取下箔软管和聚苯乙烯垫。
电气连接
有关电源电压、电流类型和所需保险丝的详
细信息,可在标牌上查找。标牌位于靠近装
载孔的地方(请参阅“产品说明”章节)。
根据现行的电线布线规范,将干衣机连接到
接地的插座上。
警告! 制造商对于不遵循上述安全注意
事项而导致的损坏或伤害不承担任何责
任。
若需要更换设备的电源线,应该交由我
们的服务中心执行。
警告! 安装干衣机后,必须能够插拔插
头。
机门反转
为了更轻松装入或取出衣物,机门可进行反
转。
警告! 只有授权的服务工程师可反转机
门。
请联系您当地的服务团队中心。工程师将
会执行机门反转,费用由您自理。
特殊附件
• 堆叠套件
这些中间安装套件可用于堆叠安装干衣
机和洗衣机(前载式且宽度为 60 厘米),
以便节省空间。洗衣机在下,干衣机在
上。
请仔细阅读该套件随附的说明。
该说明可从您的服务团队中心或专业经
销商处获得
• 排水套件
此安装套件用于将冷凝水直接排放到水
盆、弯管、沟渠等处。虽然不必再为储水
器排水,但仍必须将其保持在干衣机中的
设计位置。
必须在距离地面最少 50 厘米和最大 1 米
之间选择一个适当的高度安装固定软管,
不能将软管打成圈状。如果可能,请截短
排水软管。
请仔细阅读该套件随附的说明。
该说明可从您的服务团队中心或专业经
销商处获得
• 带抽屉底座
用于将干衣机安装在最佳高度,以留出一
些空间来存放其他物品(例如衣物)。
请仔细阅读该套件随附的说明。
4 electrolux

该说明可从您的服务团队中心或专业经
销商处获得
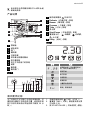
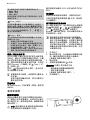
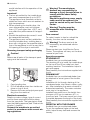
产品说明
1
2
4
6
8
9
11
3
5
7
10
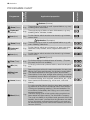
1 控制板
2 绒毛滤网
3 机门
4 通风栅
5 可调机脚
6 带冷凝水容器的隔间
7 烘干槽照明
8 用于打开底座门的按钮
9 铭牌
10 换热器
11 换热器门
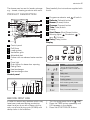
控制板
1 2 3 4 5 6 7 8 9
1
程序选择器和
关闭开关
2 Delicate (纤细衣物)按钮
3 Buzzer (蜂鸣器)按钮
4 Dryness (干燥度)按钮
5 Time (时间)按钮
6 显示屏
7 Start/Pause (开始/暂停)按钮
8
警报指示灯:
冷凝器
、
过滤器
、
水已满
9 Delay (延迟)按钮
显示屏
符号 说明
结束的时间(定时程序的时
间、延迟开始的时间)
延迟开始
烘干阶段
冷却阶段
防皱阶段
儿童安全防护锁
错误、错误选择
首次使用之前
为了去除生产时可能产生的任何残余物,可
使用湿布擦拭干衣机的烘干槽,或将湿布放
在干衣机内然后执行简短的烘干程序(30 分
钟)。
1.
将程序旋钮转到
TIME (时间)。
2. 重复按 TIME (时间)按钮直到显示屏
中出现 0.30。
3. 按 START/PAUSE (开始/暂停)按钮。
electrolux 5

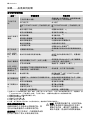
程序表
程序
最大装载量
(干衣物)
应用/性质
护理标签
Cottons (棉质)
Extra (额外)
8 公
斤
彻底烘干厚或多层织品,例如,厚绒布毛巾物品、浴衣。
Cupboard
(衣橱)
8 公
斤
彻底烘干更厚的织品,例如,厚绒布毛巾物品、针织品、毛
巾。
Iron (熨烫)
8 公
斤
用于也需要烫熨的薄织品,例如,编织衣物、棉质衬衫。
Synthetics (合成纤维)
Extra (额外)
3 公
斤
彻底烘干厚或多层织品,例如,套头毛衣、被褥、桌布。
Cupboard
(衣橱)
3 公
斤
用于无需烫熨的薄织品,例如,免烫衬衫、桌布、婴孩衣
服、袜子、带罩杯和铁丝网的女用内衣。
Iron (熨烫)
3 公
斤
用于也需要烫熨的薄织品,例如,编织衣物、棉质衬衫。
Special (特殊)
Time (时间)
8 公
斤
用于进一步烘干个别衣物。( Dryness (干燥度)功能不
可用)
Mix (混合)
3 公
斤
用于在低温下烘干棉质及合成纤维织品。
Easy Iron (免
烫)
1 公
斤
(或
5 件
衬
衫)
用于易于护理织品(例如衬衫和女装衬衫)的具备抗皱摺机
制的特殊程序;以便尽可能减少熨烫工作。效果将取决于织
品类型及其加工。在脱水后直接将织品放入干衣机。 烘干
后立即取出织品,然后放在衣架上。
Jeans (牛仔
裤)
8 公
斤
用于不同材料厚度(例如颈围、裤子翻边和接缝)的休闲衣
物,例如牛仔裤、汗衫等。
Wool (毛织
品)
1 公
斤
在最小机械负荷下使用热风烘干洗涤后的羊毛织品(请遵
循“分类和准备洗涤”章节的说明进行)。建议:烘干后立即
取出织品,因为之后不会执行抗皱摺程序。
此滚筒干衣机的毛织品烘干程序已通过 The Woolmark
Company(国际羊毛局)测试和认可。此程序适用于烘干
标有“手洗”字样的羊毛针织衣物,只要按照制造商说明在已
经过 Woolmark 认可的手洗程序中清洗衣物,然后用滚筒干
衣机烘干。(M1022)
Cooling (冷
却)
8 公
斤
长约 10 分钟的特殊程序,用于使用市面上销售的清洁套件
来光鲜和温柔清洗织物。(仅使用制造商标明适合干衣机的
产品;请遵循制造商的使用说明。)(Buzzer(蜂鸣器)功
能可用)
Quick (快速)
Synthetics
quick (合成纤维
快速)
2 公
斤
适用于在保持最少褶皱的情况下快速烘干合成纤维织品。
烘干结果:立刻可以存放起来。
6 electrolux

程序
最大装载量
(干衣物)
应用/性质
护理标签
Cottons quick
(棉质快速)
3 公
斤
适用于在保持最少褶皱的情况下快速烘干棉质织品。烘干
结果:立刻可以存放起来。
Time (时间)功能仅适用于 Time
(时间)程序。
日常使用
分类衣物
• 按织品类型分类:
–
棉/亚麻布使用
Cottons (棉质)程
序组内的程序。
–
混合织品及合成纤维使用
Synthetics (合成纤维)程序组内的程
序。
• 按护理标签分类:护理标签将说明:
可按照操作原理在滚筒干衣机内烘干
在正常温度烘干
可低温烘干
不可以在滚筒干衣机内烘干
重要事项! 请勿将护理标签上未指明适合滚
筒烘干的任何湿衣物放入干衣机内。
本干衣机可用于标明适合滚筒烘干的所有
湿衣物。
• 请勿将新的彩色纺织品和浅色衣物一起
烘干。纺织品的颜色可能会渗透到衣物
上。
•
请勿使用
Extra (额外烘干)程序烘
干棉质运动衫和针织品。衣物可能会收
缩!
•
可以使用
Wool (毛织品)程序烘干毛
织品和类似毛织品的纺织品。在烘干程
序之前,尽可能使羊毛纺织品脱水(最大
1200 rpm)。仅烘干属于类似或相同材
料、颜色或重量的羊毛纺织品。请单独烘
干羊毛面料的沉重衣物。
准备衣物
• 若要避免衣物缠结:将拉链拉上、扣好棉
被的扣,并绑紧松开的结及丝带(例如围
裙)。
• 清空衣物口袋。取出金属物件(回形针、
安全别针等)。
• 反转带双层织物的衣物(例如,带棉衬里
的兜帽,棉层应该在最外面)。这样即可
更好的烘干这类织物。
重要事项! 请勿超载干衣机。遵循最大 8 公
斤的装载量。
打开干衣机电源
将程序选择器转到任何程序。干衣机电源
将会打开。打开装载门时,内部灯管将会照
亮烘干槽。
操作
1
3 4 5
2
烘干选项
Delicate (纤细衣物)
用于在低热下温和烘干护理标签上标有 的
敏感织品和对温度敏感的纺织品(例如,人造
毛、粘胶纤维)
Buzzer (蜂鸣器)
以有声方式确认:
• 程序结束
• 防皱阶段开始和结束
• 程序中断
• 错误
Dryness (干燥度)
electrolux 7

充分增加已烘干衣物的干燥度至所选水平:
• Max -
最大
• Med -
中等
• Min -
最小
该选项有助于实现符合烘干要求的结果(对某
些程序无效)
Time (时间)
可用来设置从最少 20 分钟到最多 3 小时的个
别烘干时间(步幅为 10 分钟 - 重复按下按钮,
直到所需的程序持续时间出现在显示屏中,例
如,1 小时 20 分钟的程序为
);
适用于适当的程序
Delay (延迟)
可以将启动烘干程序的时间延迟最少 30 分钟
至最长 20 小时。
1. 选择烘干程序和附加烘干选项
2. 反复按下 Delay 按钮直到所需的延迟开始
时间出现在显示屏中,例如,若要在 12 小
时之后启动程序,则为
H
3. 若要激活延迟计时器,可按下 Start/Pause
按钮 - 程序启动时间将会持续显示
设置儿童安全防护锁
您可以设置“儿童安全防护锁”来防止程序意
外启动,或执行中的程序被意外更改。儿童
安全防护锁功能可锁定所有按钮和程序旋
钮。要启用或禁用儿童安全防护锁,可同时
按住 Dryness (干燥度)和
Time (时
间)按钮 5 秒。
符号:
将会出现在显示屏中,表示已启
用儿童安全防护锁。
若要更改烘干参数,必须禁用儿童安全
防护锁。
在烘干程序的最后阶段,将无法禁用儿
童安全防护锁。
开始程序
按 Start/Pause (开始/暂停)按钮。程序将
会启动。
程序进度将会通过 LCD 上显示的
烘干时间
显示。
更改程序
若要更改错误选择的程序,在程序启动时,
立即先将程序选择器转到
关闭
,然后再
次设置程序。
烘干程序完成/取出衣物
烘干程序完成之后,显示屏将会显示防皱图
标
和闪烁的 以及警报指示
灯:
滤网
和
水已满
。如果按下
Buzzer (蜂鸣器)按钮,将会间歇性的发出
声音信号约一分钟。
烘干程序之后将会自动执行防皱阶段,
该阶段持续大约 30 分钟。烘干槽将会
在这个阶段间隔旋转。这样即可使衣物
散开而不会出现皱摺。在防皱阶段,您
可以随时取出衣物。(应该在防皱阶段
的最后部分即将结束时取出衣物,以防
止皱摺的形成。)
1. 打开机门。
2. 取出衣物之前,先从微细过滤器取出绒
毛。最好是弄湿双手再执行此操作。
(请参阅“保养和清洁”章节。)
3. 取出衣物。
4.
将程序选择器转到
关闭
。
重要事项! 在每个烘干程序之后
- 清洁微细过滤器和细微滤网
- 排空冷凝水容器
(请参阅“保养和清洁”章节。)
5. 关闭装载门。
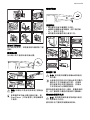
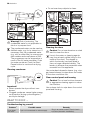
清洁和保养
清洗绒毛滤网
滤网会收集在烘干过程中积聚的所有绒毛。
为了确保干衣机完美操作,必须在执行每个
烘干程序之后,清洗绒毛滤网(细微滤网和
绒毛滤网)。
小心! 请勿使用没有安装绒毛滤网或者
绒毛滤网损坏或阻塞的干衣机。
8 electrolux

65
2 3
1
4
7
II
I
II
I
清洁机门密封垫
烘干程序完成后,立即使用湿布擦拭机门密
封垫。
清空储水器
执行每个烘干程序后清空储水器。
警告! 冷凝水不适合饮用或用于预备食
品。
如果程序因为储水器已满而中断:按
Start/Pause (开始/暂停)按钮继续烘
干程序。
清洁冷凝器
重要事项!
• 请勿使用没有冷凝器的干衣机。
• 堵塞的冷凝器会增加能耗(烘干程序延
长),损坏干衣机。
• 请勿使用尖锐物件进行清洁工作。
1
87
4
5 6
32
清洁烘干槽
小心! 请勿使用研磨剂或钢丝绒来清洁
烘干槽。
水或清洁剂中的石灰可能会在烘干槽内
部形成几乎不能看见的内层。 衣物的
烘干程度将无法再可靠检测。 衣物从
干衣机取出时比预期更潮湿。
使用标准的家用清洁剂(例如,含醋的清洁
剂)向下擦拭烘干槽的内部和烘干槽骨架。
清洁控制面板和机架
小心! 请勿使用家具清洁剂或强力清洁
剂来清洁干衣机。
使用湿布向下擦拭控制面板和机架。
electrolux 9

如果……应该如何处理
自己动手排除问题
故障
1)
可能的原因 补救方法
干衣机不启
动。
干衣机未插上电源。
将插头插入电源插座中。检查保险丝盒
(安装在室内)中的保险丝。
机门被打开。 关上机门
未按下 START PAUSE (开始/暂停)按
钮。
按下 START/PAUSE (开始/暂停)按
钮。
对烘干结果不
满意。
程序设置不正确。
设置适当的程序。
2)
绒毛过滤器堵塞。
清洁绒毛过滤器。
3)
换热器堵塞。
清洁换热器。
3)
超过最大装载量。 遵守最大装载量。
通风网罩被盖住。 让底部的通风网罩露出来。
桶内有残留物。 对桶内部进行清洁。
水质硬度过高。
设置适当的水质硬度
4)
。
机门未关闭 过滤器未锁定到位。
将细滤器安装到位和/或将粗滤器按放到
位。
LCD 上显示
Err(
错误
)。
5)
尝试在启动程序后更改参数。
关闭干衣机电源然后再打开。设置请求
的参数。
无烘干槽照明
程序选择器处于 OFF (关闭)位置。
将其转到 DRUM LIGHT (烘干槽照明)
(如果可用)或任何程序。
灯泡出现故障。 更换灯泡(请参阅下一章节。)
LCD 上显示
的程序时间不
规律变化
5)
将会根据以下各项计算程序结束时间:
衣物的类型、体积和湿度。
自动处理;这不是干衣机故障。
程序未激活 储水器已满。
排空储水器
3)
,按下 START PAUSE
(开始/暂停)按钮。
烘干周期过短
衣物量不大。/衣物相对于所选程序来说
过干。
选择时间程序或更高的烘干水平(例如
EXTRA DRY (额外烘干))。
烘干周期过长
6)
绒毛过滤器堵塞。 清洁绒毛过滤器。
装载量过高。 遵守最大装载量。
衣物未充分烘干。 将衣物充分烘干。
室温过高 - 非机器故障。 如果可能,请降低室温。
1)
如果
LCD
上出现错误消息(例如,
E51
,仅限于带
LCD
的干衣机):关闭干衣机电源然后再打开。设置程序。按
下
START/PAUSE
(开始
/
暂停)按钮。干衣机不启动。
-
请通知当地服务中心并提供错误代码。
2)
遵循程序的建议(请参阅程序概述一章)
3)
请参阅护理和清洁一章
4)
请参阅干衣机设置一章
5)
仅限于带
LCD
的干衣机
6)
注意:烘干程序会大约会在
5
小时后自动终止(请参阅烘干程序完成章节)。
更换内部照明的灯泡
仅使用特别为干衣机设计的特殊灯泡。您
可以从当地的服务中心获取专用灯泡。
重要事项! 打开干衣机时,内部照明将会在
打开机门情况下的 4 分钟后自动关闭。
警告! 请勿使用标准灯泡!这些灯泡会
积聚过多的热并可能会损坏干衣机!
更换灯泡之前,请先拔下电源插头;若
是永久连接:完全松开或停用保险丝。
10 electrolux

1. 松开灯泡上方灯罩的螺丝钉(可在位于
顶部的装载孔正背面找到;请参阅“干衣
机说明”章节。)
2. 更换灯泡。
3. 用螺丝钉栓紧灯罩。
用螺丝钉栓紧机门灯罩之前,检查 o 形垫圈
的位置是否正确。如果机门灯罩上缺少 o
形垫圈,请不要操作干衣机。
警告! 为了安全起见,必须用螺丝钉紧
固灯罩。如果未完成此操作,切勿操作
干衣机。
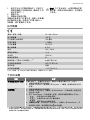
技术数据
高度 x 宽度 x 深度 85 x 60 x 58 cm
烘干槽容量 108 升
打开装载门时的深度 109 厘米
可调节高度 1.5 厘米
干衣机重量 40,5 公斤
最大装载量 8 公斤
电压 230 - 240 V
需要的保险丝 13 A
总功率 2350 W
能源效率等级 B
能源消耗(千瓦时/工作周期)(
1)
4,48 千瓦/小时
平均每年能源消耗 285,5 千瓦/小时
使用类型 家庭
允许的环境温度 + 5°C 至+ 35°C
1) 8
公斤棉质,在
1000 rpm
转速下预先排水,根据
EN 61121
标准)
干衣机设置
设置 执行
蜂鸣器永久打开/关闭 在默认情况下,报警将永远关闭。要将永久警报设置为打开(关闭):
1. 将程序选择器转到任何程序。
2. 同时按下 Buzzer (蜂鸣器)和 Dryness (干燥度)按钮并按住大约 5
秒钟。
水质硬度
1)
1. 将程序选择器转到任何程序。
2. 同时按下 Dryness (干燥度)和 Start/Pause (开始/暂停)按钮并按
住大约 5 秒钟。
3. 按下 Start/Pause (开始/暂停)按钮,直到您设置所需的水平为止。
- 低传导性<300 微秒/厘米
- 中等传导性 300-600 微秒/厘米
- 高传导性<600 微秒/厘米
4. 若要记住设置,可同时按下 Dryness (干燥度)和 Start/Pause (开
始/暂停)按钮,或将旋钮转到
关闭
位置。
1)
水包含不固定数量的石灰石和矿盐,其数量会根据地理位置而有所不同,从而也改变其传导性值。水传导性的相
应变化与那些工厂预先制定的值比较,会稍微影响程序结束时的衣物残余湿度。您的干衣机允许您根据水的传导
性值调节烘干传感器的灵敏度。
electrolux 11

服务
若出现技术故障,请先检查您是否可借助操
作说明自行解决问题 – 请参阅“
如果
……
应
该如何处理
”章节。
如果您无法自行解决问题,请联系客户服务
部门或我们的服务合作伙伴之一。
为了快速为您提供帮助,我们需要下列信
息:
- 型号说明
- 产品编号(PNC)
- 序列号(序列号位于粘贴到产品的铭牌上
- 若要查找该序列号,请参阅
产品说明
章
节。)
– 故障类型
– 显示屏所显示的任何错误信息。
当您从干衣机获取必要的参考编号后,我们
建议您在此处记下这些信息:
型号说明: ........................................
产品编号: ........................................
序列号: ........................................
12 electrolux

Electrolux. Thinking of you.
Share more of our thinking at www.electrolux.com
CONTENTS
Important safety information 13
Environment 15
Installation 15
Product description 17
Before first use 17
Programme chart 18
Daily use 19
Cleaning and maintenance 21
What to do if ... 22
Technical data 24
Machine settings 24
Service 25
Subject to change without notice
IMPORTANT SAFETY INFORMATION
Important! In the interest of your safety
and to ensure the correct use, before
installing and first using the appliance,
read this user manual carefully,
including its hints and warnings. To
avoid unnecessary mistakes and
accidents, it is important to ensure that
all people using the appliance are
thoroughly familiar with its operation
and safety features. Save these
instructions and make sure that they
remain with the appliance if it is moved
or sold, so that everyone using it
through its life will be properly
informed on appliance use and safety.
- Please read the instruction book
before using this appliance.
General safety
• It is dangerous to alter the specifications
or attempt to modify this product in any
way.
• This appliance is not intended for use by
persons (including children) with reduced
physical and sensory conditions or lack
of experience and knowledge, unless
they have been given supervision or in-
struction concerning use of the appliance
by a person responsible for their safety.
• Make sure that small children and pets
do not climb inside the drum. To avoid
this, please check into the drum before
using.
• Any objects such as coins, safety pins,
nails, screws, stones or any other hard,
sharp material can cause extensive dam-
age and must not be placed into the ma-
chine.
• In order to avoid danger of fires caused
by excessive drying, do not use appli-
ance to dry the following items: Cush-
ions, quilts etc. (these items accumulate
heat).
• Items such as foam rubber (latex foam),
shower caps, waterproof textiles, rubber
backed articles and clothes or pillows fit-
ted with foam rubber pads should not be
dried in the tumble dryer.
• Always unplug the appliance after use,
cleaning and maintenance.
• Under no circumstances should you at-
tempt to repair the machine yourself. Re-
pairs carried out by inexperienced per-
sons may cause injury or serious mal-
functioning. Contact your local Service
Centre. Always insist on genuine spare
parts.
• Items that have been soiled with sub-
stances such as cooking oil acetone,
petrol, kerosene, spot removers, turpen-
tine, waxes and wax removers should be
washed in hot water with an extra
amount of detergent before being dried in
the tumble dryer.
• Danger of explosion: Never tumble dry
items that have been in contact with in-
flammable solvents (petrol, methylated
spirits, dry cleaning fluid and the like). As
these substances are volatile, they could
cause an explosion. Only tumble dry
items washed with water.
• Risk of fire: items that have been spot-
ted or soaked with vegetable or cooking
electrolux 13

oil constitute a fire hazard and should not
be placed in the tumble dryer.
• If you have washed your laundry with
stain remover you must execute an extra
rinse cycle before loading your tumble
dryer.
• Please make sure that no gas lighters or
matches have accidentally been left in
pockets of garments incase they are loa-
ded into appliance
Warning!
• Risk of fire! Never stop a tumble
dry before the end of the drying
cycle unless all items are quickly
removed and spread out so that
the heat is dissipated.
• Lint must not be allowed to accu-
mulate around the tumble dryer.
• Risk of electric shock! Do not spray
down the appliance with jets of water.
• The final part of a tumble dryer cycle oc-
curs without heat ( cool down cycle ) to
ensure that the items are left at a temper-
ature that ensures that items will not be
damaged.
• The tumble dryer is not to be used if in-
dustrial chemicals have been used for
cleaning.
• Ensure you have good ventilation in the
installation room to avoid the back flow of
gases into the room from appliances
burning other fuels, including open fires.
Installation
• This appliance is heavy. Care should be
taken when moving it.
• When unpacking the appliance, check
that it is not damaged. If in doubt, do not
use it and contact the Service Centre.
• All packaging must be removed before
use. Serious damage can occur to the
product and to property if this is not ad-
hered to. See relevant section in the user
manual.
• Any electrical work required to install this
appliance should be carried out by a
qualified electrician or competent person.
• If the machine is situated on a carpeted
floor, please adjust the feet in order to al-
low air to circulate freely under the appli-
ance.
• After having installed the appliance,
check that it is not pressing or standing
on its electrical supply cable.
• If the tumble dryer is placed on top of a
washing machine, it is compulsory to use
the stacking kit (optional accessory).
Use
• This appliance is designed for domestic
use. It must not be used for purposes
other than those for which it was de-
signed.
• Only wash fabrics which are designed to
be machine dried. Follow the instructions
on each garment label.
• Do not dry unwashed items in the tumble
dryer.
• Do not overload the appliance. See the
relevant section in the user manual.
• Clothes which are dripping wet should
not be placed in the dryer.
• Garments which have been in contact
with volatile petroleum products should
not be machine dried. If volatile cleaning
fluids are used, care should be taken to
ensure that the fluid is removed from the
garment before placing in the machine.
• Never pull the power supply cable to re-
move the plug from the socket; always
take hold of the plug itself.
• Never use the tumble dryer if the power
supply cable, the control panel, the work-
ing surface or the base are damaged so
that the inside of the tumble dryer is ac-
cessible.
• Fabric softeners, or similar products
should be used as specified by the fabric
softener instructions.
• Caution - hot surface : Do not touch
the door light cover surface when the
light is switched on.
(Only dryers equipped with internal drum
light)
Child safety
• This machine is not intended for use by
young children or infirm persons without
supervision.
• Children often do not recognise the haz-
ards associated with electrical applian-
ces. Children should be supervised to
ensure that they do not play with the ap-
pliance.
14 electrolux

Warning!
• Danger of suffocation! The packag-
ing components (e.g. plastic film,
polystyrene) can be dangerous to
children - Keep them out of chil-
dren’s reach.
• Keep all detergents in a safe place out of
children’s reach.
• Make sure that children or pets do not
climb inside the drum.
ENVIRONMENT
The symbol on the product or on its
packaging indicates that this product may
not be treated as household waste. Instead
it should be taken to the appropriate
collection point for the recycling of electrical
and electronic equipment. By ensuring this
product is disposed of correctly, you will
help prevent potential negative
consequences for the environment and
human health, which could otherwise be
caused by inappropriate waste handling of
this product. For more detailed information
about recycling of this product, please
contact your local council, your household
waste disposal service or the shop where
you purchased the product.
Old appliance
Warning!
Remove mains plug from socket when you
have no further use for the machine. Cut off
mains cable and dispose of together with
plug. Destroy loading door hook. Children
cannot then lock themselves in the machine
and put their lives at risk.
Packaging material
The packaging materials are environmental-
ly friendly and can be recycled. The plastic
components are identified by markings, e.g.
>PE<, >PS<, etc. Please dispose of the
packaging materials in the appropriate con-
tainer at the community waste disposal fa-
cilities.
Environmental tips
• In the dryer, laundry becomes fluffy and
soft. Fabric softeners are not therefore
needed when washing.
• Your dryer will function most economical-
ly if you:
– always keep the ventilation slots on the
base of the dryer unobstructed;
– use the loading volumes specified in
the programme overview;
– ensure you have good ventilation in the
installation room;
– clean the micro-fine filter and fine
strainer after each drying cycle;
– spin the laundry well before drying.
Energy consumption depends on spin-
ning speed set in washing machine.
Higher spinning speed - lower energy
consumption.
INSTALLATION
Appliance positioning
• It is recommended that, for your conven-
ience, the machine is positioned close to
your washing machine.
• The tumble dryer must be installed in a
clean place, where dirt does not build up.
• Air must be able to circulate freely all
round the appliance. Do not obstruct the
front ventilation grille or the air intake
grilles at the back of the machine.
• To keep vibration and noise to a mini-
mum when the dryer is in use, it should
be placed on a firm, level surface.
• Once in its permanent operating position,
check that the dryer is absolutely level
with the aid of a spirit level. If it is not,
raise or lower the feet until it is.
• The feet must never be removed. Do not
restrict the floor clearance through deep-
pile carpets, strips of wood or similar.
This might cause heat built-up which
electrolux 15

would interfere with the operation of the
appliance.
Important!
• The hot air emitted by the tumble dryer
can reach temperatures of up to 60°C.
The appliance must therefore not be in-
stalled on floors which are not resistant to
high temperatures.
• When operating the tumble dryer, the
room temperature must not be lower
than +5°C and higher than +35°C, as it
may affect the performance of the appli-
ance.
• Should the appliance be moved, it must
be transported vertically.
• The appliance must not be installed be-
hind the lockable door, a sliding door a
door with a hinge on the opposite side to
that of the appliance in such a way that a
full opening of the dryer is restricted.
Removing transport safety packaging
Caution!
Before use all parts of the transport pack-
aging must be removed.
1
1. Open loading door
2. Pull off adhesive strips from inside ma-
chine on top of drum.
3. Remove foil hose and polystyrene pad-
ding from the machine.
Electrical connection
Details on mains voltage, type of current
and the fuses required should be taken
from the type plate. The type plate is fitted
near the loading aperture (see “Product de-
scription” chapter).
Connect the machine to an earthed
socket, in accordance with current wir-
ing regulations.
Warning! The manufacturer
declines any responsibility for
damage or injury through failure to
comply with the above safety
precautions.
Should the appliance power supply
cable need to be replaced, this
must be carried out by our Service
Center.
Warning! The plug must be
accessible after installing the
machine.
Door reversal
To make it easier to load or unload the
laundry, the door can be reversed.
Warning! The door must only be
reversed by an authorised service
engineer.
Please contact your local Service Force
Centre. The engineer will carry out the door
reversal at your cost.
Special accessories
STACKING KIT
Available from your authorized dealer.
The stacking kit is to install the tumble dryer
on the top of the 60 cm wide front load
washing machine. The installation helps to
get more space.
Read carefully the instructions supplied with
the kit.
DRAINING KIT
Available from your authorized dealer (can
be attached to some types of the tumble
dryers).
Installation kit for through draining of the
condensed water into a basin, siphon, gully,
etc. After installation the water container is
drained automatically. The water container
must stay in the appliance.
Installed hose must be on the height from
minimum of 50 cm to maximum of 1 m
from floor level. The hose cannot be in loop.
If possible decrease the length of the hose.
Read carefully the instructions supplied with
the kit.
PEDESTAL WITH THE DRAWER
Available from your authorized dealer.
To put the appliance higher at the level
which helps to easy load and remove the
laundry.
16 electrolux

The drawer can be use for laundry storage
e.g. : towels, cleaning products and more.
Read carefully the instructions supplied with
the kit.
PRODUCT DESCRIPTION
1
2
4
6
8
9
11
3
5
7
10
1 Control panel
2 Fluff filters
3 Loading door
4 Ventilation grille
5 Adjustable feet
6 Drawer with condensed water contain-
er
7 Drum light
8 Push button for base door opening
9 Rating Plate
10 Heat exchanger
11 Heat exchanger door
Control panel
1 2 3 4 5 6 7 8 9
1
Programme selector and
off switch
2 Delicate (Delicate) button
3 Buzzer (Buzzer) button
4 Dryness (Dryness) button
5 Time (Time) button
6 Display
7 Start/Pause (Start/Pause) button
8
Warning lights:
Condenser, Fil-
ters,
Full tank
9 Delay (Delay) button
Display
SYMBOL DESCRIPTION
Time to end (time of time
programm, time of start de-
lay)
Delay start
Drying phase
Cooling phase
Anti-crease guard phase
Child lock
Error, incorrect selection
BEFORE FIRST USE
In order to remove any residues which may
have been produced during production,
wipe the dryer drum with a damp cloth or
carry out a brief drying cycle (30 MIN) with
damp cloths in the machine.
1.
Turn the programme knob to
TIME .
2. Press the TIME button repeatedly until
0.30 appears in the display.
3. Press the START/PAUSE button.
electrolux 17

PROGRAMME CHART
Programme
max. load
(dry clothes)
Application/properties
Care label
Cottons (Cottons)
Extra (Extra )
8 kg
Thorough drying of thick or multi- layered fabrics, e.g. terry
towelling items, bathrobes.
Cupboard
(Cupboard)
8 kg
Thorough drying of fabrics of even thicknesses, e.g. terry
towelling items, knitwear, towels.
Iron (Iron)
8kg
For thin fabrics which are also to be ironed, e.g. knitwear,
cotton shirts.
Synthetics (Synthetics)
Extra (Extra)
3 kg
Thorough drying of thick or multi-layered fabrics, e.g. pull-
overs, bedding, table linen.
Cupboard
(Cupboard)
3 kg
For thin fabrics which are not ironed, e.g. easy care shirts,
table linen, baby clothes, socks, lingerie with bones or
wires.
Iron (Iron)
3 kg
For thin fabrics which are also to be ironed, e.g. knitwear,
cotton shirts.
Special (Special)
Time (Time)
8 kg
For further drying of individual items of laundry. ( Dryness
(Dryness) function not available)
Mix (Mix)
3 kg
For drying cotton and synthetic fabrics, uses low tempera-
ture.
Easy Iron
(Easy Iron)
1 kg
(or 5
shirt
s)
Special program with anti-crease mechanism for easy care
fabrics such shirts and blouses; for minimum ironing effort.
The results depends on the type of fabric and its finish.
Place fabrics in the dryer straight after spinning; once dried,
immediately remove fabrics and place on a clothes hanger.
Jeans (Jeans)
8 kg
For leisure clothing, such as jeans, sweat-shirts, etc., of dif-
ferent material thicknesses (e.g. at the neck, cuffs and
seams).
Wool (Wool)
1 kg
For drying woollen fabrics after they have been washed, us-
ing warm air at minimum mechanical load (Follow section
“Sorting and preparing washing”). Recommendation: Re-
move fabrics immediately after drying, as no anti-crease
programme follows.
The wool drying cycle of this tumble drying machine has
been tested and approved by The Woolmark Company.
The cycle is suitable to dry knitted wool garments which are
labelled "hand wash" provided that the garments are wash-
ed in a Woolmark endorsed hand washing cycle and tum-
ble dried according to the instructions issued by the manu-
facturer. (M1022)
18 electrolux

Programme
max. load
(dry clothes)
Application/properties
Care label
Cooling
(Cooling)
8 kg
Special programme, lasting around 10 minutes, for refresh-
ing or gently cleaning textiles with commercially available
dry cleaning sets. (Only use those products which are de-
clared as suitable for the drier by the manufacturer; please
observe the manufacturer’s instructions for use.)(Buzzer
(Buzzer) function available)
Quick (Quick)
Synthetics quick
(Synthetics quick)
2 kg
For quick drying synthetics fabrics with minimum creasing.
Drying result: ready to store.
Cottons quick
(Cottons quick)
3 kg
For quick drying cotton fabrics with minimum creasing. Dry-
ing result: ready to store.
Time (Time) function available only with
Time (Time) programme.
DAILY USE
Sorting laundry
• Sort by fabric type:
–
Cotton/linen for programmes in
Cottons (Cottons) programme group.
– Mixtures and synthetics for pro-
grammes in
Synthetics (Synthet-
ics ) programme group.
• Sort by care label: The care labels mean:
Drying in the tumble dryer possible in
principle
Drying at normal temperature
Drying at reduced temperature
Drying in the tumble dryer not possi-
ble
Important! Do not place in the appliance
any wet laundry which is not specified on
the care label as being suitable for tumble-
drying.
This appliance can be used for all wet laun-
dry items which are labelled as suitable for
tumble-drying.
• Do not dry new, coloured textiles togeth-
er with light-coloured laundry items. Tex-
tile colours may bleed.
• Do not dry cotton jersey and knitwear
with the
Extra (Extra) programme.
Items may shrink!
• Wool and wool-like textiles can be dried
using the
Wool (Wool) programme.
Before the drying cycle spin the woollen
textiles as well as possible (max. 1200
rpm). Only dry woollen textiles together of
similar or the same material, colour and
weight. Please dry heavy laundry items
made of wool separately.
Preparing laundry
• To avoid laundry becoming tangled:
close zips, button up duvet covers and
tie loose ties or ribbons (e.g. of aprons).
• Empty pockets. Remove metal items (pa-
per clips, safety pins, etc).
• Turn items with double-layered fabrics in-
side out (e.g. with cotton-lined anoraks,
the cotton layer should be outermost).
These fabrics will then dry better.
Important! Do not overload the appliance.
Observe max. loading volume of 8 kg.
Switching machine on
Turn the programme selector to any pro-
gramme. The machine switches on. When
the loading door is open, the internal lamp
illuminates the drum.
electrolux 19

Operating
1
3 4 5
2
Drying options
Delicate (Delicate)
gentle drying with reduced heat of sensitive
fabrics and temperature-sensitive textiles (e.g.
acrylic, viscose) marked on care label with:
Buzzer (Buzzer)
audible confirmation of:
•cycle end
• anti-crease phase start and end
• cycle interruption
• error
Dryness (Dryness)
increases the dryness of the dried laundry ade-
quately to the selected level:
• Max - maximum
• Med - medium
• Min - minimum
this option helps to achieve satisfying result of
drying (inactive with some programmes)
Time (Time)
allows to set individual time of drying from min-
imum 20 min. to maximum of 3 hours (in 10
min. steps - press the button repeatedly until
the desired programme duration is shown in
the display, e.g.
- for a pro-
gramme of 1 hour and 20 minutes ); active with
suitable programme
Delay (Delay)
allows to delay the start of a drying programme
from minimum of 30 min. to maximum of 20
hours
1. select the drying programme and addition-
al drying options
2. press the Delay button repeatedly until the
desired delay start is shown on the display,
e.g.
H if the programme has to start
after time of 12 hours
3. to activate the delay timer, press the Start/
Pause button - time to start elapses on the
display
Setting child lock
The child lock can be set to prevent a pro-
gramme being accidentally started or a pro-
gramme in operation being accidentally
changed. The child lock function locks all
buttons and the programme selector. The
child lock can be activated or deactivated
by holding down the Dryness and
Time
buttons simultaneously for 5 seconds.
The symbol:
on the display means that
the child lock is active.
Any changes of drying parameters re-
quire child lock deactivation.
The child lock cannot be deactivated in
the last phase of the drying cycle.
Starting the programme
Press the Start/Pause button. The pro-
gramme starts.
The programme progress is shown by
elapsing dry timeon the LCD.
Changing programme
To change a programme which has been
selected by mistake once the programme
has started, first turn the programme selec-
tor to
off and then set the programme
again.
Drying cycle complete / removing
laundry
Once the drying cycle is complete, the dis-
play shows the anti-crease icon
and
flashing
as well as warning
lamps:
filter and full tank. If the Buz-
zer button has been pressed, an acoustic
signal sounds intermittently for about one
minute.
20 electrolux
ページが読み込まれています...
ページが読み込まれています...
ページが読み込まれています...
ページが読み込まれています...
ページが読み込まれています...
ページが読み込まれています...
ページが読み込まれています...
ページが読み込まれています...
-
 1
1
-
 2
2
-
 3
3
-
 4
4
-
 5
5
-
 6
6
-
 7
7
-
 8
8
-
 9
9
-
 10
10
-
 11
11
-
 12
12
-
 13
13
-
 14
14
-
 15
15
-
 16
16
-
 17
17
-
 18
18
-
 19
19
-
 20
20
-
 21
21
-
 22
22
-
 23
23
-
 24
24
-
 25
25
-
 26
26
-
 27
27
-
 28
28


