
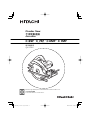
Circular Saw
เลื
อยวงเดือน
C 6SF
•
C 7SF
•
C 6MF
•
C 7MF
HANDLING INSTRUCTIONS
คู่มือการใช้งาน
Read through carefully and understand these instructions before use.
โปรดอ่านโดยละเอียดและทำความเข้าใจก่อนใช้งาน

1
1
3
4
2
!
9
0
8
6
7
5
#
@
$
q
w
t
*
(
1
)
^
%
$
&
1
3
5
7
2
4
5
8

2
w
y
4
i
u
o
p
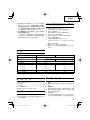
43
6 mm
17 mm
English
ไทย
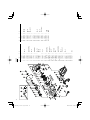
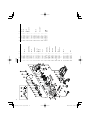
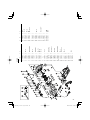
1
Lumber
ไม้
2
Base
ฐาน
3
Work bench
โต๊ะงาน
4
Saw blade
ใบเลื
อย
5
Base
ฐาน
6
Wing nut
น็อตปีกผีเส
ื
อ
7
Cutting depth
คลองเลื
อย
8
Guide
ราง
9
Cutting position at 45°
ตำแหน่งตัดที
มุม 45 องศา
0
Wing bolt
โบลต์ปีกผีเส
ื
อ
!
Scale
บรรทัด
@
Set screw
สกรูตั
งตำแหน่ง
#
Hinge part
บานพับ
$
Marking
เครื
องหมาย
%
Lower guard
กำบังล่าง
^
Saw cover
ครอบใบเลื
อย
&
Parallel adjustment screw
สกรูปรับระยะขนาน
*
Marking-off-line
เส
้
นตำแหน่ง
*
Front scale at 45° incline
เมื
อเอียงบรรทัดไปทางหน้า 45 องศา
)
Front scale when not inclined
เมื
อไม่เอียงบรรทัดหน้า
q
Box wrench
ประแจบ็อกซ์
w
Bolt
โบลต์
e
Tighten
ขันให้แน่น
r
Loosen
คลาย
t
Depress the lock lever
กดคันล็อกลง
y
Washer (B)
แหวนสกรู (B)
u
Washer (A)
แหวนสกรู (A)
i
Spindle
เพลา
o
Wear limit
ขอบเขตระยะส
ึ
กหรอ
p
No. of carbon brush
จำนวนแปรงถ่าน
5 8

3
English
GENERAL SAFETY RULES
WARNING!
Read all instructions
Failure to follow all instructions listed below may result
in electric shock, fi re and/or serious injury.
The term ”power tool” in all of the warnings listed
below refers to your mains operated (corded) power
tool or battery operated (cordless) power tool.
SAVE THESE INSTRUCTIONS
1) Work area
a) Keep work area clean and well lit.
Cluttered and dark areas invite accidents.
b) Do not operate power tools in explosive
atmospheres, such as in the presence of
fl ammable liquids, gases or dust.
Power tools create sparks which may ignite the
dust of fumes.
c) Keep children and bystanders away while
operating a power tool.
Distractions can cause you to lose control.
2) Electrical safety
a) Power tool plugs must match the outlet.
Never modify the plug in any way.
Do not use any adapter plugs with earthed
(grounded) power tools.
Unmodifi ed plugs and matching outlets will
reduce risk of electric shock.
b) Avoid body contact with earthed or grounded
surfaces such as pipes, radiators, ranges and
refrigerators.
There is an increased risk of electric shock if your
body is earthed or grounded.
c) Do not expose power tools to rain or wet
conditions.
Water entering a power tool will increase the risk
of electric shock.
d) Do not abuse the cord. Never use the cord for
carrying, pulling or unplugging the power tool.
Keep cord away from heat, oil, sharp edges or
moving parts.
Damaged or entangled cords increase the risk of
electric shock.
e) When operating a power tool outdoors, use an
extension cord suitable for outdoor use.
Use of a cord suitable for outdoor use reduces
the risk of electric shock.
3) Personal safety
a) Stay alert, watch what you are doing and use
common sense when operating a power tool.
Do not use a power tool while you are tired
or under the infl uence of drugs, alcohol or
medication.
A moment of inattention while operating power
tools may result in serious personal injury.
b) Use safety equipment. Always wear eye
protection.
Safety equipment such as dust mask, non-skid
safety shoes, hard hat, or hearing protection used
for appropriate conditions will reduce personal
injuries.
c) Avoid accidental starting. Ensure the switch is in
the off position before plugging in.
Carrying power tools with your fi nger on the
switch or plugging in power tools that have the
switch on invites accidents.
d) Remove any adjusting key or wrench before
turning the power tool on.
A wrench or a key left attached to a rotating part
of the power tool may result in personal injury.
e) Do not overreach. Keep proper footing and
balance at all times.
This enables better control of the power tool in
unexpected situations.
f) Dress properly. Do not wear loose clothing or
jewellery. Keep your hair, clothing and gloves
away from moving parts.
Loose clothes, jewellery or long hair can be
caught in moving parts.
g) If devices are provided for the connection of dust
extraction and collection facilities, ensure these
are connected and properly used.
Use of these devices can reduce dust related
hazards.
4) Power tool use and care
a) Do not force the power tool. Use the correct
power tool for your application.
The correct power tool will do the job better and
safer at the rate for which it was designed.
b) Do not use the power tool if the switch does not
turn it on and off.
Any power tool that cannot be controlled with the
switch is dangerous and must be repaired.
c) Disconnect the plug from the power source
before making any adjustments, changing
accessories, or storing power tools.
Such preventive safety measures reduce the risk
of starting the power tool accidentally.
d) Store idle power tools out of the reach of children
and do not allow persons unfamiliar with the
power tool or these instructions to operate the
power tool.
Power tools are dangerous in the hands of
untrained users.
e) Maintain power tools. Check for misalignment or
binding of moving parts, breakage of parts and
any other condition that may affect the power
tools operation.
If damaged, have the power tool repaired before
use.
Many accidents are caused by poorly maintained
power tools.
f) Keep cutting tools sharp and clean.
Properly maintained cutting tools with sharp
cutting edges are less likely to bind and are easier to
control.
g) Use the power tool, accessories and tool bits
etc., in accordance with these instructions and
in the manner intended for the particular type
of power tool, taking into account the working
conditions and the work to be performed.
Use of the power tool for operations different
from intended could result in a hazardous
situation.
5) Service
a) Have your power tool serviced by a qualifi ed
repair person using only identical replacement
parts.
This will ensure that the safety of the power tool
is maintained.
PRECAUTION
Keep children and infi rm persons away.
When not in use, tools should be stored out of reach of
children and infi rm persons.

English
4
SAFETY INSTRUCTIONS FOR ALL SAWS
a) DANGER: Keep hands away from cutting area
and the blade. Keep your second hand on auxiliary
handle, or motor housing.
If both hands are holding the saw, they cannot be cut
by the blade.
b) Do not reach underneath the workpiece.
The guard cannot protect you from the blade below
the workpiece.
c) Adjust the cutting depth to the thickness of the
workpiece.
Less than a full tooth of the blade teeth should be
visible below the workpiece.
d) Never hold piece being cut in your hands or across
your leg. Secure the workpiece to a stable platform.
It is important to support the work properly to
minimize body exposure, blade binding, or loss of
control.
e) Hold power tool by insulated gripping surfaces
when performing an operation where the cutting
tool may contact hidden wiring or its own cord.
Contact with a “live” wire will also make exposed
metal parts of the power tool “live” and shock the
operator.
f) When ripping always use a rip fence or straight edge
guide.
This improves the accuracy of cut and reduces the
chance of blade binding.
g) Always use blades with correct size and shape
(diamond versus round) of arbour holes.
Blades that do not match the mounting hardware
of the saw will run eccentrically, causing loss of
control.
h) Never use damaged or incorrect blade washers or
bolt.
The blade washers and bolt were specially designed
for your saw, for optimum performance and safety
of operation.
FURTHER SAFETY INSTRUCTIONS FOR ALL
SAWS
Causes and operator prevention of kickback:
– kickback is a sudden reaction to a pinched, bound
or misaligned saw blade, causing an uncontrolled
saw to lift up and out of the workpiece toward the
operator;
– when the blade is pinched or bound tightly by the
kerf closing down, the blade stalls and the motor
reaction drives the unit rapidly back toward the
operator;
– if the blade becomes twisted or misaligned in the
cut, the teeth at the back edge of the blade can dig
into the top surface of the wood causing the blade
to climb out of the kerf and jump back toward the
operator.
Kickback is the result of saw misuse and/or incorrect
operating procedures or conditions and can be avoided
by taking proper precautions as given below.
a) Maintain a fi rm grip with both hands on the saw and
position your arms to resist kickback forces.
Position your body to either side of the blade, but
not in line with the blade.
Kickback could cause the saw to jump backwards,
but kickback forces can be controlled by the operator,
if proper precautions are taken.
b) When blade is binding, or when interrupting a cut
for any reason, release the trigger and hold the saw
motionless in the material until the blade comes to
a complete stop.
Never attempt to remove the saw from the work or
pull the saw backward while the blade is in motion
or kickback may occur.
Investigate and take corrective actions to eliminate
the cause of blade binding.
c) When restarting a saw in the workpiece, centre the
saw blade in the kerf and check that saw teeth are
not engaged into the material.
If saw blade is binding, it may walk up or kickback
from the workpiece as the saw is restarted.
d) Support large panels to minimise the risk of blade
pinching and kickback.
Large panels tend to sag under their own weight.
Supports must be placed under the panel on both
sides, near the line of cut and near the edge of the
panel.
e) Do not use dull or damaged blades.
Unsharpened or improperly set blades produce
narrow kerf causing excessive friction, blade binding
and kickback.
f) Blade depth and bevel adjusting locking levers must
be tight and secure before making cut.
If blade adjustment shifts while cutting, it may cause
binding and kickback.
g) Use extra caution when making a “plunge cut” into
existing walls or other blind areas.
The protruding blade may cut objects that can cause
kickback.
SAFETY INSTRUCTIONS FOR SAWS WITH
PENDULUM GUARD OR TOW GUARD
a) Check lower guard for proper closing before each
use. Do not operate the saw if lower guard does not
move freely and close instantly. Never clamp or tie
the lower guard into the open position.
If saw is accidentally dropped, lower guard may be
bent.
Raise the lower guard with the retracting handle and
make sure it moves freely and does not touch the
blade or any other part, in all angles and depths of
cut.
b) Check the operation of the lower guard spring. If
the guard and the spring are not operating properly,
they must be serviced before use.
Lower guard may operate sluggishly due to damaged
parts, gummy deposits, or a build-up of debris.
c) Lower guard should be retracted manually only for
special cuts such as “plunge cuts” and “compound
cuts”. Raise lower guard by retracting handle and as
soon as blade enters the material, the lower guard
must be released.
For all other sawing, the lower guard should operate
automatically.
d) Always observe that the lower guard is covering the
blade before placing saw down on bench or fl oor.
An unprotected, coasting blade will cause the saw to
walk backwards, cutting whatever is in its path.
Be aware of the time it takes for the blade to stop
after switch is released.

5
English
PRECAUTIONS ON USING CIRCULAR SAW
1. Proceed with cutting operation when full speed has
been reached.
2. Never use the circular saw with its lower guard fi xed
open.
3. Ascertain that lower guard moves smoothly.
4. Never lay down the circular saw while the saw blade
is revolving.
5. Turn OFF the switch immediately when a fault
occurs.
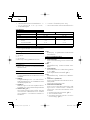
SPECIFICATIONS
Model C6SF/C6MF C7SF/C7MF
Voltage*
(110 V, 220 V, 230 V 240 V)
Power Input 1010 W 1050 W
Max. Cutting Depth 57 mm 68 mm
Saw Blade: external diam. 165 mm 190 mm
thickness 1 mm 1 mm
tip width 1.6 mm 1.6 mm
No-load Speed* 5000/min, 5500/min
Weight (without cord) 3.0 kg 3.3 kg
*Be sure to check the nameplate on product as it is subject to change by areas.
STANDARD ACCESSORIES
(1) Saw Blade ....................................................................1
(2) Box Wrench .................................................................1
(3) Guide ..........................................................................1
(4) Hex. Bar Wrench .........................................................1
Standard accessories are subject to change without
notice.
APPLICATION
○ Cutting various types of wood.
○ Cutting various decorative boards, thin plastic
boards, and new types of building materials which
are soft (use a saw blade for plastics).
PRIOR TO OPERATION
1. Power source
Ensure that the power source to be utilized conforms
to the power requirements specifi ed on the product
nameplate.
2. Power switch
Ensure that the power switch is in the OFF position. If
the plug is connected to a receptacle while the power
switch is in the ON position, the power tool will start
operating immediately, inviting serious accident.
3. Extension cord
When the work area is removed from the power
source. Use an extension cord of suffi cient thickness
and rated capacity. The extension cord should be
kept as short as practicable.
6. Never operate circular saw with its saw blade turned
upward.
7. Cutting glass fi ber is not recommended.
8. Do not use the saw blade of which the diameter
at the end of the teeth is less than 134 mm (C6SF/
C6MF) or 162 mm (C7SF/C7MF).
9. Always keep the saw blade sharp.
10. Ascertain that the workpiece is free of foreign matter
such as nails.
11. Exercise care to position the circular saw at a safe,
stable spot when sawing.
4. Prepare a wooden workstand (Fig. 1)
Since the saw blade will extend beyond the lower
surface of the lumber, place the lumber on a
workstand when cutting. If a square block is utilized
as a workstand, select level ground to ensure it is
properly stabilized. An unstable workstand will result
in hazardous operarion.
CAUTION
To avoid possible accident, always ensure that the
portion of lumber remaining after cutting is securely
anchored or held in position.
ADJUSTING THE POWER TOOL PRIOR TO USE
1. Adjusting the cutting depth
The cutting depth can be adjusted by moving the
base after loosening its wing nut (Fig. 2).
CAUTION
Should this wing nut remain loosened, it will create a
very hazardous situation. Always thoroughly clamp
it.
2. Adjusting the angle of inclination
By loosening the wing bolt at the scale, the saw blade
can be titled up to maximum angle of 45° against the
base (Fig. 3).
The angle of inclination can also be regulated by
loosening the wing bolt at the scale (Fig. 3).
CAUTION
It is very hazardous to allow this wing bolt to remain
loosened. Always thoroughly clamp it.
3. Regulating the guide
The cutting position can be regulated by moving
the guide to the left or right after loosening its wing
bolt.
The guide can be mounted on either the left or the
right side.

English
6
4. Fine tuning of parallelism
It is possible to fi ne-tune the parallelism of the saw
blade to the base using the parallelism adjustment
screw.
Adjustment has already been made at the time of
shipment from the factory. However, in the unlikely
event of parallelism being faulty, adjust as follows.
(1) Unfasten only the mounting screws of the saw
cover hinge portion (Fig. 4).
(2) Retract the protective cover into the saw cover.
(3) Insert wood chip in the rear side of the saw blade
base, and mark the position on the base (Fig. 5).
(4) Move the marked wood chip to the front of the
base, and turn the parallelism adjustment screw
so that the marking corresponds to the base side
(Fig. 6).
(5) After adjustment, fasten the mounting screws
tightly in place.
NOTE
○ Parallelism may be slightly faulty if the cutting depth
is adjusted after parallelism adjustment.
CUTTING PROCEDURES
1. Place the saw body (base) on the lumber, and align
the cutting line with the saw blade at the front scale
(Fig. 7).
2. Turn ON the switch before the saw blade contacts
the lumber. The switch is turned ON when the
trigger is squeezed, and turned OFF when the trigger
is released.
CAUTIONS
○ Before starting to saw, confi rm that the saw blade
has attained full-speed revolution.
○ Should the saw blade stop or make an abnormal
noise while operating, promptly turn OFF the
switch.
○ Always take care in preventing the power cord from
coming near to the revolving saw blade.
○ Using the circular saw with the saw blade facing
upwards or sideways is very hazardous. Such
uncommon applications should be avoided.
○ When cutting materials, always wear protective
glasses.
○ When fi nished with a job, pull out the plug from the
receptacle.
MOUNTING AND DISMOUNTING THE SAW
BLADE
CAUTION
To avoid serious accident, ensure the switch is in the
OFF position, and the power source is disconnected.
1. Dismounting the saw blade
(1) Set the cutting depth to maximum and place the
circular saw in a rigid position (Fig. 8).
(2) Keeping the lock lever depressed, carefully turn
the bolt with the supplied box wrench.
(3) When the saw shaft is fi xed, turn the box wrench
counterclockwise to remove bolt and washer (B).
(4) While gripping the lower guard knob, retract the
lower guard into the saw cover and take out the
saw blade.
2. Mounting the saw blade
(1) Install the saw blade in the reverse order to
removal.
(2) Wipe off the swarf from the spindle, washer, etc.
(3) Washer (A) is supplied for 1 type of saw blades
with the hole diameter 20 mm (Fig. 9).
(4) The saw blade should be installed so that the
arrow on the saw blade is aligned with the arrow
on the saw cover.
(5) Tighten the bolt securely.
CAUTIONS
○ If a box wrench other than the one supplied is used,
the bolt cannot be tightened correctly. Always use
the supplied box wrench.
○ Before connecting the power cord, check that the
lock lever is returned to its original position and the
saw blade rotates smoothly.
MAINTENANCE AND INSPECTION
1. Inspecting the saw blade
Since use of a dull saw blade will cause motor
malfunctioning and degraded effi ciently, whet it or
replace with a new one without delay when abrasion
is noted.
2. Inspecting the mounting screws
Regularly inspect all mounting screws and ensure
that they are properly tightened. Should any of the
screws be loose, retighten them immediately. Failure
to do so could result in serious hazard.
3. Maintenance of the motor
The motor unit winding is the very “heart” of the
power tool. Exercise due care to ensure the winding
does not become damaged and/or wet with oil or
water.
4. Inspecting the carbon brushes (Fig. 10)
The motor employs carbon brushes which are
consumable parts. Since an excessively worn
carbon brush could result in motor trouble, replace
the carbon brushes with new ones which having the
same carbon brush No. shown in the fi gure when they
become worn to or near the "wear limit". In addition,
always keep carbon brushes clean and ensure that
they slide freely within the brush holders.
○ Replacing carbon brushes
Disassemble the brush cap with a slotted-head
screwdriver. The carbon brush can then be easily
removed.
5. Inspecting lower guard functioning and its
maintenance
Carefully maintain the lower guard so that it remains
capable of smoothly functioning. Completely remove
sawdust deposited around the rotary portion of the
lower guard.
6. Service parts list
A: Item No.
B: Code No.
C: No. Used
D: Remarks
CAUTION
Repair, modifi cation and inspection of Hitachi Power
Tools must be carried out by a Hitachi Authorized
Service Center.
This Parts List will be helpful if presented with the
tool to the Hitachi Authorized Service Center when
requesting repair or other maintenance.
In the operation and maintenance of power tools, the
safety regulations and standards prescribed in each
country must be observed.
MODIFICATIONS
Hitachi Power Tools are constantly being improved
and modifi ed to incorporate the latest technological
advancements.
Accordingly, some parts (i.e. code numbers and/or
design) may be changed without prior notice.

7
English
NOTE
Due to HITACHI’s continuing program of research and
development, the specifi cations herein are subject to
change without prior notice.

8

9

10
○
○

11
●
●
●
●
●
●
●
●
●

12
○
㽷砽
㽷

13
ไทย
กฎความปลอดภัยโดยทั
วไป
คำเตือน!
โปรดอ่านคำแนะนำทั
งหมด
ถ้าไม่ปฏิบัติตามคำแนะนำทั
งหมด อาจถูกไฟฟ้ าดูด เกิดไฟไหม้ และ/
หรือบาดเจ็บสาหัสก็ได้
คำว่า "เครื
องมือไฟฟ้ า" ในคำเตือนต่อไปนี
ทั
งหมดหมายถึงเครื
องมือที
คุณใช้งานกับปลั
กไฟฟ้ า (มีสายไฟ) หรือใช้งานกับแบตเตอรี
(ไร้สาย)
โปรดปฏิบัติตามคำแนะนำต่อไปนี
1) พื
นที
ทำงาน
a) รักษาพื
นที
ทำงานให้สะอาดและมีแสงสว่างเพียงพอ
ส
ิ
งที
เกะกะและความมืดทำให้เกิดอุบัติเหตุได้
b) อย่าใช
้
เครื
องมือไฟฟ้ าในบรรยากาศที
อาจระเบิด เช
่
น
มีของเหลวไวไฟ แก๊สหรือฝุ่น
เครื
องมือไฟฟ้ าอาจเกิดประกายไฟที
อาจทำให้ฝุ่นและไอติดไฟ
ได้
c) ใช
้
งานเครื
องมือไฟฟ้ าให้ไกลจากเด็กและคนเฝ้ าชม
คนที
วอกแวกทำให้คุณขาดสมาธิในการทำงานได้
2) ความปลอดภัยทางไฟฟ้า
a) ปลั
กของเครื
องมือไฟฟ้ าต้องเหมาะกับเต้าเส
ี
ยบ
อย่าดัดแปลงปลั
ก
อย่าใช
้
ปลั
กของตัวปรับแรงดันไฟฟ้ ากับเครื
องมือไฟฟ้ าชนิดที
ต่อลงดิน
ปลั
กกับเต้าเส
ี
ยบที
ไม่พอดีกันอาจทำให้คุณถูกไฟฟ้าดูด
b) อย่าให้ตัวคุณส
ั
มผัสกับพื
นผิวที
ต่อลงดิน เช
่
นท่อโลหะ
เครื
องทำความร้อน เตาอบ ตู้เย็น เป็นต้น
อาจถูกไฟฟ้าดูดถ้าร่างกายของคุณต่อวงจรลงดิน
c) อย่าให้เครื
องมือไฟฟ้ าถูกกับนำฝนหรือความเปียกช
ื
น
นำที
เข้าไปในเครื
องมือไฟฟ้ าจะเพิ
มความเส
ี
ยงที
จะถูกไฟฟ้ าดูด
d) อย่าใช
้
สายไฟฟ้ าในงานอื
น อย่าใช
้
สายเพื
อหิ
ว ดึงหรือ
เส
ี
ยบเครื
องมือไฟฟ้ า ให้สายไฟอยู่ห่างจากความร้อน นำมัน
ขอบแหลมคมหรือช
ิ
นส
่
วนที
เคลื
อนไหว
สายที
ชำรุดหรือตึงอาจทำให้คุณถูกไฟฟ้าดูดได้ง่าย
e) เมื
อใช
้
งานเครื
องมือไฟฟ้ านอกอาคาร
ใช้สายพ่วงชนิดที
ใช้กับนอกอาคารเมื
อใช้สายที
เหมาะสมจะลด
ความเส
ี
ยงที
จะถูกไฟฟ้ าดูด
3) ความปลอดภัยส
่
วนบุคคล
a) ระวังตัว ดูส
ิ
งที
คุณกำลังทำ ใช
้
สามัญสำนึกเมื
อใช
้
เครื
องมือ
ไฟฟ้ า อย่าใช
้
เครื
องมือไฟฟ้ าเมื
อคุณอ่อนเพลียหรือกินยา
สุรา หรือยาเสพติด
การขาดสติชั
วขณะเมื
อใช้เครื
องมือไฟฟ้ าอาจทำให้คุณบาดเจ็บ
สาหัส
b) ใช
้
อุปกรณ์นิรภัย สวมแว่นตาป้ องกันเสมอ
อุปกรณ์ป้องกันเช่นหน้ากากกันฝุ่น รองเท้ากันลื
น หมวกนิรภัย
หรือจุกอุดหูที
เหมาะสมจะเลี
ยงการบาดเจ็บของร่างกายได้
c) ระวังเครื
องทำงานโดยไม่ตั
งใจ ให้สวิทซ
์
อยู่ในตำแหน่งปิด
ก่อนเส
ี
ยบปลั
ก
เมื
อจับเครื
องมือไฟฟ้ าเมื
อนิ
วอยู่ที
ตัวสวิทซ์ หรือเมื
อเส
ี
ยบปลั
ก
ขณะเปิดสวิทซ์ไว้อาจทำให้เกิดอุบัติเหตุ
d) เอาสลักปรับแต่งหรือประแจออกก่อนเปิดสวิทซ
์
ไฟฟ้ า
สลักหรือประแจที
ติดกับส
่
วนหมุนของเครื
องมือไฟฟ้ าอาจทำให้
คุณบาดเจ็บได้
e) อย่าเอื
อมตัว ยืนให้มั
นและสมดุลตลอดเวลา
ทำให้ควบคุมเครื
องมือไฟฟ้ าได้ดีขึ
นเมื
อมีเหตุที
ไม่คาด น
f) แต่งตัวให้รัดกุม อย่าสวมเส
ื
อผ้าหลวมหรือใช
้
เครื
องประดับ
ให้ผม เส
ื
อผ้าและถุงมืออยู่ห่างจากช
ิ
นส
่
วนที
เคลื
อนที
เส
ื
อผ้าหลวม เครื
องประดับหรือผมยาวอาจถูกชิ
นส
่
วนหมุนรั
ง
เข้าไป
g) ถ้าออกแบบเครื
องมือไฟฟ้ าไว้ให้ต่อกับชุดดูดฝุ่นหรือเศษวัสดุ
ให้เช
ื
อมต่อและใช
้
งานอย่างถูกต้อง
เมื
อใช้กับชุดอุปกรณ์เหล่านี
จะลดอันตรายจากฝุ่น
4) การใช
้
และบำรุงรักษาเครื
องมือไฟฟ้ า
a) อย่าใช
้
เครื
องมือไฟฟ้ าโดยฝืนกำลัง ใช
้
เครื
องมือที
ถูกต้องกับ
งานของคุณ
เครื
องมือไฟฟ้ าที
ถูกต้องจะทำงานได้ดีกว่าและปลอดภัยกว่า
ในอัตราตามที
ออกแบบไว้แล้ว
b) อย่าใช
้
เครื
องมือไฟฟ้ าถ้าสวิทซ
์
ปิดเปิดไม่ได้
เครื
องมือไฟฟ้ าที
ควบคุมด้วยสวิทซ์ไม่ได้จะมีอันตรายและต้อง
ซ่อมเส
ี
ย
c) ถอดปลั
กจากแหล่งไฟฟ้ าก่อนปรับแต่ง เปลี
ยนอะไหล่
หรือเก็บรักษา
มาตรการป้ องกันเช่นนี
จะลดความเส
ี
ยงของอุบัติเหตุที
เครื
องมือไฟฟ้ าจะเริ
มทำงานโดยไม่ได้ตั
งใจ
d) เก็บเครื
องมือไฟฟ้ าให้ห่างจากเด็ก และอย่ายอมให้ผู้ที
ไม่
เคยช
ิ
นกับเครื
องมือไฟฟ้ าหรือคำแนะนำเหล่านี
ให้ใช
้
เครื
องมือ
ไฟฟ้ า
เครื
องมือไฟฟ้ าเป็นส
ิ
งที
มีอันตรายมากเมื
ออยู่ในมือของคนที
ไม่
ชำนาญ
e) บำรุงรักษาเครื
องมือไฟฟ้ า ตรวจดูศูนย์เคลื
อน ส
่
วนบิดงอ
ชำรุดหรือสภาพอื
นๆ ที
มีผลต่อการทำงานของเครื
องมือ
ไฟฟ้ า
หากชำรุด ให้ซ
่
อมแซมเส
ี
ยก่อนใช
้
งาน
อุบัติเหตุจำนวนมากเกิดจากเครื
องมือไฟฟ้ าที
บำรุงรักษา
ไม่ดีพอ
f) ให้เครื
องมือตัดมีความคมและสะอาด
เครื
องมือตัดที
บำรุงรักษาอย่างถูกต้องและมีขอบคมจะไม่ค่อย
บิดงอ และควบคุมได้ง่ายกว่า
g) ใช
้
เครื
องมือไฟฟ้ า ส
่
วนประกอบและปลายเครื
องมือตัดตาม
คำแนะนำเหล่านี
และตามที
ออกแบบไว้ โดยพิจารณาสภาพ
งานและส
ิ
งที
จะใช
้
งาน
ถ้าใช้เครื
องมือไฟฟ้ ากับงานที
ไม่ได้ออกแบบไว้อาจเกิดความ
เส
ี
ยหายได้
5) การซ
่
อมบำรุง
a) ให้ช
่
างซ
่
อมที
ชำนาญเป็ นผู้ซ
่
อม และเปลี
ยนอะไหล่ที
เป็ น
ของแท้
ทำให้เครื
องมือไฟฟ้ ามีความปลอดภัย
คำเตือน
เก็บให้พ้นมือเด็กและผู้ไม่ชำนาญ
หากไม่ได้ใช
้
ควรเก็บให้พ้นมือเด็กและผู้ไม่ชำนาญ

ไทย
14
คำแนะนำความปลอดภัยสำหรับเลื
อยไฟฟ้า
a) อันตราย: อย่าให้มือถูกกับคลองเลื
อยและใบเลื
อย ใช
้
อีก
มือหนึ
งจับคันจับ หรือตัวมอเตอร์
ถ้าจับเลื
อยด้วยมือทั
งสอง จะใช้ ใบเลื
อยตัดไม่ได้
b) อย่าเข้าไปใต้ช
ิ
นงาน
แผ่นกั
นป้องกันคุณจากใบเลื
อยใต้ชิ
นงานไม่ได้
c) ปรับแต่งความลึกของคลองเลื
อยไปตามความหนาของช
ิ
นงาน
ควรเห็นคลองเลื
อยน้อยกว่าความยาวของ นเลื
อยที
อยู่ใต้ชิ
นงาน
d) อย่าจับช
ิ
นงานที
จะเลื
อยไว้ ในมือหรือคร่อมเท้า ให้จับช
ิ
นงานกับ
แท่นงานที
แน่นหนา
ต้องจับชิ
นงานให้แน่นเพื
อลดความเส
ี
ยงที
ร่างกายจะกระทบ
ใบเลื
อยงอ หรือขาดการควบคุม
e) จับเครื
องมือไฟฟ้ าที
ผิวจับซ
ึ
งเป็นฉนวนเมื
อใช
้
งานโดยที
เครื
องมือ
ไฟฟ้าอาจแตะกับสายไฟฟ้าหรือลวดที
มองไม่เห็น
เมื
อแตะกับสายที
มีไฟฟ้ า ทำให้ชิ
นส
่
วนโลหะของเครื
องมือไฟฟ้ ามี
กระแสและคุณอาจถูกไฟฟ้าดูด
f) เมื
อตัดหรือเซาะร่อง ให้ ใช
้
แผ่นเซาะหรือรางขอบตรง
เพิ
มความแม่นยำของงานตัดและลดโอกาสที
ใบเลื
อยจะบิดงอ
g) ใช
้
ใบเลื
อยที
ถูกขนาดและมีรูความคม (แบบกลมหรือเหลี
ยม)
ใบเลื
อยที
ไม่ตรงกับแท่นยึดของเครื
องเลื
อยจะหมุนไม่ตรงศูนย์
ทำให้สูญเส
ี
ยการควบคุม
h) อย่าใช
้
แหวนหรือสกรูยึดใบเลื
อยที
ไม่ชำรุดหรือผิดขนาด
เราได้ออกแบบแหวนหรือสกรูยึดที
ตรงกับเลื
อยไฟฟ้ าของคุณ เพื
อให้
เกิดสมรรถนะและความปลอดภัยสูงสุด
คำแนะนำเพิ
มเติมเพื
อความปลอดภัยของเลื
อยไฟฟ้าทุกชนิด
สาเหตุและการป้ องกันผู้ ใช้งานจากการกระดอน
– การกระดอนเป็นปฏิกิริยาทันทีจากใบเลื
อยที
ฝืด สะท้อนหรือ
ไม่ได้ศูนย์ ทำให้เลื
อยไฟฟ้ าที
ควบคุมไม่ได้ยกตัวขึ
นออกจากชิ
นงาน
และเข้าหาผู้ใช้งาน
– เมื
อใบเลื
อยฝืดหรือกระดอนเพราะผ่าคลองเลื
อยเสร็จ ใบเลื
อย
จะหยุดและมอเตอร์ขับเลื
อยไฟฟ้ ากลับเข้าหาตัวผู้ใช้งานโดยทันที
– ถ้าใบเลื
อยบิดหรือไม่ได้ศูนย์ขณะตัด นเลื
อยที
ขอบหลังจะ
งเข้าที
ผิวบนของแท่งไม้ ทำให้ใบเลื
อยไต่ออกจากคลองเลื
อย
และกระโดดกลับมายังผู้ใช้งาน
การกระดอนเป็นปฏิกิริยาจากการใช้เลื
อยและ/
หรือขั
นตอนและสภาพการ
ใช้งานที
ไม่ถูกต้อง และอาจเลี
ยงได้ โดยใช้ความระมัดระวังดังต่อไปนี
a) ใช
้
มือทั
งสองจับเลื
อยให้แน่น และวางตำแหน่งมือให้ต้านแรง
กระดอนกลับ
วางตำแหน่งลำตัวไปทางด้านใดด้านหนึ
งของใบเลื
อย แต่ไม่ให้
ตรงกับใบเลื
อย
การกระดอนอาจทำให้เลื
อยไฟฟ้ ากระโดดกลับ แต่ผู้ ใช้งานอาจ
ควบคุมแรงกระดอนได้ หากใช้ความระมัดระวังตามสมควร
b) เมื
อบิดใบเลื
อย หรือหยุดตัดเพราะความจำเป็ นบางอย่าง
ให้ปล่อยสวิทซ
์
และจับจนเลื
อยหยุดนิ
งในเนื
อไม้
อย่าพยายามเอาเลื
อยออกจากช
ิ
นงานหรือดึงเลื
อยกลับเมื
อใบเลื
อย
กำลังหมุน เพราะอาจกระดอนกลับได้
ตรวจสอบและหาทางแก้ ไขเพื
อไม่ให้ ใบเลื
อยบิดงอ
c) เมื
อหมุนเลื
อยในช
ิ
นงานอีกครั
ง ให้ ใบเลื
อยอยู่ในคลองเลื
อย
และไม่ให้ นเลื
อยขบเนื
อไม้
ถ้าใบเลื
อยบิดตัว อาจกระดอนหรือกระโจนออกจากชิ
นงานเมื
อคุณ
เปิดสวิทซ์
d) ยึดแท่งไม้ ใหญ่ให้แน่นเพื
อไม่ให้ ใบเลื
อยฝืดและกระดอนกลับ
ชิ
นไม้ ใหญ่มักแอ่นเพราะนำหนักของตัวเอง
ต้องรองรับใต้ชิ
นไม้หรือทั
งสองข้าง ใกล้คลองเลื
อยและใกล้ขอบไม้
e) อย่าใช
้
ใบเลื
อยที
ทื
อหรือชำรุด
ใบเลื
อยที
ทื
อหรือไม่ได้ดัดอย่างถูกต้องทำให้เกิดคลองเลื
อยแคบๆ
เกิดแรงฝืด ใบเลื
อยบิดงอและกระดอนกลับได้
f) ต้องขันคันล็อกความลึกและปรับแต่งมุมของใบเลื
อยให้แน่นก่อน
ใช
้
งาน
ถ้าตำแหน่งใบเลื
อยเปลี
ยนไปขณะตัด ทำให้ ใบเลื
อยบิดและ
กระดอนกลับได้
g) ใช
้
ความระมัดระวังเป็นพิเศษเมื
อบากเข้าไปในผนังหรือส
่
วนอื
นๆ
ที
มองไม่เห็น
ใบเลื
อยที
ยื
นออกมาอาจตัดส
ิ
นส
่
วนอื
นจนกระดอนกลับได้
คำแนะนำความปลอดภัยของเลื
อยที
มีแผ่นกั
นแกว่งหรือ
แผ่นกั
นฉุด
a) ตรวจดูให้แผ่นกั
นล่างปิดสนิทก่อนใช
้
งาน อย่าเปิดสวิทซ
์
เมื
อแผ่น
กั
นล่างไม่เลื
อนอย่างคล่องตัวและปิดโดยทันที อย่ารั
งหรือมัดแผ่น
กั
นล่างให้อยู่ในตำแหน่งเปิด
ถ้าเลื
อยตกกระแทกโดยบังเอิญ แผ่นกั
นล่างอาจบิดงอ
ยกแผ่นกั
นล่างที
มือจับรั
ง และตรวจดูให้
เลื
อนโดยอิสระและไม่แตะ
กับใบเลื
อยหรือส
่
วนอื
นๆ ในทุกทิศทางและทุกความลึกที
ตัด
b) ตรวจดูการทำงานของสปริงกดแผ่นกั
นล่าง ถ้าแผ่นกั
นและสปริง
ไม่ทำงานอย่างถูกต้อง จะต้องซ
่
อมก่อนใช
้
งาน
แผนกั
นล่างอาจทำงานไม่คล่องตัว จนชิ
นส
่
วนชำรุด มีขี
เลื
อยติด
หรืออุดตัน
c) ควรรั
งแผ่นกั
นล่างเองเมื
อใช
้
ในงานตัดพิเศษ เช
่
นเซาะลาก
หรือตัดแบบซ
ั
บซ
้
อน ยกแผ่นกันล่างที
ตัวจับรั
ง และเมื
อใบเลื
อย
ตัดไม้แล้ว ต้องเลิกรั
งแผ่นกั
นล่างทันที
ในงานตัดอื
นๆ นั
น แผ่นกั
นล่างควรทำงานโดยอัตโนมัติ
d) ตรวจดูให้แผ่นกั
นล่างปิดใบเลื
อยก่อนวางเลื
อยไฟฟ้ าลงบนแท่น
งานหรือพื
น
ใบเลื
อยที
ไม่มีแผ่นกั
นและกำลังหมุนทำให้เลื
อยไฟฟ้ าถลากลับ
และตัดอะไรต่อมิอะไรที
อยู่ใกล้ๆ
ให้ส
ั
งเกตระยะเวลาที
ใบเลื
อยหยุดหลังจากปิดสวิทซ์
ข้อควรระวังในการใช้เลื่อยวงเดือน
1 เริ
มตัดเมื
อมีความเร็วสูงสุด
2. อย่าใช้เลื
อยวงเดือนที
ล็อกแผ่นกั
นล่างไว้ ในตำแหน่งเปิด
3. โปรดแน่ ใจว่า ครอบล่างเลื
อนได้อย่างคล่องตัว
4. อย่าวางเลื
อยวงเดือนลง เมื
อใบเลื
อยยังหมุนอยู่
5. ปิดสวิทซ์ OFF ทันทีเมื
อเกิดความผิดพลาด
6. อย่าใช้งานเลื
อยวงเดือนเมื
อใบเลื
อยหมุนขึ
น
7. ไม่ควรใช้ตัดไฟเบอร์กลาส

15
ไทย
8. อย่าใช้ ใบเลื
อยที
เส
้
นผ่านศูนย์กลางที
ปลาย นเลื
อยน้อยกว่า 134
มม. (รุ่น C6SF/C6MF) หรือ 162 มม. (รุ่น C7SF/C7MF)
9. รักษาใบเลื
อยให้คมอยู่เสมอ
อุปกรณ์มาตรฐาน
(1) ใบเลื
อย ....................................................................................... 1
(2) ประแจบ็อกซ์ .............................................................................. 1
(3) ราง ............................................................................................. 1
(4) ประแจหกเหลี
ยม ........................................................................ 1
อาจเปลี
ยนแปลงอุปกรณ์มาตรฐานได้โดยไม่ต้องแจ้งล่วงหน้า
การใช
้
งาน
○
ใช้ตัดไม้ชนิดต่างๆ
○
ใช้ตัดแผ่นประดับ แผ่นพลาสติกบางและวัสดุก่อสร้างชนิดใหม่ที
นุ่ม
(ใช้ใบเลื
อยกับพลาสติก)
คำแนะนำก่อนการใช
้
งาน
1. แหล่งไฟฟ้ า
ตรวจดูให้แหล่งไฟฟ้ าที
จะใช้ตรงกับราละเอียดจำเพาะบนแผ่นป้ าย
ของเลื
อยไฟฟ้ า
2. สวิทซ
์
ไฟฟ้ า
ตรวจดูให้สวิทซ์ ไฟฟ้ าอยู่ในตำแหน่ง OFF ถ้าเส
ี
ยบปลั
กเข้ากับ
เต้าเส
ี
ยบเมื
อสวิทซ์อยู่ในตำแหน่ง ON เครื
องใช้ ไฟฟ้ าจะทำงานทันที
และทำให้เกิดอุบัติเหตุที
ร้ายแรงได้
3. สายไฟฟ้ าพ่วง
เมื
อพื
นที
ทำงานอยู่ห่างจากแหล่งจ่ายไฟ ให้ ใช้สายพ่วงที
โตและ
มีความจุไฟฟ้ามากพอ ควรพยายามให้สายพ่วงส
ั
นที
สุดเท่าที
จะทำได้
4. เตรียมแท่นงานไม้ (รูปที
1)
เนื
องจากใบเลื
อยจะตัดผ่านไปทางผิวล่างของชิ
นไม้ จึงให้วางไม้
บนแท่นงานขณะที
ตัด ถ้าใช้ ไม้เหลี
ยมเป็นแท่นงาน ให้ ใช้พื
นที
ระดับราบเพื
อให้มั
นคง แท่นงานที
ไม่มั
นคงอาจทำให้เกิดความ
เส
ี
ยหายใช้ทำงาน
คำเตือน
เพื
อเลี
ยงอุบัติเหตุ ตรวจดูให้ยึดหรือตรึงส
่
วนที
เหลือของไม้ ไว้ ได้
หลังจากตัดเสร็จแล้ว
การปรับแต่งเครื
องมือไฟฟ้าก่อนใช
้
งาน
1. การปรับแต่งคลองเลื
อย
อาจปรับแต่งคลองเลื
อยโดยเลื
อนฐานหลังจากคลายน็อตปีกผีเส
ื
อ
(รูปที
2)
คำเตือน
ถ้าน็อตปีกผีเส
ื
อยังหลวมอยู่ จะเกิดอันตรายมากให้ล็อก ให้แน่น
อยู่เสมอ
2. การปรับแต่งมุมเอียง
เมื
อคลายน็อตปีกผีเส
ื
อที
บรรทัด อาจเอียงใบเลื
อยจากฐานได้จนถึง
45 องศา (รูปที
3)
อาจปรับแต่งมุมเอียงได้ โดยคลายน็อตปีกผีเส
ื
อ (รูปที
3)
คำเตือน
ถ้าน็อตปีกผีเส
ื
อยังหลวมอยู่ จะเกิดอันตรายมาก ให้ล็อกให้แน่
น
อยู่เสมอ
3. การปรับแต่งราง (อุปกรณ์ประกอบ)
อาจปรับแต่งตำแหน่งตัดโดยเลื
อนรางไปทางซ้ายหรือทางขวาหลังจาก
คลายน็อตปีกผีเส
ื
อ
อาจติดตั
งรางไว้ทางด้านซ้ายหรือด้านขวาก็ได้
4. การปรับแต่งความขนานโดยละเอียด
อาจปรับแต่งความขนานของใบเลื
อยกับฐานโดยละเอียด โดยใช้
สกรูปรับระยะขนาน เมื
อส
่
งมอบจากโรงงาน บริษัทได้ปรับตั
ง
ความขนานมาแล้ว แต่ถ้าความขนานคลาดเคลื
อนไปบ้าง ให้ปรับ
แต่งดังต่อไปนี
(1) คลายเฉพาะสกรูยึดบานพับของครอบใบเลื
อย (รูปที
4)
(2) รั
งฝาครอบกลับไปที
ครอบใบเลื
อย
(3) สอดแท่งไม้เข้าทางด้านหลังของฐานใบเลื
อย และทำเครื
อง
หมายตำแหน่งไว้ที
ฐาน (รูปที
5)
รุ่น C6SF/C6MF C7SF/C7MF
แรงดันไฟฟ้ า (110 โวลท์ 220 โวลท์ 230 โวลท์ 240 โวลท์)
กำลังไฟฟ้ า 1010 วัตต์ 1050 วัตต์
ความลึกของคลองเลื
อยสูงสุด 57 มม. 68 มม.
ใบเลื
อย: เส
้
นผ่านศูนย์กลางภายนอก
ความหนา
ความกว้างของคลองเลื
อย
165 มม.
1 มม.
1.6 มม.
190 มม.
1 มม.
1.6 มม.
ความเร็วอิสระ* 5000/นาที, 5500/นาที
นำหนัก (ไม่รวมสายไฟฟ้า) 3.0 กก. 3.3 กก.
* โปรดตรวจดูป้ ายที
ตัวเลื
อยไฟฟ้
า เพราะแตกต่างไปตามท้องที
ใช้งาน
รายละเอียดจำเพาะ
10. โปรดแน่ ใจว่า ชิ
นงานไม่มีส
ิ
งแปลกปลอม เช่นตะปู
11. ใช้ความระมัดระวังเมื
อตัด โดยตั
งตำแหน่งให้ปลอดภัยและมั
นคง

ไทย
16
(4) เลื
อนแท่งไม้ที
ทำเครื
องหมายไปที
ด้านหน้าของฐาน และ
หมุนสกรูปรับระยะขนานเพื
อให้เครื
องหมายตรงกับด้านข้าง
ของฐาน (รูปที
6)
(5) หลังจากปรับแต่ง ขันสกรูยึดให้เข้าที
จนแน่น
หมายเหตุ
○ ความขนานอาจผิดพลาดได้บ้างถ้าปรับแต่งคลองเลื
อยหลังจากปรับ
ตั
งความขนาน
ลำดับการตัด
1. วางเลื
อยไฟฟ้ า (ฐาน) บนแท่งไม้ และจัดให้แนวตัดตรงกับใบเลื
อย
ที
บรรทัดหน้า (รูปที
7)
2. เปิดสวิทซ์ ON ก่อนใบเลื
อยแตะกับแท่งไม้ สวิทซ์จะเปิด ON
เมื
อใช้นิ
วกดกดสวิทซ์ และปิด OFF เมื
อปล่อยนิ
วจากสวิทซ์
○ ก่อนจะใช้ตัดด้วยเลื
อยไฟฟ้ า ตรวจดูให้มีรอบหมุนสูงสุดเส
ี
ยก่อน
○ ถ้าใบเลื
อยหยุดหมุนหรือมีเส
ี
ยงผิดปกติขณะทำงาน ปิดสวิทซ์ ไปที
OFF โดยทันที
○ ระวังอยู่เสมอ ไม่ให้สายไฟฟ้าเข้าไปใกล้ ใบเลื
อยที
กำลังหมุน
○ การใช้เลื
อยวงเดือนที
ใบเลื
อยหันขึ
นหรือหันไปด้านข้างจะมีอันตราย
มาก ควรเลี
ยงการทำงานในท่าทางที
ไม่ปกติเช่นนั
น
○ เมื
อตัดวัสดุ ใช้แว่นตาป้ องกันเสมอ
○ เมื
อทำงานเสร็จแล้ว ให้ถอดปลั
กออกจากเต้าเส
ี
ยบ
การติดและถอดใบเลื
อย
คำเตือน
เพื
อเลี
ยงอุบัติเหตุร้ายแรง กดสวิทซ์ไปที
ตำแหน่ง OFF และถอดจาก
แหล่งจ่ายไฟเสมอ
1. ถอดใบเลื
อยออก
(1) ตั
งให้คลองเลื
อยลึกที
สุด และวางเลื
อยวงเดือนในตำแหน่งที
แน่น (รูปที
8)
(2) กดคันล็อกลง หมุนโบลต์อย่างระมัดระวังด้วยประแจบ็อกซ์ที
ให้มา
(3) เมื
อยึดเพลาเลื
อยแล้ว ขันประแจบ็อกซ์ในทิศทางทวนเข็มนาฬ
ิ
กา
เพื
อถอดโบลต
์และแหวน (B) ออกไป
(4) จับกำบังล่าง เลื
อนกำบังล่างไปยังครอบใบเลื
อย และเอาใบเลื
อย
ออกมา
2. การติดตั
งใบเลื
อย
(1) ติดตั
งใบเลื
อยในลำดับกลับกับลำดับการถอดออก
(2) เช็ดเศษวัสดุออกจากเพลา แหวน เป็นต้น
(3) แหวน (A) ใช้กับใบเลื
อยประเภท 1 ที
มีเส
้
นผ่านศูนย์กลางรู
20 มม. (รูปที
9)
(4) ควรติดตั
งใบเลื
อยให้ทิศทางของลูกศรบนใบเลื
อยตรงกับลูกศร
บนครอบใบเลื
อย
(5) ขันโบลต์ให
้แน่น
ข้อควรระวัง
○ ถ้าใช้ประแจบ็อกซ์ชนิดอื
นที
บริษัทไม่ได้เตรียมให้มา อาจขันโบลต์
แน่นไม่พอก็ ได้ โปรดให้ ใช้ประแจบ็อกซ์ชนิดอื
นที
บริษัทได้
เตรียมให้มาเสมอ
○ ก่อนต่อสายไฟฟ้า ตรวจดูให้คันล็อกกลับสู
่
ตำแหน่งเดิม และใบ
เลื
อยหมุนได้อย่างคล่องตัวเส
ี
ยก่อน
การบำรุงรักษาและการตรวจสอบ
1. การตรวจสอบใบเลื
อย
เนื
องจากการใช้ ใบเลื
อยที
ทื
อจะทำให้มอเตอร์ทำงานผิดปกติ
และเส
ื
อมประส
ิ
ทธิภาพโดยเร็ว ให้ลับหรือเปลี
ยนใหม่โดยเร็ว
ถ้าพบว่าส
ึ
กหรอ
2. การตรวจสอบสกรูยึด
ให้ตรวจสอบสกรูยึดเสมอ และให้ขันไว้อย่างถูกต้อง ถ้าสกรูหลวม
ให้ขันเส
ี
ยใหม่โดยทันที มิฉะนั
นอาจเกิดอันตรายมาก
3. การบำรุงรักษามอเตอร์
การขดลวดของมอเตอร์เป็นหัวใจสำคัญของเครื
องมือไฟฟ้ า ให้ ใช้
ความระมัดระวังเพื
อไม่ ให้ขดลวดของมอเตอร์ชำรุดและ/
หรือเปียกนำหรือนำมัน
4. การตรวจสอบแปรงถ่าน (รูปที
10)
มอเตอร์มีแปรงถ่าน ซึ
งเป็นชิ
นส
่
วนที
ส
ิ
นเปลือง เนื
องจากแปรง
ถ่านที
ส
ึ
กหรอมากจะทำให้มอเตอร์ขัดข้องได้ โปรดเปลี
ยนแปรง
ถ่านเส
ี
ยใหม่ด้วยชนิดที
มีหมายเลขเดียวกับตามรูป เมื
อแปรง
ถ่านส
ึ
กหรอจนถึง หรื
อใกล้ระดับ "ขอบเขตระยะส
ึ
กหรอ"
นอกจากนี
รักษาแปรงถ่านให้สะอาดเสมอ และตรวจดูให้เลื
อนได้
โดยอิสระในปลอกแปรง
○ การเปลี
ยนแปรงถ่าน
ถอดฝาแปรงถ่านด้วยไขควงปากแบน ต่อมาจะถอดแปรงถ่าน
ออกได้ โดยง่ายดาย
5. การตรวจสอบการทำงานและบำรุงรักษากำบังล่าง
ให้บำรุงรักษากำบังล่างอย่างระมัดระวัง เพื
อให้ทำงานได้อย่างคล่องตัว
อยู่เสมอ โปรดเอาขี
เลื
อยที
สะสมรอบชิ
นส
่
วนหมุนของครอบล่าง
ออกไปให้หมด
6. รายการอะไหล่ซ
่
อม
A: หมายเลขอะไหล่
B: หมายเลขรหัส
C: จำนวนที
ใช้
D: หมายเหตุ
คำเตือน
ศูนย์บริการที
ได้รับอนุญาตของฮิตาชิเท่านั
นเป็นผู้ซ่อม ดัดแปลง
และตรวจสอบเครื
องมือไฟฟ้ าของฮิตาชิ
รายการอะไหล่ซ่อมนี
จะเป็นประโยชน์เมื
อส
่
งให้ศูนย์บริการที
ได้รับ
อนุญาตของฮิตาชิเท่านั
นเพื
อแจ้งซ่อมหรือบำรุงรักษา
ต้องปฏิบัติตามระเบียบและมาตรฐานความปลอดภัยของแต่ละ
ประเทศในการใช้งานและบำรุงรักษาเครื
องมือไฟฟ้ า
การแก้ไข
มีการปรับปรุงและแก้ ไขเครื
องมือไฟฟ้ าของฮิตาชิเสมอ เพื
อให้
สอดคล้องกับความก้าวหน้าล่าสุดทางเทคโนโลยี
ดังนั
น จึ
งอาจเปลี
ยนแปลงชิ
นส
่
วนบางอย่าง (คือ หมายเลขรหัสและ/
หรือรุ่น) ได้ โดยไม่ต้องแจ้งล่วงหน้า
หมายเหตุ
เนื
องจากฮิตาชิมีแผนงานวิจัยและพัฒนาอย่างต่อเนื
อง รายละเอียด
จำเพาะนี
จึงอาจเปลี
ยนแปลงได้โดยไม่ต้องแจ้งล่วงหน้า

17
C6SF
ABCD
1 963803 1
2 322088 1
3 308361 1
4 305568 2 M5
×
12
5 322506 1
6 317203 1
7 6002VV 1 6002VVCMPS2L
8 308362 1
9 308773 3 M3
×
12
10 322099 1
11 ———— 1 165MM-D20
12 322100 1
13 957749 1 M7
×
17.5
14 302434 3 M5
×
45
15 301653 3 D4
×
20
16 ———— 1
17 322504 1 "31, 32"
18 931701 1
19 316394 1
20 608VVM 1 608VVC2PS2L
21 930703 2
22-1 340571E 1 220V-230V "21"
22-2 340571F 1 240V "21"
23 322002 1
24-1 360624E 1 220V-230V
24-2 360694F 1 240V
25 307918 1
26 6000VV 1 6000VVCMPS2L
27A 318647 1
28 962782 1 M5
×
6
29 322004 1 "27A, 41, 42"
30 ———— 1
31 938477 2 M5
×
8
32 957051 2
33 999043 2
34 935829 2
35 981373 1
36 953327 1 D8.8
ABCD
37 959140 1
38 937631 1
39 984750 2 D4
×
16
40 953174 2 D5
×
55
41 961729 1
42 949794 1 M6
×
20
43 948167 2 M6
44 314620 1 M6
×
22 "43"
45 ———— 1
46 322578 1
47 322505 1
48 941056 1
49 307898 1 M6
×
18
50 308387 1
51 308364 1 M6
×
15
52 322007 1 "43, 48, 49, 51"
53 315183 1
54 982631 1
501 302756 1
502 990666 1 2.5MM
503 940543 1 10MM

18
C7SF
ABCD
1 963803 1
2 322088 1
3 308361 1
4 305568 2 M5
×
12
5 322507 1
6 317203 1
7 6002VV 1 6002VVCMPS2L
8 308362 1
9 308773 3 M3
×
12
10 322099 1
11 ———— 1 190MM-D20
12 322100 1
13 957749 1 M7
×
17.5
14 302434 3 M5
×
45
15 301653 3 D4
×
20
16 ———— 1
17 322504 1 "31, 32"
18 931701 1
19 316394 1
20 608VVM 1 608VVC2PS2L
21 930703 2
22-1 340571E 1 220V-230V "21"
22-2 340571F 1 240V "21"
23 322002 1
24-1 360624E 1 220V-230V
24-2 360694F 1 240V
25 307918 1
26 6000VV 1 6000VVCMPS2L
27A 318647 1
28 962782 1 M5
×
6
29 322015 1 "27A, 41, 42"
30 ———— 1
31 938477 2 M5
×
8
32 957051 2
33 999043 2
34 935829 2
35 981373 1
36 953327 1 D8.8
ABCD
37 959140 1
38 937631 1
39 984750 2 D4
×
16
40 953174 2 D5
×
55
41 961729 1
42 949794 1 M6
×
20
43 948167 2 M6
44 314620 1 M6
×
22 "43"
45 500468Z 1
46 322578 1
47 322505 1
48 941056 1
49 307898 1 M6
×
18
50 308387 1
51 308364 1 M6
×
15
52 322016 1 "43, 48, 49, 51"
53 315183 1
54 982631 1
501 302756 1
502 990666 1 2.5MM
503 940543 1 10MM

19
C6MF
ABCD
1 963803 1
2 322088 1
3 308361 1
4 305568 2 M5
×
12
5 322506 1
6 317203 1
7 6002VV 1 6002VVCMPS2L
8 308362 1
9 308773 3 M3
×
12
10 322099 1
11 ———— 1 165MM-D20
12 322100 1
13 957749 1 M7
×
17.5
14 302434 3 M5
×
45
15 301653 3 D4
×
20
16 ———— 1
17 322504 1 "31, 32"
18 931701 1
19 316394 1
20 608VVM 1 608VVC2PS2L
21 930703 2
22 340571E 1 220V-230V "21"
23 322002 1
24 360624E 1 220V-230V
25 307918 1
26 6000VV 1 6000VVCMPS2L
27A 318647 1
28 962782 1 M5
×
6
29 322004 1 "27A, 41, 42"
30
———
—1
31 938477 2 M5
×
8
32 957051 2
33 999043 2
34 935829 2
35 981373 1
36 953327 1 D8.8
37 959140 1
ABCD
38 937631 1
39 984750 2 D4
×
16
40 953174 2 D5
×
55
41 961729 1
42 949794 1 M6
×
20
43 948167 2 M6
44 314620 1 M6
×
22 "43"
45 ———— 1
46 322578 1
47 322505 1
48 941056 1
49 307898 1 M6
×
18
50 308387 1
51 307937 1
52 322021 1 "43, 48, 49, 51"
53 315183 1
54 982631 1
501 302756 1
502 990666 1 2.5MM
503 940543 1 10MM
ページが読み込まれています...
ページが読み込まれています...
ページが読み込まれています...
ページが読み込まれています...
-
 1
1
-
 2
2
-
 3
3
-
 4
4
-
 5
5
-
 6
6
-
 7
7
-
 8
8
-
 9
9
-
 10
10
-
 11
11
-
 12
12
-
 13
13
-
 14
14
-
 15
15
-
 16
16
-
 17
17
-
 18
18
-
 19
19
-
 20
20
-
 21
21
-
 22
22
-
 23
23
-
 24
24


