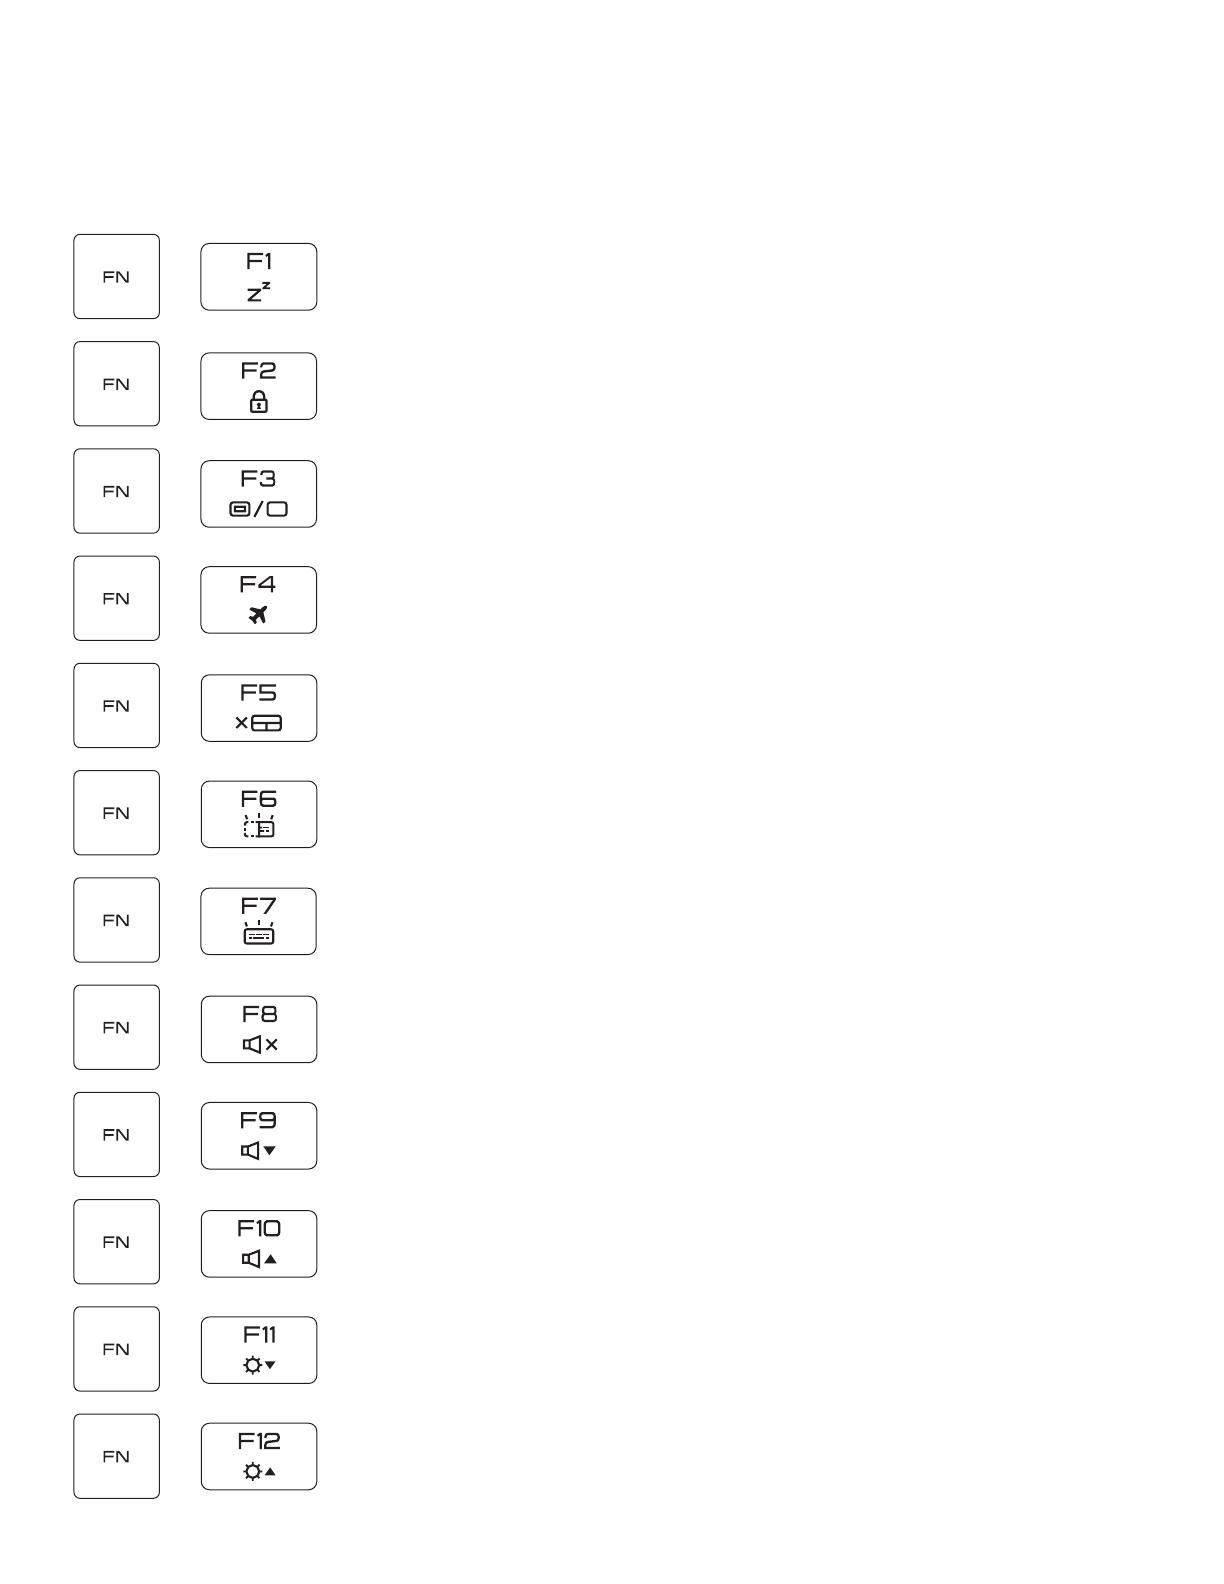
Intel LAPAC71G ユーザーガイド

タイプ
ユーザーガイド
Intel® NUC X15 Laptop Kit
• LAPAC51G
• LAPAC71G
• LAPAC71H
User Guide
Version 1.0
English
Regulatory Model: AC57
1
Table of Contents
US English
UK English
Français
Deutsch
Italiano
Español
Español (LA)
日本語
Norsk
Русский
简体中文
繁體中文
2
14
27
40
53
66
79
92
105
118
131
144
.............................................
.............................................
..................................................
..................................................
....................................................
...................................................
..........................................
......................................................
.......................................................
..................................................
.................................................
.................................................
2
Preparing your Computer
Connect the power cord to the AC adapter then to a grounded
100-240VAC outlet.
Caution: Risk of shock or fire. Do not use power cord if damaged. Please reach
out to place of purchase for replacement.
Connect the AC adapter’s DC output plug to the DC IN jack on the right side of
the system.
AC
ADAPTER
Power Cord
DC Output Plug
19.5V
3
The display panel can be opened to a wide range of angles for optimal viewing.
Press the power button to turn on your laptop computer.
Preparing your Computer
Attempting to force the lid open beyond 135 degrees will cause damage to
the hinges and/or the display.
4
Product Overview
US Keyboard
B
C
F
G
I
H
J
E
A
D
5
Product Overview
A
B
E
F
G
I
J
LCD Screen
Internal display/panel
Digital Microphones
Dual built-in microphones
Infrared LED
Used to support Windows Hello feature
C
D
Camera
High Definition Camera
Blue LED
Camera Activity Indicator
Caps Lock Status Indicator
Caps Lock ON: Indicator On
Caps Lock OFF: Indicator Off
H
Touchpad Enable/Disable Switch with Indicator
Double tap to enable or disable the touchpad.
Indicator will turn on when the touchpad is disabled.
Power Button and Power LED
Press once to turn the laptop on when it is powered off or asleep. Indicator will turn on. Press
once to notify the operating system to power off the laptop or enter sleep mode. Indicator
will turn off if powered off.
Power On: White
Power Off: Off
Suspend: Breathing White
Touchpad/Clickpad
Touch-sensitive pointing device which functions like a mouse
Keyboard
Membrane Keyboard with single zone RGB Backlight
6
Right Side
C
HDMI 2.1 Port
Supports high-definition digital video connections
B
USB 3.2 Gen2 Port
Connect any USB device into this port, such as a USB flash drive, keyboard, or mouse.
A
D
Power Connector
Connect the AC adapter into this connector
Thunderbolt™ 4 Port
Connect any USB Type C or Thunderbolt™ device into this port, such as a USB Flash drive or an
external storage device. This port will also support displays using a Type-C to DisplayPort cable.
B
A DC
7
Left Side
A
B
C
USB 3.2 Gen2 Port
Connect any USB device into this port, such as a USB flash drive, keyboard, or mouse.
Kensington Lock
Anti-theft key lock hole
Network Jack (RJ-45)
This jack lets you connect to a Local Area Network (LAN)
D
Headset Jack
Connect amplified speakers or headphones into this jack
D
C
AB
8
Bottom Side
A
B
C
Vents
The thermal vents are designed to cool the internal components and avoid overheating
Back Cover Screws
Modification of any of the laptop’s components will void the warranty
Speakers
Stereo audio output
A
CB
9
Back Side
A
Vents
The thermal vents are designed to cool the internal components and avoid overheating
A A
10
The following defines the row of function keys which also contain a secondary
hotkeys/shortcuts which can be accessed by pressing and holding down the
Function Key (FN) while simultaneously pressing the desired hotkey/shortcut.
Understanding the Keyboard
11
Keyboard Shortcuts
To activate these functions, press the hotkey associated with the desired function
as indicated below:
+
Function
Lock:
Press this key combination (FN + F2) to toggle control
for primary/secondary Fn row assignment.
+
Sleep:
Press this key combination (FN + F1) to initiate low
power state.
+
Mute
Audio:
Press this key combination (FN + F8) to toggle
between mute and unmute.
+
Volume
Down:
Press this key combination (FN + F9) to turn the
audio volume down.
+
Volume
Up:
Press this key combination (FN + F10) to turn the
audio volume up.
+
+
Clickpad
Enable/
Disable:
Press this key combination (FN + F5) to toggle
enable/disable for the clickpad. LED is illuminated
when disabled.
+
Keyboard
Brightness
Down:
Press this key combination (FN + F6) to decrease
keyboard brightness.
+
Screen
Brightness
Down:
Press this key combination (FN + F11) to decrease
screen brightness.
+
Screen
Brightness
Up:
Press this key combination (FN + F12) to increase
screen brightness.
+
2nd
Monitor
Control:
Press this key combination (FN + F3) to initiate
secondary monitor display mode.
+
Airplane
Mode:
Press this key combination (FN + F4) to turn Wireless
and Bluetooth® on or off.
Keyboard
Brightness
Up:
Press this key combination (FN + F7) to increase
keyboard brightness.
12
Keyboard Shortcuts
+
PRT SC:
Press this key combination (FN + PRT SC) to send
the current screen image to the printer.
+
Page
Up:
Press this key combination (FN + PGUP) to enable
standard page up.
+
Page
Down:
Press this key combination (FN +PGDN) to enable
standard page down.
+
Home:
Press this key combination (FN + HOME) to
enable standard home.
+
End:
Press this key combination (FN + END) to enable
standard end.
13
Using the Touchpad/Clickpad
The touchpad / clickpad is a rectangular electronic panel located just below your
keyboard. Clicking twice within the 15mm x 15mm corner in the top left will
enable or disable (lighted indicator) touchpad functionality. You can slide your
finger on the static-sensitive panel of the touchpad / clickpad to move the cursor.
Press the left and right bottom corners located on the bottom edge of the
touchpad / clickpad to make selections and run functions. These two buttons are
similar to the left and right buttons on a mouse. Tapping on the touchpad /
clickpad produces similar results.
x2
LEFT RIGHT
Use these bottom corners
similar to mouse buttons
Click twice here to enable
or disable the touchpad
Touchpad/Clickpad
14
Intel® NUC X15 Laptop Kit
• LAPAC51G
• LAPAC71G
• LAPAC71H
User Guide
Version 1.0
UK English
Regulatory Model: AC57
15
Preparing your Computer
Connect the power cord to the AC adapter then to a grounded
100-240VAC outlet.
Caution: Risk of shock or fire. Do not use power cord if damaged. Please reach
out to place of purchase for replacement.
AC
ADAPTER
Power Cord
DC Output Plug
Connect the AC adapter’s DC output plug to the DC IN jack on the right side of
the system.
19.5V
16
The display panel can be opened to a wide range of angles for optimal viewing.
Press the power button to turn on your laptop computer.
Preparing your Computer
Attempting to force the lid open beyond 135 degrees will cause damage to
the hinges and/or the display.
17
Product Overview
B
C
F
G
I
H
J
E
A
D
18
Product Overview
A
B
E
F
G
I
J
LCD Screen
Internal display/panel
Digital Microphones
Dual built-in microphones
Infrared LED
Used to support Windows Hello feature
C
D
Camera
High Definition Camera
Blue LED
Camera Activity Indicator
Caps Lock Status Indicator
Caps Lock ON: Indicator On
Caps Lock OFF: Indicator Off
H
Touchpad Enable/Disable Switch with Indicator
Double tap to enable or disable the touchpad.
Indicator will turn on when the touchpad is disabled.
Power Button and Power LED
Press once to turn the laptop on when it is powered off or asleep. Indicator will turn on. Press
once to notify the operating system to power off the laptop or enter sleep mode. Indicator
will turn off if powered off.
Power On: White
Power Off: Off
Suspend: Breathing White
Touchpad/Clickpad
Touch-sensitive pointing device which functions like a mouse
Keyboard
Membrane Keyboard with single zone RGB Backlight
19
Right Side
C
HDMI 2.1 Port
Supports high-definition digital video connections
B
USB 3.2 Gen2 Port
Connect any USB device into this port, such as a USB flash drive, keyboard, or mouse.
A
D
Power Connector
Connect the AC adapter into this connector
Thunderbolt™ 4 Port
Connect any USB Type C or Thunderbolt™ device into this port, such as a USB Flash drive or an
external storage device. This port will also support displays using a Type-C to DisplayPort cable.
B
A DC
  • Page 1 1
  • Page 2 2
  • Page 3 3
  • Page 4 4
  • Page 5 5
  • Page 6 6
  • Page 7 7
  • Page 8 8
  • Page 9 9
  • Page 10 10
  • Page 11 11
  • Page 12 12
  • Page 13 13
  • Page 14 14
  • Page 15 15
  • Page 16 16
  • Page 17 17
  • Page 18 18
  • Page 19 19
  • Page 20 20
  • Page 21 21
  • Page 22 22
  • Page 23 23
  • Page 24 24
  • Page 25 25
  • Page 26 26
  • Page 27 27
  • Page 28 28
  • Page 29 29
  • Page 30 30
  • Page 31 31
  • Page 32 32
  • Page 33 33
  • Page 34 34
  • Page 35 35
  • Page 36 36
  • Page 37 37
  • Page 38 38
  • Page 39 39
  • Page 40 40
  • Page 41 41
  • Page 42 42
  • Page 43 43
  • Page 44 44
  • Page 45 45
  • Page 46 46
  • Page 47 47
  • Page 48 48
  • Page 49 49
  • Page 50 50
  • Page 51 51
  • Page 52 52
  • Page 53 53
  • Page 54 54
  • Page 55 55
  • Page 56 56
  • Page 57 57
  • Page 58 58
  • Page 59 59
  • Page 60 60
  • Page 61 61
  • Page 62 62
  • Page 63 63
  • Page 64 64
  • Page 65 65
  • Page 66 66
  • Page 67 67
  • Page 68 68
  • Page 69 69
  • Page 70 70
  • Page 71 71
  • Page 72 72
  • Page 73 73
  • Page 74 74
  • Page 75 75
  • Page 76 76
  • Page 77 77
  • Page 78 78
  • Page 79 79
  • Page 80 80
  • Page 81 81
  • Page 82 82
  • Page 83 83
  • Page 84 84
  • Page 85 85
  • Page 86 86
  • Page 87 87
  • Page 88 88
  • Page 89 89
  • Page 90 90
  • Page 91 91
  • Page 92 92
  • Page 93 93
  • Page 94 94
  • Page 95 95
  • Page 96 96
  • Page 97 97
  • Page 98 98
  • Page 99 99
  • Page 100 100
  • Page 101 101
  • Page 102 102
  • Page 103 103
  • Page 104 104
  • Page 105 105
  • Page 106 106
  • Page 107 107
  • Page 108 108
  • Page 109 109
  • Page 110 110
  • Page 111 111
  • Page 112 112
  • Page 113 113
  • Page 114 114
  • Page 115 115
  • Page 116 116
  • Page 117 117
  • Page 118 118
  • Page 119 119
  • Page 120 120
  • Page 121 121
  • Page 122 122
  • Page 123 123
  • Page 124 124
  • Page 125 125
  • Page 126 126
  • Page 127 127
  • Page 128 128
  • Page 129 129
  • Page 130 130
  • Page 131 131
  • Page 132 132
  • Page 133 133
  • Page 134 134
  • Page 135 135
  • Page 136 136
  • Page 137 137
  • Page 138 138
  • Page 139 139
  • Page 140 140
  • Page 141 141
  • Page 142 142
  • Page 143 143
  • Page 144 144
  • Page 145 145
  • Page 146 146
  • Page 147 147
  • Page 148 148
  • Page 149 149
  • Page 150 150
  • Page 151 151
  • Page 152 152
  • Page 153 153
  • Page 154 154
  • Page 155 155
  • Page 156 156
  • Page 157 157
  • Page 158 158

Intel LAPAC71G ユーザーガイド

タイプ
ユーザーガイド