
© 2018 Koninklijke Philips N.V.
All rights reserved.
保留所有权力。
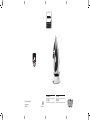
GC2078-GC2089
series
User manual
사용
설명서
用户手册
使用手冊
4239 000 93303

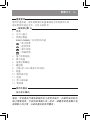
ENGLISH
c
d
g
h
i
e
f
b
a
m j
k
l
2 3 4
5
9
7 86
10 11 12 13
14
15 16 17
18

EasySpeed Plus Cordless GC2078-GC2089 series
ENGLISH 6
한국어 14
简体中文 24
繁體中文 35

Important
Read the separate important information leaet and the user manual
carefully before you use the appliance. Save both documents for future
reference.
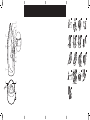
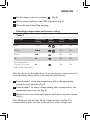
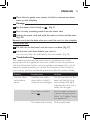
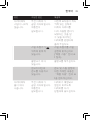
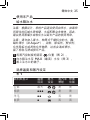
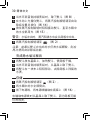
General description (Fig. 1)
1 Spray nozzle
2 Cap of lling opening
3 Steam control
- CALC CLEAN = Calc-Clean function
- = dry ironing
- = optimal steam
- = maximum steam
- = turbo steam
4 Steam boost button
5 Spray button
6 Temperature dial
7 Type plate
8 Water tank with MAX water level indication
9 Soleplate
10 Light ring
11 Base
12 Iron storage lock
13 Mains cord
Using the appliance
Filling the water tank
Note: Your appliance has been designed to be used with tap water. In case
you live in an area with hard water, fast scale build-up may occur. Therefore,
it is recommended to use distilled or de-mineralized water to prolong the
lifetime of your appliance.
Note: Do not add perfume, water from tumble dryer, vinegar, magnetically
treated water (e.g., Aqua+), starch, descaling agents, ironing aids, chemically
descaled water or other chemicals as they may cause water spitting, brown
staining, or damage to your appliance.
6 ENGLISH

7
ENGLISH
1 Set the steam control to position . (Fig. 2)
2 Fill the water tank up to the MAX indication (Fig. 3).
3 Closethecapofthellingopening.
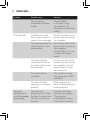
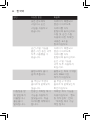
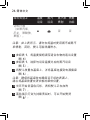
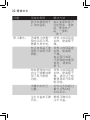
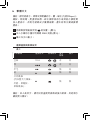
Selecting temperature and steam setting
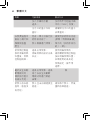
Table 1
Fabric type Temperature
setting
Steam
setting
Steam
boost
Spray
Linen MAX
,
Ye s Yes
Cotton
3
,
Ye s Ye s
Wool
2
No Ye s
Silk
1
No No
Synthetic fabrics
(e.g. acrylic, nylon,
polyamide, polyester).
1
No No
Note: As indicated in the table above, do not use steam or steam boost at a
low temperature, otherwise hot water may leak from the iron.
1 Consult table 1 to set the temperature dial to the appropriate
setting for your garment (Fig 4)
2 Consult table 1 to select a steam setting that corresponds to the
temperature you have set. (Fig. 5)
3 Place the iron on its base and connect the base to a power socket.
(Fig 6.)
Note: Make sure that the base sits on a stable and level surface. It is
recommended to place the base on the soft part of the ironing board.

8
ENGLISH
4 Thelightringstartstoashbluelight,indicatingtheironisheating
up. (Fig 7.)
5 Whenthebluelightturnssteady,youcanstartironing.(Fig.8)
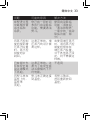
Operation of Smart Charging base
The iron is equipped with Smart Charging base. The light will indicate
thestatusoftheiron,andremindyoutochargetheironafter20to
25 seconds to ensure a good wrinkle removal performance. Please
refer to table 2 for the operation of the base.
Note: to ensure good wrinkle removal performance, always put the iron on
its base during the resting period. Do not place the iron on its heel. (Fig.9)
Table 2
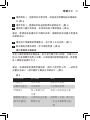
Light status Iron status Instructions
Flashing blue Heating up Wait for iron to be ready.
Steady blue Ready for use You can start ironing.
Flashing orange The iron needs to
be charged now
Put the iron back to the
base to charge it.
Slow breathing
blue (specic
types only)
Safety auto-off has
been activated
Refer to Chapter
“Features”, section “safety
auto-off”.
Features
Spray function
- Press the spray button to moisten the garment to be ironed. This
helps remove stubborn creases (Fig. 10).
Steam boost function
- Press and release the steam boost button for a powerful boost of
steam to remove stubborn creases (Fig. 11).

9
ENGLISH
- For optimal steam boost performance, it is recommended to press
the steam boost trigger at a 5 seconds interval.
Vertical steam
- You can use the steam boost function when you hold the iron in
vertical position for removing creases from hanging clothes, curtains
etc. (Fig. 12)
Dry ironing
- Set the steam control to to iron without steam. (Fig. 2)
Safety auto-off function (specic types only)
- The iron switches off automatically if the iron is not in use for
8 minutes. The light ring starts to slowly breath in blue to indicate
the safety auto-off mode is activated.
- To let the iron heat up again, remove the iron (if the iron is on the
base) and put it back to the base.
Cleaning and maintenance
Cleaning
1 Set the steam control to ,unplugthebaseandlettheironcool
down. (Fig. 2)
2 Pour any remaining water out of the water tank.
3 Wipeakesandanyotherdepositsoffthesoleplatewithadamp
cloth and a non-abrasive (liquid) cleaning agent.
Caution:Tokeepthesoleplatesmooth,avoidhardcontactwithmetal
objects.Neveruseascouringpad,vinegarorotherchemicalstoclean
the soleplate.
Note: Regularly rinse the water tank with tap water. Empty the water tank
after rinsing it.

10
ENGLISH
Calc-Clean function
IMPORTANT: To prolong the lifetime of your appliance and
to maintain good steaming performance, use the Calc-Clean
function once every two weeks. If the water in your area is
very hard (i.e. when akes come out of the soleplate during
ironing), use the Calc-Clean function more frequently.
1 Make sure the steam control is set to . (Fig. 2)
2 Fill the water tank to the MAX indication. (Fig. 3)
Do not pour vinegar or other descaling agents into the water tank.
3 Set the temperature dial to MAX. (Fig. 13)
4 Pluginthebase,puttheirononthebaseandlettheironheatup.
(Fig. 6)
5 Remove the iron when the light ring turns steady blue. (Fig. 8)
6 Hold the iron over the sink. Push the steam control to the Calc-
Clean position and hold it. (Fig. 14)
7 Gently shake the iron while holding the steam control until all
water in the water tank has been used up. (Fig. 15)
Caution:Whilescaleisushedout,steamandboilingwateralsocome
out of the soleplate.
8 Set the steam control back to . (Fig. 2)
Note: Repeat the Calc-Clean process if the water that comes out of the iron
still contains scale particles.
After the Calc-Clean process
1 Put the iron on the base. Let the iron heat up to dry the soleplate.
2 Take the iron from the base when the light ring turns steady blue.

11
ENGLISH
3 Move the iron gently over a piece of cloth to remove any water
stains on the soleplate.
Storage
1 Set the steam control back to . (Fig. 2)
2 Pour out any remaining water from the water tank.
3 Unplug the mains cord and wind the mains cord around the base.
(Fig. 16)
Removeironfromthebasewhenyouwindthecord,asthesoleplate
could still be hot.
4 Put the iron on the base. Lock the iron to its base. (Fig. 17)
5 Let the iron cool down before you store it.
You can carry the iron and base by the iron handle. (Fig. 18)
Troubleshooting
This chapter summarises the most common problems you could
encounter with the appliance. If you are unable to solve the problem
with the information below, visit www.philips.com/support for a list of
frequently asked questions or contact the Consumer Care Centre in
your country (see the worldwide guarantee leaet for contact details).
Problem Possible cause Solution
The iron does
not produce
steam.
Cordless iron cools
down after a while. It
needs to be recharged.
Put the iron back to the
base until the light ring
turns steady blue light,
indicating that the iron is
ready for use again.
The steam control is
set to .
Set the steam control to
a steam setting (consult
Table 1 in Chapter “using
the appliance”).
The water tank is empty. Fill the water tank.

12
ENGLISH
Problem Possible cause Solution
You are using a
temperature of below
2 dots.
Consult Table 1
in Chapter “using
the appliance” for
temperature and steam
setting.
The iron leaks. Cordless iron cools
down after a while. It
needs to be recharged.
Put the iron back to its
base to heat up and dry
the soleplate.
You are using steam or
steam boost at a low
temperature.
Put the iron back to its
base to heat up and dry
the soleplate.
Consult Table 1 for use
of steam and steam
boost.
You have used the
steam boost function
too often within a very
short period.
Put the iron back to its
base to heat up and dry
the soleplate. Use the
steam boost function
less frequently.
The water tank is
overlled.
Do not ll the water
tank beyond the MAX
indication.
The door of lling
opening is not closed
properly.
Make sure that the
door of lling opening is
closed properly.
Flakes and
impurities come
out of the soleplate
during ironing.
You have not
performed Calc-Clean
function for some time.
The iron need to be
cleaned.
Use the Calc-Clean
function (see chapter
‘Cleaning and
maintenance’, section
‘Calc-Clean function’).

13
ENGLISH
Problem Possible cause Solution
When I push the
steam control to
the turbo steam
position, the
steam control
jumps back.
This is normal.
The turbo steam is
designed as this.
Keep holding the steam
control in the turbo
steam position while
using turbo steam. For
other steam settings, this
is not necessary.
Only part of
the light ring is
lighted in safety
auto-off mode.
This is normal. This
is intended to save
energy in safety auto-
off mode.
N/A
The base is not
lighted up when
I place the iron
on it.
The iron is not
connected to the base
properly.
Take out the iron and
put it back to the base
again.

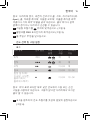
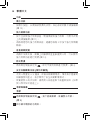
중요
제품을 사용하기 전에 중요 정보 책자 및 사용 설명서를 주의
깊게 읽으십시오. 향후 참조할 수 있도록 두 책자를 잘 보관해
두십시오.
각 부의 명칭 (그림 1)
1 스프레이 노즐
2 물 주입구 뚜껑
3 스팀량 조절기
- CALC CLEAN = 석회질 제거 기능
- = 건식 다림질
- = 최적 스팀
- = 최대 스팀
- = 터보 스팀
4 순간 스팀 버튼
5 스프레이 버튼
6 온도 조절기
7 명판
8 MAX 수위 표시선이 있는 물탱크
9 열판
10 표시등
11 받침대
12 다리미 보관용 잠금 장치
13 전원 코드
제품 사용
물탱크 채우기
참고: 이 다리미는 수돗물을 사용하도록 제작되었습니다. 사용
지역의 수돗물이 경수일 경우 석회질이 더 빨리 생성될 수
있습니다. 이럴 경우 증류수 또는 탈염수를 사용하면 제품의
수명이 연장됩니다.
14 한국어

15
한국어
참고: 다리미에 향수, 회전식 건조기의 물, 식초, 자기처리수
(
예
:
Aqua+),
풀, 석회질 제거제, 다림질 보조제, 이물질 제거용 화학
약품이나 기타 화학 약품을 넣지 마십시오. 물이 튀거나 갈색
얼룩이 생기거나 다리미가 손상될 수 있습니다.
1 스팀량 조절기를 위치에 맞추십시오. (그림 2)
2 물탱크를 MAX 표시선까지 채우십시오 (그림 3).
3 물 주입구 뚜껑을 닫으십시오.
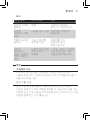
온도 선택 및 스팀 설정
표 1
섬유 종류 온도 설정 스팀
설정
순간
스팀
스프레이
기능
마직 최대
,
예 예
면직
3
,
예 예
모직
2
아니요 예
실크
1
아니요 아니요
합성 섬유(예:
아크릴, 나일론,
폴리아미드,
폴리에스테르)
1
아니요 아니요
참고: 위의 표에 표시된 대로 낮은 온도에서 스팀 또는 순간
스팀을 사용하지 마십시오. 그렇지 않으면 다리미에서 뜨거운
물이 샐 수 있습니다
.
1 표 1을 참조하여 온도 조절기를 옷감에 알맞게 설정하십시오
(그림 4).

16
한국어
2 표 1을 참조하여 설정한 온도에 알맞은 스팀 설정을
선택하십시오. (그림 5)
3 다리미를 받침대에 놓고 전원 콘센트에 연결합니다. (그림 6)
참고: 받침대가 안정적이고 평평한 곳에 놓여 있는지
확인하십시오. 받침대는 다리미판의 부드러운 부분에 놓는 것이
좋습니다.
4 다리미가 가열되고 있음을 알려주는 파란색 표시등이
깜박거리기 시작합니다. (그림 7)
5 파란색 표시등이 계속 켜져 있으면 다림질을 시작할 수
있습니다. (그림 8)
스마트 충전 받침대 작동
다리미에는 스마트 충전 받침대가 장착되어 있습니다. 표시등은
다리미의 상태를 나타내며, 우수한 주름 제거 성능을 위해 20 ~
25초 후 다리미를 충전하도록 알려줍니다. 받침대 작동에 대한
자세한 내용은 표 2를 참조하십시오.
참고: 우수한 주름 제거 성능을 위해 사용하지 않는 동안에는
항상 다리미를 받침대 위에 놓아 두십시오. 다리미를 세워 두지
마십시오.
(
그림
9)

17
한국어
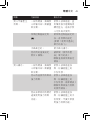
표 2
표시등 상태 다리미 상태 지침
파란색 표시등
깜박임
예열 다리미가 준비될
때까지 기다리십시오.
파란색
표시등이 켜져
있음
사용할 준비가 됨 다림질을 시작할 수
있습니다.
주황색 표시등
깜박임
지금 다리미를
충전해야 함
다리미를 다시
받침대에 놓고
충전하십시오.
파란색
표시등이
천천히 깜박임
(특정 모델만
해당)
안전한 자동 전원
차단 기능이
작동됨
“기능”란의 “안전한
자동 전원 차단 기능”
섹션을 참조하십시오.
특징
스프레이 기능
- 스프레이 버튼을 눌러 다림질할 부분을 적셔주십시오.
이렇게 하면 보다 간편하게 심하게 구겨진 주름을 제거할 수
있습니다 (그림 10).
순간 스팀 기능
- 순간 스팀 버튼을 눌렀다가 놓으면 강력한 순간 스팀이
나와서 심하게 구겨진 주름을 제거할 수 있습니다 (그림 11).
- 최적의 순간 스팀 성능을 유지하려면 5초 간격으로 순간 스팀
버튼을 눌러주는 것이 좋습니다.

18
한국어
수직 스팀
- 순간 스팀 기능 은 걸려있는 옷이나 커튼 등의 주름을 없애기
위해 다리미를 수직으로 들고 있는 상태에서 사용할 수
있습니다 (그림 12).
건식 다림질
- 스팀 없이 다림질하려면 스팀량 조절기를 위치로
맞추십시오. (그림 2)
안전한 자동 전원 차단 기능 (특정 모델만 해당)
- 다리미를 8분 동안 사용하지 않으면 다리미 전원이 자동으로
꺼집니다. 안전한 자동 전원 차단 기능이 작동한다는 것을
알리는 파란색 표시등이 천천히 깜박입니다.
- 다리미를 다시 예열하려면 다리미를 분리했다가(다리미가
받침대에 있는 경우) 다시 받침대에 놓으십시오.
세척 및 유지관리
세척
1 스팀량 조절기를 위치에 맞추고 받침대의 전원 코드를
뽑아 다리미를 식힙니다. (그림 2)
2 물탱크에 남아 있는 물을 모두 따라내십시오.
3 젖은 헝겊과 비마모성 세척액으로 열판에서 불순물을
닦으십시오.
주의: 열판을 매끄럽게 유지하려면 금속 물질에 긁히지 않도록
주의하십시오. 열판을 닦을 때는 절대 수세미나 식초 또는 기타
화학 약품을 사용하지 마십시오.
참고: 물탱크는 수돗물로 정기적으로 헹구십시오. 헹군 후에는
물탱크를 비우십시오
.

19
한국어
석회질 제거 기능
중요 사항: 제품의 수명을 늘리고 우수한 스팀 성능을
유지하려면 석회질 제거 기능을 2주일에 한 번씩 사용하십시오.
사용 지역의 물이 심한 경수일 경우(예를 들어, 다림질하는 동안
열판에서 이물질이 나오는 경우)에는 석회질 제거 기능을 더욱
자주 사용하십시오.
1 스팀량 조절기가 위치에 맞추어져 있는지 확인하십시오.
(그림 2)
2 물탱크를 MAX 표시선까지 채우십시오 (그림 3).
물 탱크에 식초 또는 다른 석회질 제거제를 넣지 마십시오.
3 온도 조절기를 MAX로 설정하십시오 (그림 13).
4 받침대를 전원에 연결하고 다리미를 받침대에 놓아
예열하십시오. (그림 6)
5 파란색 표시등이 계속 켜져 있으면 다리미를 분리하십시오.
(그림 8)
6 싱크대 위에서 다리미를 수평으로 들고, 스팀량 조절기를
석회질 제거 위치에 맞추십시오 (그림 14).
7 스팀량 조절기를 맞춘 상태로 탱크의 물이 소모될 때까지
다리미를 천천히 흔드십시오 (그림 15).
주의: 석회질이 씻겨져 나오는 동안 스팀과 끓는 물도 열판에서
새어나옵니다.
8 스팀량 조절기를 다시 위치에 맞추십시오. (그림 2)
참고: 다리미에서 나오는 물에 여전히 석회질 입자가 들어있는
경우 석회질 제거를 반복하십시오
.

20
한국어
석회질 제거 작업 후
1 다리미를 받침대에 올려 놓고 열판이 마르도록 다리미를
가열하십시오.
2 파란색 표시등이 계속 켜져 있는 상태로 바뀌면 다리미를
받침대에서 분리하십시오.
3 다리미를 천 위에 문질러서 열판에 남아 있는 물 얼룩을
제거하십시오.
보관
1 스팀량 조절기를 다시 위치에 맞추십시오. (그림 2)
2 물탱크에 남아 있는 물을 모두 따라내십시오.
3 전원 코드를 뽑아 받침대에 감아 두십시오. (그림 16)
코드를 감을 때에는 열판이 아직 뜨거울 수 있으므로 다리미를
받침대에서 분리하십시오.
4 다리미를 받침대에 올려 놓고 고정시키십시오. (그림 17)
5 보관하기 전에 다리미를 식히십시오.
다리미 손잡이를 잡고 다리미와 받침대를 옮길 수 있습니다.
(그림 18)
문제 해결
이 란은 제품을 사용하면서 가장 일반적으로 경험하는 문제와
그 해결 방법을 제시합니다. 아래 정보로 문제를 해결할 수
없는 경우 www.philips.com/support를 방문하여 자주 묻는 질문
(FAQ) 목록을 참조하거나 필립스 고객 상담실로 문의하십시오.
연락처는 제품 보증서를 참조하십시오.

21
한국어
원인 가능한 원인 해결책
다리미에서
스팀이 나오지
않습니다.
무선 다리미가
금방 식어버립니다.
재충전이
필요합니다.
파란색 표시등이 계속
켜져 있는 상태로
바뀌어 다리미를
다시 사용할 준비가
되었다는 것을 알
수 있을 때까지는
다리미를 받침대에
올려 두십시오.
스팀 조절기가
위치에 맞춰져
있습니다.
스팀 조절기를 스팀
설정에 맞추십시오
(“제품 사용”란의 표
1 참조).
물탱크가 비어
있습니다.
물탱크를 채우십시오.
점 2개 미만의
온도를 사용하고
있습니다.
온도 및 스팀 설정에
대한 자세한 내용은
“제품 사용”란의 표
1을 참조하십시오.
다리미에서
물이 새어
나옵니다.
무선 다리미가
금방 식어버립니다.
재충전이
필요합니다.
다리미가 예열되고
열판이 마르도록
다리미를 다시
받침대에 놓으십시오.

22
한국어
원인 가능한 원인 해결책
낮은 온도에서
스팀이나 순간
스팀을 사용하고
있습니다.
다리미가 예열되고
열판이 마르도록
다리미를 다시
받침대에 놓으십시오.
스팀 및 순간 스팀
사용에 대한 자세한
내용은 표 1을
참조하십시오.
순간 스팀 기능을
짧은 시간 동안 너무
자주 사용했을 수
있습니다.
다리미가 예열되고
열판이 마르도록
다리미를 다시
받침대에 놓으십시오.
순간 스팀 기능을
너무 자주 사용하지
마십시오.
물탱크에서 물이
넘쳐 흐릅니다.
물탱크는 최대 수위량
표시 MAX 이상
채우지 마십시오.
물 주입구 뚜껑이
올바르게 닫혀있지
않습니다.
물 주입구 뚜껑이
올바르게 닫혀있는지
확인하십시오.
다림질을 할
때 열판에서
이물질이나
불순물이
떨어집니다.
한동안 석회질 제거
기능을 사용하지
않았습니다. 지금
다리미를 세척해야
합니다.
석회질 제거 기능을
사용하십시오(‘청소
및 유지관리’란의
‘석회질 제거 기능’
섹션 참조).
ページが読み込まれています...
ページが読み込まれています...
ページが読み込まれています...
ページが読み込まれています...
ページが読み込まれています...
ページが読み込まれています...
ページが読み込まれています...
ページが読み込まれています...
ページが読み込まれています...
ページが読み込まれています...
ページが読み込まれています...
ページが読み込まれています...
ページが読み込まれています...
ページが読み込まれています...
ページが読み込まれています...
ページが読み込まれています...
ページが読み込まれています...
ページが読み込まれています...
ページが読み込まれています...
ページが読み込まれています...
ページが読み込まれています...
ページが読み込まれています...
-
 1
1
-
 2
2
-
 3
3
-
 4
4
-
 5
5
-
 6
6
-
 7
7
-
 8
8
-
 9
9
-
 10
10
-
 11
11
-
 12
12
-
 13
13
-
 14
14
-
 15
15
-
 16
16
-
 17
17
-
 18
18
-
 19
19
-
 20
20
-
 21
21
-
 22
22
-
 23
23
-
 24
24
-
 25
25
-
 26
26
-
 27
27
-
 28
28
-
 29
29
-
 30
30
-
 31
31
-
 32
32
-
 33
33
-
 34
34
-
 35
35
-
 36
36
-
 37
37
-
 38
38
-
 39
39
-
 40
40
-
 41
41
-
 42
42


