
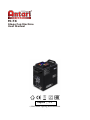
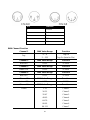
1
M-7X
Stage Fog Machine
User Manual
English ‧ 中文
© 2019 Antari Lighting and Effects Ltd.

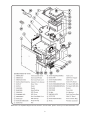
2
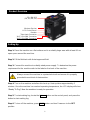
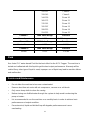
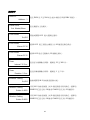
Note: This is an exploded diagram of 120V machine, For 220-240V, please contact your local Antari dealer or us.

3
User Manual
Safety Information
Please read the following safety information carefully before operating the
machine. Information includes important safety information about installation,
usage, and maintenance. Pay attention to all warning labels and instructions in
this manual and printed on the machine.
If you have questions about how to operate the machine safely, please contact your local
Antari dealer for help.
Keep this device dry.
Always connect to a grounded circuit to avoid risk of electrocution.
Before connecting the machine to power, always check the voltaged indicate on the
machine matches to your local AC voltage. Do not use the machine if AC power
voltage does not match.
Disconnect the machine from AC power before servicing and when not in use.
If the supply cord is damaged, contact your local Antari dealer for replacement.
This product is for indoor use only! Do not expose to rain or moisture. If fluid is spilled,
disconnect AC power and clean with a damp cloth. If fluid is spilled onto electronic
parts, immediately unplug the machine and contact your local Antari dealer for advice.
No user serviceable and modifiable parts inside. Never try to repair this product, an
unauthorized technician may lead the machine to damage or malfunction.
For adult use only. Children being supervised not to play with the machine. Never
leave the machine running unattended.
The machine is not to be used by persons (including children) with reduced physical,
sensory or mental capabilities, or lack of experience and knowledge.
Installed in a well ventilated area. Provide at least 50 cm space around the machine.
Never add flammable liquid of any kind to the machine.

4
Make sure there are no flammable materials close to the machine while operating.
Only use Antari fluid. Other fluid may lead to heater clog and malfunction.
If the machine fails to work, unplug the machine and stop operation immediately.
Contact your local Antari dealer for .
Before transporting the machine, make sure the fluid tank is completely drained.
Smoke fluid may present health risks if swallowed. Do not drink smoke fluid. Store it
securely. In case of eye contact or if fluid is swallowed immediately look for medical
advice.
Unpacking and Inspection
Immediately upon receiving the machine, carefully unpack the carton, check all content to
ensure that all parts are present and have been received in good condition. If any parts
appear damaged or mishandled from shipping, notify the shipper immediately and retain the
packing material for inspection.
What is included: 1 x M-7X Fogger
1 x W-2 Wireless Remote
1 x Power Cord
1 x User Manual
Product Dimension
W 193 mm
H 385.7 mm
L 345 mm

5
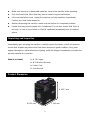
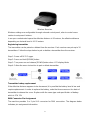
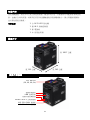
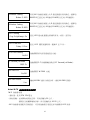
Product Overview
Setting Up
Step 1: Place the machine on a flat surface and in a suitably large area with at least 50 cm
open space around the machine.
Step 2: Fill the fluid tank with Antari approved fluid.
Step 3: Connect the machine to suitably rated power supply. To determine the power
requirement for the machine refer to the label on the back of the machine.
Always connect the machine to a protected circuit and ensure it is properly
grounded to avoid risk of electrocution.
Step 4: Turn on the machine and allow it to heat up. Heat up takes approximatley 5
mintues. Once the machine has reached operating temperature, the LCD display will show
“Ready To Fog”. Now the machine is ready for operation.
Step 5: To start making fog, locate the Volume button on the control panel, and press the
button to start making fog.
Step 6: To turn off the machine, press STOP button and turn Powercon to the OFF
position.
22 x 3W LED
(5R, 6G, 6B, 5A)
LCD Control Panel
Wireless Reciver
Breaker
Twist Lock Connector
XLR 3-Pin DMX Connector
XLR 5-Pin DMX Connector

6
Operation
Control Panel Operation
The machine can be operated with an onboard digital control interface
Button
Function
[MENU]
Scroll through setting menu
▲ [UP]/[TIMER]
Up/Activate Timer function
▼ [DOWN]/[VOLUME]
Down/Activate Volume function
[STOP]
Deactivate Timer/Volume function/Return to Standby
Control Menu
Set DMX address from 1 to 504
Set machine as Master of Slave unit
Turn built-in LED color mode On or Off
Set LED output color from macro 1 to 10
DMX512
Address: 1
Stand Alone
Set Master/Slave
Color Mode
On/Off
Color Mode
Marco:01-10
ANTARI M-7X
Ready to Fog

7
Set LED chase from 1 to 15
Set interval from 15 to 360 seconds
Set duration from 1 to 5 seconds
Turn On or Off W-2 wireless control function
Set wireless remote button function macro color 1 to 10 or chase
1 to 15 and off.
Set wireless remote button function macro color 1 to 10 or chase
1 to 15 and off.
Set wireless remote button function macro color 1 to 10 or chase
1 to 15 and off.
Set wireless remote button function macro color 1 to 10 or chase
1 to 15 and off.
Setting for LED to turn on with fog only or always on.
Set LED delay time before off from 0.3-0.5 or 0-5 seconds.
Color Mode
Chase:01-15
Timer
Interval 15 Sec
Timer
Duration 01-05 Sec
Wireless Setting
On
Wireless Setting
Button A:M01/Off
Wireless Setting
Button B:M01/Off
Wireless Setting
Button C:M01/Off
Wireless Setting
Button D:M01/Off
LED Setting
Fog Only/Always On
LED Fade Out
Delay: 0 Sec

8
Turn On/Off run last setting function
Turn On/Off 2-7 Sec Jet Mode; Jet output can be set between 2-
7 seconds
Turn On/Off W-DMX
Rest W-DMX connection
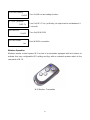
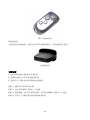
Wireless Operation
Wireless remote control system W-2 consist of a transmitter equipped with four buttons to
activate four user configurable LED setting and fog; with an onboard receiver attach to the
rear panel of M-7X.
W-2 Wireless Transmitter
Run Last Setting
On/Off
W-DMX512
On/Off
W-DMX Reset
Yes
2-7 Sec Jet Mode
Off/2-7s

9
Wireless Receiver
Wireless settings are configurable through onboard control panel, refer to control menu
section to setup each buttons.
In an open unobstructed space the effective distance is 50 meters, the effective distance
depending on obstacle level is 10-25 meters.
Registering transmitter
The transmitter can be paired or deleted from the receiver. Each receiver can pair up to 10
transmitters. Follow the steps below to pair or delete a transmitter from the receiver.
Step 1: Power off M-7X Fogger
Step 2: Press and hold [DOWN] button
Step 3: Turn power on and release [DOWN] button when LCD display blinks
Step 4: Follow the menu instruction to pair or delete transmitter
Transmitter battery replacement
If the effective distance appears to be decreased, it is possible the battery level is low and
require replacement. In order to replace the battery, undo the three screws on the back of
transmitter to release the cover. Replace with the same type and specification of battery
which is 27A 12V
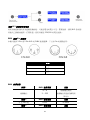
DMX Connector Pin Assignment
The machine provides 3 or 5 pin XLR connector for DMX connection. The diagram below
indicates pin assignment information.

10
Pin
Function
1
Ground
2
Data-
3
Data+
4
N/A
5
N/A
DMX Channel Function
Channel 1
DMX Value Range
Function
Fog
0 – 4
5 – 255
Fog Off
Fog On (lasts for 20s)
Channel 2
DMX Value Range
Function
Red LED
0-255
0-100%
Channel 3
DMX Value Range
Function
Green LED
0-255
0-100%
Channel 4
DMX Value Range
Function
Blue LED
0-255
0-100%
Channel 5
DMX Value Range
Function
Amber LED
0-255
0-100%
Channel 6
DMX Value Range
Function
Chase
1-15
16-31
32-47
48-63
64-79
80-95
96-111
Chase 1
Chase 2
Chase 3
Chase 4
Chase 5
Chase 6
Chase 7

11
112-127
128-143
144-159
160-175
176-191
192-207
208-223
224-255
Chase 8
Chase 9
Chase 10
Chase 11
Chase 12
Chase 13
Chase 14
Chase 15
Channel 7
DMX Value Range
Function
Chase Speed
0-255
0-255 step per min
Channel 8
DMX Value Range
Function
Master Dimmer
0-255
0-100%
Channel 9
DMX Value Range
Function
Strobe
0-255
1-20 Hz
Fluid
Use Antari FLC water-based Fluid for the best effect for the M-7X Fogger. The machine is
tested and calibrated with this liquid to get the best output performance. Warranty will be
voided if any other type of liquid is used, improper use of liquid may lead to machine failure
and malfunction.
Service and Maintenance
․ Do not allow the machine to become contaminated.
․ Remove dust from air vents with air compressor, vacuum or a soft brush.
․ Only use a damp cloth to clean the casing.
․ Before storing run distilled water through the system to help avoid condensing the
pump or heater.
․ It is recommended to run the machine on a monthly basis in order to achieve best
performance and output condition.
․ Excessive dust, liquid and dirt built up will degrade performance and cause
overheating.

12
Breaker Reset
Disconnect AC power before reset breaker. Only replace fuse with same type
and rating.
Step 1: Disconnect AC power
Step 2: Flip breaker to ON position
Step 3: Turn on machine to test
Breaker
100V = 16A 250V
120V = 15A 250V
240V = 9A 250V
Technical Specifications
- Input voltage
- Rated power
- Light source
- Warm-up time
- Fluid consumption
- Fluid tank capacity
- Compatible fluid
- Ambient temp. range
- Output
- Control
- DMX channels
- Connection
- Optional accessories
- Dimension
- Weight
US model:AC 100-120V, 50 / 60Hz 13A
EU model:AC 220-240V, 50 / 60Hz 6.5A
1516W
22 x 3W LED (5 Red, 6 Green, 6 Blue, 5 Amber)
7 minutes (approx.)
200 ml/min
2.4L (0.63gal)
Antari FLC Super Light Fog Fluid
0°C - 40 °C (32 °F-104 °F)
10 meters height
DMX512, Timer, Manual, Wireless, Master/Slave
Wireless DMX (Optional)
9 channels
Twist Lock Connector (Power)
XLR 3-pin and 5-pin (DMX)
WTR-90 Wireless DMX
L344 W193 H381 mm (L13.54 W7.60 H15 inch)
14 kg (30.8 lbs)

13
使 用 說 明 書
使用說明及安全注意事項
在使用機器以前,請仔細閱讀以下說明,此份說明書包含了如何在安全的情況下
安裝並使用機器,且會說明機器上所有標示的標籤所代表的意義。
如果您有任何使用上的問題,請聯繫當地的 Antari 經銷商尋求清楚的說明與協助。
․ 保持機器的乾燥。
․ 請配合接地型插座,以避免觸電的危險。
․ 使用機器前,請確定使用場所的 AC 電源規格,與機器電壓規格是否相符。
․ 拔開機器和 AC 電源插座時,請確認機器已關機不在使用的狀態下。
․ 本產品僅限室內使用,請勿將機器暴露在雨中或潮濕的環境,如果有液體(煙霧水)翻倒
或溢出,請勿連結機器與 AC 電源,用乾布擦拭乾淨,如果任何液體進入機器電子零
件,請立即拔除插頭,並連繫當地的 Antari 經銷商。
․ 本機器不含任何用戶拆解和自行維修或修改的零件在內,請勿嘗試自行維修或改裝機
器,未經授權的技術人員,可能導致機器故障或永久損壞。
․ 機器限成人操作,請勿在無人值守時讓機器運作。
․ 在通風良好的地方安裝使用機器,機器周邊至少應保留 50 公分的空間。
․ 請勿添加任何易燃物品進入機器。
․ 操作機器時請確認周邊沒有任何易燃的材料。
․ 為確保機器的使用壽命,請使用 Antari FLC 氣柱機專用煙霧水,添加其他液體可能會導
致電熱管阻塞和機器的故障。
․ 如果機器出現故障,請拔下機器插頭,立即停止工作。並請連繫您當地的 Antari 經銷
商。
․ 運送機器以前,請確認機器的油箱已完全清空。.
․ 煙霧水不能食用,吞食煙霧水可能導致損壞健康的風險,請將煙霧水存放在室內安全的
地方。如果碰觸到眼睛或誤吞食,請立即尋求醫生的協助。

14
包裝內容
在收到機器後,請立即小心地打開包裝紙箱,檢查所有內容,以確保所有零配件都有齊全收
到,並處於良好的狀態。如果有任何部件因運輸過程出現損壞或缺少,請立即連絡經銷商,
並以原包裝退回檢查。
內容包括: 1 台 M-7X LED 氣柱機
1 個 W-2 無線控制器
1 條 電源線
1 本 使用說明書
機器尺寸
機器外觀概述
22 x 3W LED
(5R, 6G, 6B, 5A)
Neutrik TRUE 1 主電源連接
LCD 控制面板
無線訊號接收
器
XLR 3-Pin DMX 連接座
XLR 5-Pin DMX 連接座
復歸式電流斷路器
寬 193 公釐
高 385.7 公釐
長 345 公釐

15
設定安裝
步驟
1: 將機器平放於平坦的表面,機器周圍至少應保留 50 公分的空間。
步驟
2: 將 FLC 氣柱機專用煙霧水注入機器所附的油桶,並注意不要坳折到油管。
步驟
3: 將機器連接電源。連接之前,請確認機器背後技術標籤上所標示要求功率,是否與
電源相符。
請務必將機器連結到有保護的電路,並確保有正確地接地,以避免觸電的危險。
步驟
4: 啟動機器電源,使機器開始加溫。溫機到工作溫度大約需時 5 分鐘。一旦機器達到
工作溫度,LCD 控制面板會顯示“Ready To Fog”。表示機器已經準備好並進行操作。
步驟
5: 欲開始輸出煙霧,將機器正面控制面板上的 Volume 按下開始煙霧輸出。
步驟
6: 需關閉本機時, 按下 STOP 並將 Powercon 電源接頭轉至 OFF 的位置。
操作
控制面板操作
使用機器所搭載的數位控制面板進行操作。
按鈕
功能
[MENU]
瀏覽所有設定清單
▲ [UP]/[TIMER]
增加數值/啟動 定時模式
▼ [DOWN]/[VOLUME]
減少數值/啟動 輸出量模式
[STOP]
取消 定時/輸出量模式 返回待機畫面
ANTARI M-7X
Ready to Fog

16
控制清單
設定 DMX 從 1 至 504 的位址(本機佔用 9 個 DMX 頻道) 。
設定機器為主從模式。
開啟或關閉 LED 燈內置顏色選項。
選擇 LED 燈已預設在機器上的 10 種固定顏色模式。
選擇 LED 燈自走變換的 15 種顏色模式。
設定每次煙霧輸出間隔,範圍是 15 至 360 秒。
設定持續煙霧輸出時間,範圍是 1 至 5 秒。
啟動或關閉 W-2 無線遙控控制功能。
利用 W-2 無線控制器上的 A 鍵記錄最常用的顏色,選擇自
MARCO(已設定)的 10 種或 CHASE(自走)的 15 種選項。
利用 W-2 無線控制器上的 B 鍵記錄最常用的顏色,選擇自
MARCO(已設定)的 10 種或 CHASE(自走)的 15 種選項。
DMX512
Address: 1
Stand Alone
Set Master/Slave
Color Mode
On/Off
Color Mode
Marco:01-10
Color Mode
Chase:01-15
Timer
Interval 15 Sec
Timer
Duration 5 Sec
Wireless Setting
On/Off
Wireless Setting
Button A:M01
Wireless Setting
Button B:M01

17
利用 W-2 無線控制器上的 C 鍵記錄最常用的顏色,選擇自
MARCO(已設定)的 10 種或 CHASE(自走)的 15 種選項。
利用 W-2 無線控制器上的 D 鍵記錄最常用的顏色,選擇自
MARCO(已設定)的 10 種或 CHASE(自走)的 15 種選項。
設定 LED 燈功能僅僅在噴煙時有效,或者一直有效。
設定 LED 關閉延遲時間,範圍 0 至 5 秒。
啟動/關閉前次使用最後設定功能。
啟動/關閉 2-7 秒煙霧輸出模式(2-7 Second Jet Mode)。
啟動/關閉 W-DMX 功能
離線 W-DMX 連結 (換控台時,重抓 W-DMX 訊號)
Antari M-7X
無線控制器使用說明
*W-2 無線發射器
- 發射器:使用 27A 12V 電池
- 接收距離:在無障物的開放空間,有效距離為 50 公尺。
實際狀況根據障礙物多寡,保守距離約為 10-25 公尺。
- W-2 無線發射器配有四個按鈕,可用來啟動使用者設定好的煙霧與 LED 效果。
Wireless Setting
Button C:M01
Wireless Setting
Button D:M01
LED Setting
Fog Only/Always On
LED Fade Out
Delay: 0 Sec
Run Last Setting
On/Off
W-DMX512
On/Off
W-DMX Reset
Yes
2 Second Jet Mode
Off/2-7s

18
W-2
無線發射器
*無線接收器
- 接收器在經過測試後,會固定在 M-7X 的機器後板上,請勿嘗試將它拔除。
無線接收器
*
設定功能
1. 接收器能與發射器對頻及取消對頻
2. 每個接收器可以與 10 組發射器對頻
3. 請按照以下步驟來取消與對頻無線發射器
步驟 1: 關閉 M-7X LED 氣柱機
步驟 2: 按住 [DOWN / 箭頭向下] 按鍵
步驟 3: 啟動機器,當 LCD 螢幕亮起時,放開 [DOWN / 箭頭向下] 按鍵
步驟 4: 按照以下步驟來取消與對頻無線發射器

19
更換
W-2
無線發射器電池
如果無線控制器的有效控制距離縮短,可能是電池的電力不足,需要更換。請將 W-2 發射器
背後的三個螺絲旋開,打開背蓋,使用同樣是 27A/12V 的電池更換。
DMX
連接
Pin
點說明
本機可提供 3 Pin 或 5 Pin XLR 的 DMX 連接選擇。下方為 Pin 的接點說明:
Pin
功能
1
接地
2
數據-
3
數據+
DMX
通道功能
通道 1
DMX 數值範圍
功能
煙霧輸出
0 – 4
5 – 255
煙霧輸出關閉
煙霧輸出開啟(持續時間
20 秒)
通道 2
DMX 數值範圍
功能
紅色 LED 燈
0-255
0-100%
通道 3
DMX 數值範圍
功能

20
綠色 LED 燈
0-255
0-100%
通道 4
DMX 數值範圍
功能
藍色 LED 燈
0-255
0-100%
通道 5
DMX 數值範圍
功能
琥珀色 LED 燈
0-255
0-100%
通道 6
DMX 數值範圍
功能
Chase / 自走
1-15
16-31
32-47
48-63
64-79
80-95
96-111
112-127
128-143
144-159
160-175
176-191
192-207
208-223
224-255
Chase 1
Chase 2
Chase 3
Chase 4
Chase 5
Chase 6
Chase 7
Chase 8
Chase 9
Chase 10
Chase 11
Chase 12
Chase 13
Chase 14
Chase 15
通道 7
DMX 數值範圍
功能
Chase Speed/自走速度
0-255
每分鐘 0-255 階
通道 8
DMX 數值範圍
功能
Master Dimmer
主控調光器
0-255
0-100%
通道 9
DMX 數值範圍
功能
Strobe/閃動速度
0-255
1-20 Hz
ページが読み込まれています...
ページが読み込まれています...
ページが読み込まれています...
ページが読み込まれています...
-
 1
1
-
 2
2
-
 3
3
-
 4
4
-
 5
5
-
 6
6
-
 7
7
-
 8
8
-
 9
9
-
 10
10
-
 11
11
-
 12
12
-
 13
13
-
 14
14
-
 15
15
-
 16
16
-
 17
17
-
 18
18
-
 19
19
-
 20
20
-
 21
21
-
 22
22
-
 23
23
-
 24
24


