
CDE7500
Commercial Display
使用手册
机型: VS16869

感谢您选择 ViewSonic
作为超过 30 年的世界领先显示解决方案提供商,ViewSonic 一直专注
在技术发展、创新和简单化方面超过世界的预期。在ViewSonic,我们
相信我们的产品能够对世界产生积极的影响,并且我们深信您选择的
ViewSonic 产品会很好地为您服务。
再次感谢选择 ViewSonic!

i
电磁相容信息
注意:此部分介绍了所有连接要求以及相关规定说明。相应应用的确定应参照铭牌标
签和装置上的相关标记。
FCC 符合性声明
本设备符合 FCC 规则第 15 部分的规定。
其操作遵循下面两个条件:(1)本设备不会导致有害干扰;(2)本设备必须承受任
何接收到的干扰,包括可能导致异常操作的干扰。
依 FCC 规则的第十五章,本设备经测试,符合 B 级数码设备的限制标准。这些限制
标准用于确认电气设备不会对居室中安装的其它设备产生有害干扰。本设备会产生、
使用和发射射频能量,因此若没有依照指示安装及使用,可能会对无线电通讯产生有
害的干扰。然而,这并不保证该设备在特定安装过程中不会发生这种干扰。如果该设
备对收音机或电视机产生有害的干扰(这可以通过设备的开、关来判定),用户可以
尝试以下的方法消除干扰:
• 重新调整或放置接收天线。
• 增加设备与无线接收设备之间的间距。
• 将该设备连接到与无线设备不同的另一插座上。
• 洽询销售商或具有无线电/电视经验的技术人员请求帮助。
警告:请注意,若未经符合性负责方的明确许可而进行任何变更或修改,可能会导致
您失去操作本设备的资格。
加拿大工业部声明
CAN ICES-3 (B)/NMB-3(B)
针对欧盟国家的 CE 符合性
此设备符合电磁兼容指令2014/30/EU和低电压指令2014/35/EU的要求。
以下信息仅适用于欧盟(EU)成员国:
右侧所示的符号符合《处理废弃电子产品(WEEE)指令2012/19/EU》之规
定。
凡标有此符号的产品不得作为城市废品加以处理,而必须按照当地有关法律
利用贵国或贵地区的废品回收及收集系统而加以处理。

ii
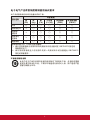
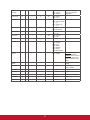
电子电气产品有害物质限制使用标识要求
本产品有害物质的名称及含量标识如下表:
部件名称
有害物质
铅
(Pb)
汞
(Hg)
镉
(Cd)
六价铬
(Cr (VI))
多溴联苯
(PBB)
多溴联苯醚
(PBDE)
外壳 ○ ○ ○ ○ ○ ○
电路板组件 × ○ × ○ ○ ○
电源线 /
适配器
× ○ ○ ○ ○ ○
外部信号
连接线
× ○ ○ ○ ○ ○
液晶面板 × ○ × ○ ○ ○
本表格依据 SJ/T 11364 的规定编制。
○: 表示该有害物质在该部件所有均质材料中的含量均在 GB/T26572 规定的
限量要求以下。
×: 表示该有害物质至少在该部件的某一均质材料中的含量超出 GB/T26572
规定的限量要求。
环保使用期限说明
此电子电气产品在说明书所述的使用条件下使用本产品,含有的有害物
质或元素不致发生外泄,不致对环境造成污染或对人身、财产造成严重
损害的期限为10年。

iii
注意事项与警告
1. 在使用设备之前,仔细阅读这些指导说明。
• 妥善保管这些指导说明。
• 注意所有警告并遵照所有指示。
• 使用显示器时,请保持离屏幕约 40-50 公分的距离。
• 在移动时务必小心搬动显示器。
• 切勿拆下后盖。显示器内有高压零件。如果您触碰这些零件,可能会受到严重伤
害。
• 请勿在靠近水的地方使用本设备。警告: 为减低火灾或电击的危险,请勿将此产品暴
露在雨或潮湿的环境中。
• 避免将显示器直接暴露在阳光或其它热源中。调整显示器方向,使其偏离光照以
减少眩光。
• 仅用柔软的干布擦干净。如果还不干净,请参照"如何清洁显示器"中更进一步的提
示。
• 不要触摸屏幕。否则皮肤上带来的油脂很难清除。
• 切勿摩擦显示器面板或者在面板上按压,否则可能对屏幕造成无法修复的损坏。
• 切勿堵住任何的通风孔,按照厂商的提示进行安装。
• 请勿在靠近,如散热器、热记录器、火炉或其他任何能够产生热量的仪器(如扩
音器)的地方安装本设备。
• 请将显示器放置在通风良好的地方。请勿将任何物品放在显示器上,否则会阻碍
散热。
• 请勿将任何重物放置到显示器、视频信号线或电源线上。
• 如果出现冒烟、异常噪音或异味,请立即关闭显示器并电话通知经销商或
ViewSonic。继续使用显示器是不安全的。
• 请特别注意机器的接地状况。普通插头有两个金属脚,其中的一片比另外一片
宽。接地型插头有两片金属片用于导电,另外一个接地的专用引脚。机器接地良
好,将为您提供安全保障。如果插头不能插入电源插座,请找电工来替换旧的插
座。
• 保护电源线的插头、插座及其他与设备连接部位,免受行人践踏或物品挤压。务
必将电源插座靠近设备,这样方便使用。
• 仅使用制造商所指定之装置/附件。
• 只能使用由制造商指定或与本设备一起出售之推车、座架、三脚架、
托架、或桌子。在移动设备与推车的整体组合时,务必十分小心,避
免在翻倒时受伤。
• 长期不使用时,请将电源插头拔出。
• 当机器受损,如电源线或者插头损坏、被液体溅到或物体落到机器上、机器被雨
淋或者受潮、不能正常工作或者掉到地上,需要请专业人员来进行检修。

iv
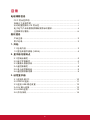
目录
电磁相容信息
FCC 符合性声明 .................................................................................. i
加拿大工业部声明 ................................................................................ i
针对欧盟国家的 CE 符合性 ................................................................. i
电子电气产品有害物质限制使用标识要求 ............................................ ii
注意事项与警告 ..................................................................................iii
版权信息
产品注册 ............................................................................................. 2
用户纪录 ............................................................................................. 2
1. 开始
1.1 包装内容 ....................................................................................... 3
1.2 壁挂架套件规格 (VESA) ............................................................... 4
2. 显示器功能特点
2.1 控制台概览 ................................................................................... 5
2.2 端子界面概览 ................................................................................ 6
2.3 摄像头面板安装 ............................................................................ 7
2.4 遥控器概览 ................................................................................... 8
2.5 装入遥控器电池 ............................................................................ 9
2.6 遥控接收器范围 ............................................................................ 9
3. 设定显示器
3.1 连接外部 PC ............................................................................... 10
3.2 RS232 连接 ................................................................................ 11
3.3 连接 USB 周边装置 .................................................................... 12
3.4 AV 输入连接 ............................................................................... 13
3.5 HDMI 连接 .................................................................................. 13
3.6 开机/待机 .................................................................................... 14

v
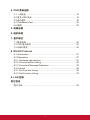
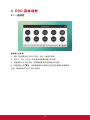
4. OSD 菜单操作
4.1 一般设定 ..................................................................................... 15
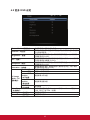
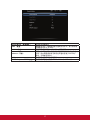
4.2 更多 OSD 设定 ........................................................................... 16
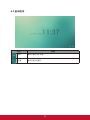
4.3 启动程序 ..................................................................................... 19
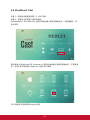
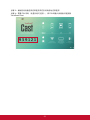
4.4 ViewBoard Cast .......................................................................... 20
4.5 缩放 ............................................................................................ 22
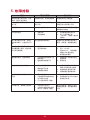
5. 故障排除
6. 维护保养
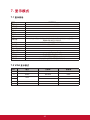
7. 显示模式
7.1 整体规格 ..................................................................................... 25
7.2 VGA 显示模式 ............................................................................ 25
7.2 HDMI 模式 .................................................................................. 26
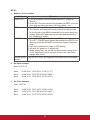
8. RS-232 Protocol
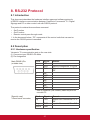
8.1 Introduction ................................................................................. 27
8.2 Description ................................................................................. 27
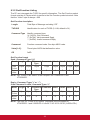
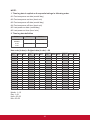
8.2.1 Hardware specification ............................................................ 27
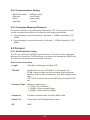
8.2.2 Communication Setting ........................................................... 28
8.2.3 Command Message Reference ............................................... 28
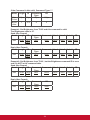
8.3 Protocol ...................................................................................... 28
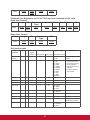
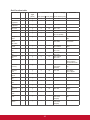
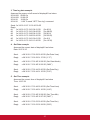
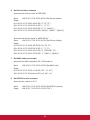
8.3.1 Set-Function Listing ................................................................. 28
8.3.2 Get-Function Listing ................................................................ 33
9. LAN 控制
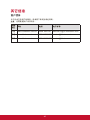
其它信息
客户支持 ........................................................................................... 40

1
版权信息
版权所有© ViewSonic Corporation, 2017。保留所有权利。
Macintosh 与 Power Macintosh 是苹果公司的注册商标。
Microsoft 、Windows 和 Windows 标志是 Microsoft Corporation 在美国与其他国家的
注册商标。
ViewSonic 与三只鸟标志是 ViewSonic Corporation 的注册商标。
VESA是视讯电子标准协会的注册商标。DPMS、DisplayPort 和 DDC是 VESA的商
标。
是 SRS Labs, Inc. 的注册商标。
Premium Sound technology is incorporated under license from SRS Labs, Inc.
ENERGY STAR® 美国环保局 (EPA) 的注册商标。
身为 ENERGY STAR® 的伙伴,ViewSonic Corporation 保证本产品完全符合
ENERGY STAR
®
的能源效率规定。
免责声明:ViewSonic 公司不对本文档中的技术、编辑错误或遗漏负责;亦不对因提
供本数据,或因本产品之性能或使用所造成意外或衍生的损坏负责。
为了持续产品改良的利益,ViewSonic 公司保留在没有通知的情况下变更此产品规格
的权利。本文件中信息如有修改,恕不另行通知。
未经 ViewSonic Corporation 事先书面同意,任何人均不得为任何目的,以任何方式
复制、翻版或传送此文件。

2
产品注册
为满足您未来的产品需求,并立即收到额外的产品信息,请造访所在地区的
ViewSonic 网站并注册您的产品。
注册产品能为您未来的客服需求做好准备。 请打印本使用指南,并于「妥善保存此记
录」区域中填入数据。 显示器的序号位于显示器的背面。如需详细信息,请参阅本指
南的「客户支持」章节。
用户纪录
产品名称:
机型:
文件编号:
序号:
购买日期:
CDE7500
ViewSonic Commercial Display
VS16869
CDE7500_UG_SCH Rev. 1B 05-16-17
_______________________________________
_______________________________________
需在产品寿命结束时正确弃置产品
ViewSonic 尊重环境并致力于以保护环境的态度工作与生活。感谢您为更聪明、 更绿
色的计算机运算尽一份心力。请上 ViewSonic 网站了解更多信息。
美国和加拿大: http://www.viewsonic.com/company/green/recycle-program/
欧洲: http://www.viewsoniceurope.com/uk/support/recycling-information/
台湾: http://recycle.epa.gov.tw/recycle/index2.aspx

3
1. 开始
恭喜您购买 ViewSonic
®
显示器。
重要! 请储存好原包装盒和所有包装材料以便将来运输需要。
注意: 本指南中的「Windows」一词代表 Microsoft Windows 操作系统。
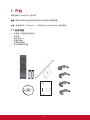
1.1 包装内容
• 电源线(视国家/地区而定)
• 遥控器
• AAA电池 x 2
• 摄像头面板
• 快速启动指南
• 用户指南精灵光盘
CDE7500
Commercial Display
Quick Start Guide
1
Package Contents
● Power cable
● Remote control
● AAA battery x 2
● Camera plate
● User manual CD wizard
● Quick Start Guide
Wall Mount Kit Specifications (VESA)
2
inch VESA Spec. (A x B) Standard Screw (C x D) Quantity
IFP7500/IFP7500-CN/
CDE7500
600 x 400 mm M8 x 20 mm 4
PN-WMK-047
A
B
PC System Requirements
Intel
®
Pentium
®
processor or
greater running on
Windows
®
Platform,
4x CD-ROM drive; 64MB or
more of available RAM;
800x600 color display.
Mac
®
System Requirements
Mac OS version 10.x;
4x CD-ROM drive; 64MB or
more of available RAM;
800x600 color display.
Copyright © 2016, ViewSonic Corporation. All rights reserved. All trademarks,
registered or otherwise, are the property of their respective companies. Disclaimer:
ViewSonic Corporation shall not be liable for technical or editorial reeors or omissions
contained herein; nor for incidental or consequential damages resulting from
furnishing this meterial, or the performance or use of this product. In the interest of
continuing product improvement, ViewSonic Corporation reserves the right to
change product specifications without notice. Information in this CD-ROM may
change without notice, No part of this CD-ROM may be copied, reproduced, or
transmitted by any means, for any purpose without prior written permission of
ViewSonic Corporation.
07/13/16 • CDE61T_UG • Made in China
CDE5561T/CDE6561T/CDE7061T/IFP7561T/
CDE8452T/SWB5561B/SWB6561B/
SWB7061B/SWB8452B
User Guide and
Installation Software

4
1.2 壁挂架套件规格 (VESA)
请按照壁挂架安装指南中的说明,安装壁挂架或活动式安装架。如需安装至其他建筑
材料上,请联系最近的经销商。
CDE7500
Commercial Display
Quick Start Guide
1
Package Contents
● Power cable
● Remote control
● AAA battery x 2
● Camera plate
● User manual CD wizard
● Quick Start Guide
Wall Mount Kit Specifications (VESA)
2
inch VESA Spec. (A x B) Standard Screw (C x D) Quantity
IFP7500/IFP7500-CN/
CDE7500
600 x 400 mm M8 x 20 mm 4
PN-WMK-047
A
B
PC System Requirements
Intel
®
Pentium
®
processor or
greater running on
Windows
®
Platform,
4x CD-ROM drive; 64MB or
more of available RAM;
800x600 color display.
Mac
®
System Requirements
Mac OS version 10.x;
4x CD-ROM drive; 64MB or
more of available RAM;
800x600 color display.
Copyright © 2016, ViewSonic Corporation. All rights reserved. All trademarks,
registered or otherwise, are the property of their respective companies. Disclaimer:
ViewSonic Corporation shall not be liable for technical or editorial reeors or omissions
contained herein; nor for incidental or consequential damages resulting from
furnishing this meterial, or the performance or use of this product. In the interest of
continuing product improvement, ViewSonic Corporation reserves the right to
change product specifications without notice. Information in this CD-ROM may
change without notice, No part of this CD-ROM may be copied, reproduced, or
transmitted by any means, for any purpose without prior written permission of
ViewSonic Corporation.
07/13/16 • CDE61T_UG • Made in China
CDE5561T/CDE6561T/CDE7061T/IFP7561T/
CDE8452T/SWB5561B/SWB6561B/
SWB7061B/SWB8452B
User Guide and
Installation Software
英吋 VESA 规格 (A x B) 标准螺丝 (C x D) 数量
CDE7500 600 x 400 mm M8 x 20 mm 4
• ViewSonic 提供如上表所示标准规格的壁挂架套件。
• 若要找到最适合的安装架,请浏览 www.viewsonic.com.cn 或致电客服
• 在购买我们的壁挂架套件时,将会提供详细的安装手册和组装需要的所有零组
件。
• 请勿使用非标准规格的螺丝,以免造成液晶显示器内部的损坏。

5
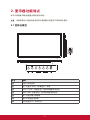
2. 显示器功能特点
本节介绍智能白板/液晶显示器的各项功能。
注意:本使用册中介绍的功能或应用可能因购买的型号不同而有所差异。
2.1 控制台概览
Item Description
Power port
HDMI ports
LAN port
VGA port
VGA-AUDIO port
AV-OUT port
YPbPr/YCbCr IN ports
AV-IN port
① ② ③ ④ ⑤
⑥
⑦
Item Description
AUDIO IN port
USB ports
Headset port
SPDIF port
RS232 IN/OUT port
3
Control Panel Overview
4
Terminal Interface Overview
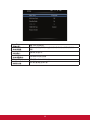
Item Description
Power On/Standby button
Press to show the OSD (On Screen Display) menu
VOL + / VOL - button; select or adjust menu options
BRI+ / BRI- button; select or adjust menu options
Press to show Input Source menu
Indicator and remote receiver
AC Power On/Off switch
① ② ③ ② ④ ⑤
⑥ ⑦ ⑧ ⑨ ⑩ ⑫⑪ ⑬
Optional Slot in PC
Optional Slot in PC
项目 说明
开机 / 待机按钮
按下可显示 OSD(屏幕显示)菜单
VOL + / VOL - 音量按钮;选择或调整菜单选项
BRI+ / BRI- 亮度按钮;选择或调整菜单选项
按下可显示输入源菜单
指示灯和遥控接收器
交流电源打开 / 关闭开关

6
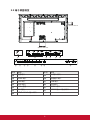
2.2 端子界面概览
Item Description
Power port
HDMI ports
LAN port
VGA port
VGA-AUDIO port
AV-OUT port
YPbPr/YCbCr IN ports
AV-IN port
① ② ③ ④ ⑤
⑥
⑦
Item Description
AUDIO IN port
USB ports
Headset port
SPDIF port
RS232 IN/OUT port
3
Control Panel Overview
4
Terminal Interface Overview
Item Description
Power On/Standby button
Press to show the OSD (On Screen Display) menu
VOL + / VOL - button; select or adjust menu options
BRI+ / BRI- button; select or adjust menu options
Press to show Input Source menu
Indicator and remote receiver
AC Power On/Off switch
① ② ③ ② ④ ⑤
⑥ ⑦ ⑧ ⑨ ⑩ ⑫⑪ ⑬
Optional Slot in PC
Optional Slot in PC
项目 说明 项目 说明
电源端口 AV 输入端口
HDMI 端口 音频输入端口
LAN 端口 USB 端口
VGA 端口 耳机端口
VGA- 音量 SPDIF 端口
AV- 输出 RS232 输入 / 输出端口
YPbPr/YCbCr 输入端口

7
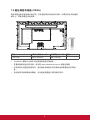
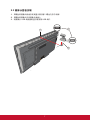
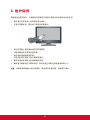
2.3 摄像头面板安装
1. 用螺丝将摄像头面板安装到显示器顶部(螺丝孔位于后侧)
2. 用螺丝将摄像头安装摄像头面板上
3. 将摄像头 USB 线插接到显示器顶部 USB 端口
②
①
③

8
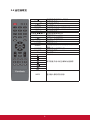
2.4 遥控器概览
在正常操作和待机之间切换
SNAP
取得屏幕截图
启用或禁用声音
数字键 输入数字
FREEZE 启用或禁用系统中的定格功能
HOME
显示主启动程序
MENU 显示屏幕菜单
光标键
选择或调整菜单选项
VOL +/- 调整音量
返回上一个设置界面
INPUT 显示输入源选择菜单
BRI(亮度)+/- 调整亮度
S.MODE 选择声音模式
SLEEP
设置达到指定时间时的睡眠时间和自动
待机
ASPECT 切换屏幕上的屏幕比例
P.MODE 选择画面模式
OK 确认操作
用于智能平台中的多媒体功能操作
INFO 显示输入源的内容信息

9
2.5 装入遥控器电池
按照以下说明将随附的电池装入遥控器。建议不要混用不同类型的电池。
1. 取下遥控器后面的电池盖。
2. 装入两颗「AAA」电池,确保电池上的「+」符号对应电池槽上的「+」。
3. 将电池盖对准遥控器上的插槽,并扣入卡锁装回电池盖。
警告:如果换错电池,可能会发生爆炸。
注意:务必以环保的方式处理废电池。请联系当地政府部门,详细了解如何安全处理
废电池。
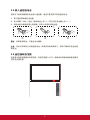
2.6 遥控接收器范围
这里显示遥控接收器的有效范围。有效范围是 8 公尺。请确保没有物体阻碍遥控器讯
号传送至接收器。
Quick Start Guide
CDE7500_QSG Rev.1a 02-14-17
Copyright © 2017 ViewSonic Corporation. All rights reserved.
3
中国
http://www.viewsonic.com.cn
电话:4008 988 588
香港
http://www.hk.viewsonic.com
電話:852 3102 2900
澳門
http://www.hk.viewsonic.com
電話:853 2870 0303
台灣
http://www.viewsonic.com.tw
電話:0800 061 198
한국
http://ap.viewsonic.com/kr/
Phone: 080 333 2131
Singapore/Malaysia/Thailand
http://www.viewsonic.com.sg
Phone: 65 6461 6044
India
http://www.in.viewsonic.com
Phone: 1800-419-0959
United States
http://www.viewsonic.com
Phone: 1-800-688-6688 (Toll-Free)
1-424-233-2530 (Toll)
Canada
http://www.viewsonic.com
Phone: 1-866-463-4775 (Toll-Free)
1-424-233-2533 (Toll)
Europe
http://www.viewsoniceurope.com
Australia/New Zealand
http://www.viewsonic.com.au
Phone: 1800 880 818 (AUS)
0800 008 822 (NZ)
South Africa
http://ap.viewsonic.com/za/
Latin America (Chile)
http://www.viewsonic.com/la/
Phone: 1230-020-7975
Latin America (Mexico)
http://www.viewsonic.com/la/
Phone: 001-8882328722
Latin America (Peru)
http://www.viewsonic.com/la/
Phone: 0800-54565
Latin America (Argentina)
http://www.viewsonic.com/la/
Phone: 0800-4441185
Puerto Rico & Virgin Islands
http://www.viewsonic.com
Phone: 1-800-688-6688 (English)
1-866-379-1304 (Español)
CDE7500
Commercial Display
This CD is
compatible with
Windows
®
and
Mac OS 10.x
Copyright © 2016, ViewSonic Corporation. All rights reserved. All trademarks,
registered or otherwise, are the property of their respective companies. Disclaimer:
ViewSonic Corporation shall not be liable for technical or editorial reeors or omissions
contained herein; nor for incidental or consequential damages resulting from
furnishing this meterial, or the performance or use of this product. In the interest of
continuing product improvement, ViewSonic Corporation reserves the right to
change product specifications without notice. Information in this CD-ROM may
change without notice, No part of this CD-ROM may be copied, reproduced, or
transmitted by any means, for any purpose without prior written permission of
ViewSonic Corporation.
MM/DD/YY • XXXXXX_UG • Made in China
User Guide and
Installation Software

10
3. 设定显示器
警告:为了您和装置的安全,在外部装置准备好之前,请勿连接电源。
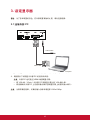
3.1 连接外部 PC
5
Remote Control Overview
Connection Diagram
Schematic diagram for connecting the product to a PC.
(Note: Disconnect the power plug before installing or removing the product!)
6
7
Switch between normal operation and standby
SNAP Take screenshot
Enable or disable sound
NUMERIC KEYS Input any number
FERRZE Enable or disable freeze function in the system
HOME
Display the main launcher
MENU Display the on screen menu
CURSOR KEYS
Select or adjust menu options
VOL +/- Adjust volume
Return to the previous setting interface
INPUT Display the input source selection menu
BRI +/- Adjust brightness
S.MODE Select the sound mode
SLEEP
Set the sleep time and auto standby when the
specified time is reached
ASPECT Switch the aspect ratio on the screen
P.MODE Select the picture mode
Confirm the operationOK
For operation of multimedia functions in
the intelligent platform
INFO
Display the content information of the
input source
Serial port cable
PC
RS232
Audio Cable
VGA Cable
Computer
RS232 Connections
When you use an RS232 serial port cable to connect your display to an external
computer, certain functions can be controlled by the PC, including power on/off, volume
adjustment and more.
Remark: The connection diagram in this Manual is only for reference when
connecting a PC box, which is subject to actual operations.
1. 请按照以下说明显示外部 PC 的视讯和声音。
注意:外部 PC 也可透过 HDMI 线接到显示器。
• 将 VGA 线(15-pin)从外部 PC 接到显示器上的 VGA 输入埠。
• 将音源线从外部 PC 上的音讯输出端口接到显示器上的音讯输入端口。
注意:为取得最佳效果,计算机输入分辨率请选择 1920x1080p。

11
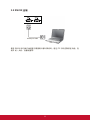
3.2 RS232 连接
5
Remote Control Overview
Connection Diagram
Schematic diagram for connecting the product to a PC.
(Note: Disconnect the power plug before installing or removing the product!)
6
7
Remark: The connection diagram in this Manual is only for reference when
connecting a PC box, which is subject to actual operations.
RS232 Connections
When you use an RS232 serial port cable to connect your display to an external
computer, certain functions can be controlled by the PC, including power on/off,
volume adjustment and more.
Switch between normal operation and standby
SNAP
Take screenshot
Enable or disable sound
NUMERIC KEYS Input any number
FERRZE Enable or disable freeze function in the system
HOME
Display the main launcher
MENU Display the on screen menu
CURSOR KEYS
Select or adjust menu options
VOL +/- Adjust volume
Return to the previous setting interface
INPUT Display the input source selection menu
BRI +/- Adjust brightness
S.MODE Select the sound mode
SLEEP
Set the sleep time and auto standby when the
specified time is reached
ASPECT Switch the aspect ratio on the screen
P.MODE Select the picture mode
Confirm the operationOK
For operation of multimedia functions in
the intelligent platform
INFO
Display the content information of the
input source
Serial port cable
PC
RS232
Audio Cable
VGA Cable
Computer
USB Cable
使用 RS232 串行端口线将显示器接到外部计算机时,透过 PC 可以控制某些功能,包
括开 机/关机、音量调整等。

12
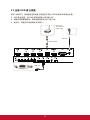
3.3 连接 USB 周边装置
如同一般的PC,使用智能型白板能方便连接不同的 USB 设备和其他周边装置。
1. USB 周边装置:将 USB 装置线接到 USB 输入埠。
2. 网络和调制解调器线:将路由器线接到 LAN 输入埠。
3. 麦克风:将麦克风线接到麦克风端口。
HDMI cable
Media player
8
9
Connecting USB Peripherals
1. USB Peripherals: Plug the USB device cable into the USB IN port.
2. Networking and modem cables: Plug the router cable into the LAN IN port.
3. Microphone: Plug the microphone cable into the MIC port.
HDMI Connections
More OSD settings
10
General Setting
11
Input sources, Volume,
and Brightness"
Picture Mode Sound Mode
Setting
Router and
other network
signal output
Audio line
USB line
USB Equipment
Network cable
Network cable
Item Description
vBoard Click to launch annotation app
vShare Click to show wireless screen sharing app
Browser Click to launch web browser
APPs Click to pop up app list.
Settings Click to show settings page.

13
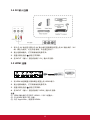
3.4 AV 输入连接
1. 将 3 色 AV 线从显示器上的 AV 输入端口接到周边装置上的 AV 输出端口(AV
线:黄色为视讯,红色为右音频,白色是左音讯)。
2. 插上电源线插头,打开后面板的电源开关。
3. 按显示器右边的 按钮打开屏幕。
4. 按 INPUT(输入)按钮切换到「AV」输入讯号源。
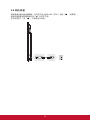
3.5 HDMI 连接
HDMI cable
Media player
8
9
Connecting USB Peripherals
1. USB Peripherals: Plug the USB device cable into the USB IN port.
2. Networking and modem cables: Plug the router cable into the LAN IN port.
3. Microphone: Plug the microphone cable into the MIC port.
HDMI Connections
More OSD settings
10
General Setting
11
Input sources, Volume,
and Brightness"
Picture Mode Sound Mode
Setting
Router and
other network
signal output
Audio line
USB line
USB Equipment
Network cable
Network cable
Item Description
vBoard Click to launch annotation app
vShare Click to show wireless screen sharing app
Browser Click to launch web browser
APPs Click to pop up app list.
Settings Click to show settings page.
1. 将 HDMI 线接到显示器和周边装置上的 HDMI 端口。
2. 插上电源线插头,打开后面板的电源开关。
3. 按显示器右边的 按钮打开屏幕。
4. 按 INPUT(输入)按钮切换到「HDMI」输入讯号源。
注意:
(1). HDMI 输出端口仅可用于 HDMI1、2 和 3 的输入。
(2). 仅 HDMI4 具有 CEC 功能。
(3). 对于 Apple Mac,请使用 HDMI4。
ページが読み込まれています...
ページが読み込まれています...
ページが読み込まれています...
ページが読み込まれています...
ページが読み込まれています...
ページが読み込まれています...
ページが読み込まれています...
ページが読み込まれています...
ページが読み込まれています...
ページが読み込まれています...
ページが読み込まれています...
ページが読み込まれています...
ページが読み込まれています...
ページが読み込まれています...
ページが読み込まれています...
ページが読み込まれています...
ページが読み込まれています...
ページが読み込まれています...
ページが読み込まれています...
ページが読み込まれています...
ページが読み込まれています...
ページが読み込まれています...
ページが読み込まれています...
ページが読み込まれています...
ページが読み込まれています...
ページが読み込まれています...
ページが読み込まれています...
ページが読み込まれています...
ページが読み込まれています...
ページが読み込まれています...
-
 1
1
-
 2
2
-
 3
3
-
 4
4
-
 5
5
-
 6
6
-
 7
7
-
 8
8
-
 9
9
-
 10
10
-
 11
11
-
 12
12
-
 13
13
-
 14
14
-
 15
15
-
 16
16
-
 17
17
-
 18
18
-
 19
19
-
 20
20
-
 21
21
-
 22
22
-
 23
23
-
 24
24
-
 25
25
-
 26
26
-
 27
27
-
 28
28
-
 29
29
-
 30
30
-
 31
31
-
 32
32
-
 33
33
-
 34
34
-
 35
35
-
 36
36
-
 37
37
-
 38
38
-
 39
39
-
 40
40
-
 41
41
-
 42
42
-
 43
43
-
 44
44
-
 45
45
-
 46
46
-
 47
47
-
 48
48
-
 49
49
-
 50
50


