
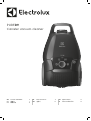
PURED9
Canister vacuum cleaner
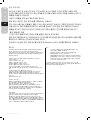
GB INSTRUCTION BOOK 4
CS 说明书 7
CT 說明手冊 10
ID BUKU PETUNJUK
13
KO 설명서 16
TH
19
VI SÁCH HƯỚNG DẪN 22

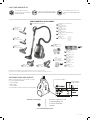
1 32 4
2www.electrolux.com

13 14
17
16 18
5 876
9
1211
2625
19 20 22
21
15
10
23
24
3www.electrolux.com

ENGLISH
Thank you for choosing Electrolux PURED9 vacuum cleaner. Always
use original accessories and spare parts to get the best results. This
product is designed with the environment in mind. All plastic parts
are marked for recycling purposes.
BEFORE STARTING
• Read this manual carefully.
• Check that all parts described are included.
• Pay special attention to the safety precautions!
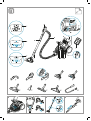
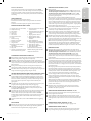
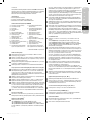
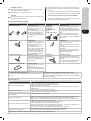
DESCRIPTION OF PURED9 VACUUM CLEANER
A. Display (see versions later)
B. Exhaust lter lid
C. Exhaust lter
D. Parking slots
E. Power cord
F. Motor lter
G. Motor lter holder
H. S-bag®
I. S-bag® holder
J. Dust compartment cover
K. AeroPro 3in1 tool
L. AeroPro hose
M. AeroPro handle (see versions
later)
N. AeroPro telescopic tube
O. Parking clip
P. Display for models with rotary
knob manual control*
Q. Display for models with remote
control*
R. Display for models with remote
control and AUTO function*
S. AeroPro Classic handle*
T. AeroPro Ergo handle*
U. AeroPro Remote Control
handle*
V. FlowMotion nozzle*
W. FlowMotion LED (high) nozzle
(with front lights)*
X. AeroPro Turbo nozzle*
Y. AeroPro Mini Turbo nozzle*
Z. ParkettoPro nozzle*
AA. AeroPro FlexProPlus nozzle*
AB. AeroPro Long crevice nozzle*
* Certain models only
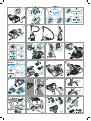
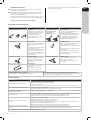
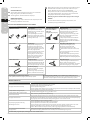
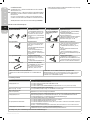
HOW TO USE THE VACUUM CLEANER
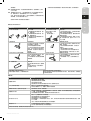
1 Open the dust compartment cover by pulling the S-BAG button.
Check that the dust bag (s-bag) is in place.
2 Insert the hose into the cleaner (to remove it, press the lock buttons
and pull). Insert the hose into the hose handle until the lock button
clicks (to release it, press the lock button
and pull).
3 Attach the telescopic tube to the nozzle. Attach the telescopic tube to
the hose handle (to remove it, press the lock button and pull).
4 Adjust the telescopic tube by holding the lock with one hand and
pulling the handle with the other hand.
START/STOP THE VACUUM CLEANER AND ADJUST SUCTION POWER
5 Pull out the power cord and plug it into the mains. Press the ON/
OFF button to turn the cleaner on/o. Indicators light up, MIN/MAX
indicator lights up from left to right and back (auto function models).*
Models with remote control can also be operated by the ON/OFF
button on the handle.*
6 Adjust suction power (manual control models): Turn the rotary knob
on the cleaner or use the air valve on the handle.*
7 Adjust suction power (remote control models): Press +/- button on the
handle. MIN/MAX and symbols indicators on display will show level of
power.*
8 Adjust suction power (remote control models with AUTO): The cleaner
starts in AUTO mode (automatic power regulation). AUTO indicator is
illuminated on the display and MIN/MAX indicator pulses. To regulate
power manually press +/- button on handle. Press AUTO button to
return to auto-function.*
9 After cleaning, push the REWIND button to rewind the cable.
PARKING POSITIONS
10 Use parking position on the side (A) or underneath (C) to carry and
store the cleaner, or at the back when you want to pause cleaning.
REPLACING THE DUSTBAG, SBAG®
11 Replace the s-bag when
- P* Models with rotary knob: S-BAG indicator lights up in red
- Q* Models with remote control: S-BAG symbol lights up red.
- R* Models with remote control and AUTO: S-BAG indicator lights
up in red (green light: bag is OK, yellow light: soon time to replace
bag).
NB: Always change the s-bag when S-BAG indicator is illuminated or
has red light even if the s-bag is not full (it may be blocked) and after
using carpet cleaning powder. For best possible performance, use the
Ultra Long Performance bag which is especially developed for your
cleaner. Other synthetic s-bags can also be used. Do not use paper
dust bags! www.s-bag.com
12 Pull the S-BAG button to open the dust compartment. The handle of
the s-bag holder goes up. Pull the handle to remove the s-bag with
holder. Do not press the release button.
13 Hold the s-bag with holder over a dust bin. Press the button to release
the s-bag. Insert a new s-bag to the holder by inserting the cardboard/
plastic at the back of the holder.
14 Insert the s-bag with holder by pushing it straight down in its tracks.
Make sure the s-bag is not stuck under the holder. Close the lid. If the
s-bag is not properly placed or is missing, the lid will not close.
NB: When you start the cleaner after s-bag replacement, It takes 10
seconds before the S-BAG indicator turns o (P* Models with rotary
knob and Q* Models with remote control) or turns green (R* Models
with remote control and AUTO).
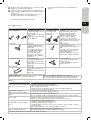
REPLACING THE FILTERS
15 Replace/clean** the lter when (**washable lter only)
- P* Models with rotary knob: you have changed the s-bag 5 times
- Q* Models with remote control: FILTER symbol lights up in red
- R* Models with remote control and AUTO: lter indicator lights
up in red. Green light indicates that the lter is ok. It lights up briey
when you start the vacuum cleaner.
16 Pull the FILTER button to open the lter lid. Use original s-lters.
Remove the lter and check the reference on the frame to dene type.
Replace with a new lter or clean it**. Rinse the inside (dirty side) in
lukewarm tap water. Tap the lter frame to remove the water. Repeat
the process four times. (*
*washable lter only)
NB: Do not use cleaning agents. Avoid touching the lter surface.
Let the lter dry completely (min. 24 h in room temperature) before
putting back ! Change the washable lter at least once a year or when
it is very dirty or damaged. Do not remove the L-shaped foam under
the lter.
17 After replacing the lter, close the lter lid until it is clicked back into
place. If the lter lid comes o, position the hinges at the bottom and
push the lter lid until it is clicked back into place.
NB: When you start the cleaner after lter replacement, It takes 10
seconds before the FILTER indicator turns green (models with remote
control and AUTO function) or turns o (remote control models).*
18 Replace the motor lter when dirty or after every 5th s-bag. Push the
lter holder down and pull it out. Exchange the lter and close the lid.
VACUUMING WITH THE UNIVERSAL NOZZLE V*, W*
19 Change nozzle setting with the pedal. Icon illustrates recommended
oor type.
20 FlowMotion LED (high) nozzle*: Move the nozzle forward. The front
light turns on automatically after a few seconds. When the nozzle is
not used, the light turns o automatically after a few seconds.
CLEANING THE UNIVERSAL NOZZLE V*, W**
21 Disconnect the nozzle from the tube. Clean with the hose handle.
CLEANING THE TURBO NOZZLE X*
22 Disconnect the nozzle from the tube and remove entangled threads
etc by snipping them away with scissors. Use the hose handle to clean
the nozzle. *
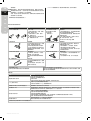
3IN1 ACCESSORY TOOL
23 Pull the textile tab to take out 3in1 tool. The tool has 3functions, see
pictures on next page.
24 After usage, put it back in its place.
4
www.electrolux.com
GB
CS
CT
ID
KO
TH
VI

Electrolux reserves the right to change products, information and
specications without notice.
CHANGING THE BATTERIES*
25 Nozzle with front lights*: Change batteries when front lights start
blinking fast. Use 2 AA batteries.
26 Handle with remote control*: Change battery when light indicator
turns red or is not responding when pressing any button.
Use only
batteries type LITHIUM CR1632.
NB: Remove the batteries from the product before scrapping. Follow
your country’s rules for collection of batteries and electrical products.
Enjoy a great cleaning experience with PURED9!
TIPS ON HOW TO GET THE BEST RESULTS
NOZZLE/ACCESSORY USE FOR: NOZZLE/ACCESSORY USE FOR:
K. 3in1 accessory tool*
3 tools in 1:
1. Dusting tool for hard surfaces
(bookshelves, skirting boards etc).
2. Upholstery tool for textiles
(curtains, upholstery etc).
3. Crevice tool for narrow spaces
(behind radiators etc).
V. FlowMotion nozzle*
W. FlowMotion LED
(high) nozzle
(with front lights)*
Universal nozzle:
- For all oor types, best dust pick up on
both carpets and hard oors.
- Change nozzle setting with the pedal.
Icon will show recommended oor type.
- Front light helps to detect dust and
dirt in dark spaces (under furniture etc).
FlowMotion LED (high) nozzle only
1 2 3
X. Turbo nozzle* Carpet nozzle:
- Brushes and vacuums at the same
time (best pick up of hair, bres
etc).
- Brush roller is driven by the airow
of the vacuum cleaner.
- Not suitable for carpets with very
deep piles and long fringes, anti-
slip carpets like door mats or water
resistant carpets. Use universal
nozzle instead.
Y. Mini Turbo nozzle* Upholstery nozzle:
- Brushes and vacuums at the same time
(best pick up of hair, bres etc).
- For textile furniture, car seats, mattresses
etc.
- Brush roller is driven by the airow of the
vacuum cleaner.
- Not suitable for carpets with very deep
pile and long fringes as it can get stuck in
the rotating brush roll.
Z. ParkettoPro nozzle* Hard oor nozzle:
- For gentle cleaning of hard oor
(parquet, wooden oor, tiles etc).
- Best dust pick up on hard oor
with crevices.
AA. FlexProPlus nozzle* Hardoor nozzle:
- For reach under/between furniture,
corners and other obstacles.
- Can easily turn 180 degrees to access
narrow spaces.
AB. Long crevice nozzle* Extra long tool:
- For areas hard to reach (top of
shelves etc).
- For narrow spaces (behind
radiators, under car seats etc).
Models with manual power regulation
– follow graphics on cleaner for optimal performance.
Models with AUTO-function automatically adjust the suction power
in order to give an optimal cleaning performance and comfort on every surface.
For manual regulation, follow graphics for optimal performance.
TROUBLESHOOTING
PROBLEM SOLUTION
The vacuum cleaner does not start
• Check that the cable is connected to the mains.
• Check that the plug and cable are not damaged.
• Check for a blown fuse.
• Check if the battery indicator lamp in the remote control handle responds (certain models only).
The s-bag® indicator light is illuminated
• Check if the s-bag® is full or blocked.
• If you have already changed the s-bag®, change the motor lter.
The lter indicator light is illuminated
(only at specic models)
Change, or wash (if washable), the exhaust lter.
The cleaner stops
The cleaner might be overheated: disconnect it from the mains; check if the nozzle, tube, hose or lters
are blocked. Let the cleaner cool down for 30 minutes before plugging it in again.
If the cleaner still does not work, contact an authorized Electrolux service centre.
Reduction of suction capacity versus
normal
• Check if the s-bag is full or blocked.
• Check if the motor lter is clogged and needs changing.
• Check if nozzle is blocked and needs to be cleared.
• Check if hose is blocked by squeezing it gently. However, be careful in case the obstruction has been
caused by glass or needles caught inside the hose.
Note: The warranty does not cover any damage to the hose caused by cleaning it.
Water has been sucked into the vacuum
cleaner
It will be necessary to replace the motor at an authorized Electrolux service centre.
Damage to the motor caused by the penetration of water is not covered by the warranty.
For any further problems, contact an authorized Electrolux service centre.
5
www.electrolux.com
GB
CS
ID
KO
VI
TH
CT

SAFETY PRECAUTIONS
This appliance is not intended for use by persons (including children) with reduced physical,
sensory or mental capabilities, or lack of experience and knowledge, unless they have been given
supervision or instruction concerning use of the appliance by a person responsible for their safety.
Children should be supervised to ensure that they do not play with the appliance.
Cleaning and maintenance should not be undertaken by children without supervision.
WARNING: Turbo nozzles* have a rotating brush where parts can get entrapped. Please use them
with caution and only on intended surfaces. Please turn the vacuum cleaner o before removing
entrapped parts or cleaning the brush.
Batteries must be removed from the remote control in the handle* / LED lighted nozzle* before
scraping the product**.
*Certain models only.
**Information on how to remove the battery in the fold-out part section 25 and 26.
Always disconnect the plug from the mains before cleaning or maintaining the appliance or when
removing the battery. The battery is to be disposed of safely.
If the cord is damaged, it must be replaced only by an authorized Electrolux service centre in order to
avoid a hazard.
PURED9 should only be used indoors for normal vacuuming and in a domestic environment. Make sure the vacuum cleaner is stored in a dry place.
All service or repairs must be carried out by an authorized Electrolux
service centre.
Packaging material, e.g. plastic bags should not be accessible to children
to avoid suocation.
Never use the vacuum cleaner:
In wet areas.
Close to ammable gases, etc.
When the product shows visible signs of damage.
On sharp objects or uids.
When the oor nozzle shows visible signs of a damages.
On hot or cold cinders, lighted cigarette butts, etc.
On ne dust, for instance plaster, concrete, our, hot or cold ashes.
Do not leave the vacuum cleaner in direct sunlight.
Avoid exposing the vacuum cleaner to strong heat or freezing
temperatures.
Never use the vacuum cleaner without its lters.
Do not try to touch the brush roll while the cleaner is switched on and the
brush roll is turning.
When the wheels are blocked.
Power cord precautions
Check the plug and cord regularly. Never use the vacuum cleaner if the
plug or cord is damaged.
Damage to the vacuum cleaner’s cord is not covered by the warranty.
Never pull or lift the vacuum cleaner by the cord.
Using the vacuum cleaner in the above circumstances may cause serious
personal injury or damage to the product. Such injury or damage is not
covered by the warranty or by Electrolux.
SERVICING AND WARRANTY
All service or repairs must be carried out by an authorized Electrolux
service centre.
Damage to the vacuum cleaner’s cord is not covered by the warranty.
Damage to the motor caused by; vacuuming liquid, immersing appliance
in liquid or using appliance with a damaged hose and nozzle is not
covered by the warranty.
Always use original s-bag dust bags suitable for this particular vacuum
cleaner, see section 11. Damages caused to the cleaner by incorrect use of
none-original dust bags is not covered by the warranty.
DISPOSAL
This symbol on the product indicates that this product contains
a battery which shall not be disposed with normal household
waste.
This symbol on the product or on its packaging indicates that
the product may not be treated as household waste.
To recycle your product, please take it to an ocial collection
point or to an Electrolux service center that can remove and
recycle the battery and electrical parts in a safe and professional
way. Follow your country’s rules for the separate collection of
electrical products and rechargeable batteries.
Hereby, Electrolux Home Care and SDA, declares that the Vacuum Cleaner
with radio equipment type HER2 and HER3 is in compliance with Directive
2014/53/EU.
6
www.electrolux.com
GB
CS
CT
ID
KO
TH
VI

GB
CS
CT
ID
KO
VI
7
www.electrolux.com
TH
简体中文
非常感谢您选用Electrolux PURED9真空吸尘器。为保证理想使用效
果,请始终使用原装配件和备件。本产品设计以环保为本。所有塑料
部件均有回收标志。
使用前指南
•• 仔细阅读本手册。
•• 检查是否包括所有描述的部件。
•• 应特别注意安全预防措施!
PURED9真空吸尘器说明
A. 显示屏(参见后面的版本)
B. 出风口滤网盖
C. 出风口滤网
D. 收纳卡槽
E. 电源线
F. 电机滤网
G. 电机滤网架
H. S-bag®
I. S-bag®支架
J. 集尘仓盖
K. AeroPro三合一工具
L. AeroPro软管
M. AeroPro手柄(参见后面的•
版本)
N. AeroPro伸缩管
O. 收纳夹
P. 旋钮手动控制型号的专用•
显示屏*
Q. 遥控型号专用显示屏*
R. 具有遥控和自动功能的型号的
专用显示屏*
S. AeroPro Classic手柄*
T. AeroPro Ergo手柄*
U. AeroPro遥控手柄*
V. FlowMotion吸嘴*
W. FlowMotion LED (high)吸嘴(
带有前灯)*
X. AeroPro 涡轮吸嘴*
Y. AeroPro微型涡轮吸嘴*
Z. ParkettoPro吸嘴*
AA. AeroPro FlexProPlus吸嘴*
AB. AeroPro长缝隙吸嘴*
* 仅限特定型号
如何使用真空吸尘器
1 拉动S-BAG按钮打开集尘仓盖。检查集尘袋•(s-bag)•是否安装到位。
2 将软管插入吸尘器(要拔下,请按下锁定按钮并拉动软管)。将软
管插入软管手柄直到锁定按钮发出咔嗒声(要拔下,请按下锁定按
钮并拉动软管•)。
3 将伸缩管与吸嘴连接。将伸缩管连接到软管手柄(要拔下,请按下
锁定按钮并拉动软管)。
4 用一只手按住锁定按钮,另一只手拉动手柄,即可调节伸缩管。
启动/停止真空吸尘器及调节吸力•
5 拉出电源线,把它插到电源上。按下ON/OFF按钮以打开/关闭吸
尘器。指示灯亮起,MIN/MAX指示灯从左到右然后从右到左亮起
(自动功能型号)。*遥控型号也可通过手柄上的ON/OFF按钮操
作。*
6 调节吸力(手动控制型号):旋转吸尘器上的旋钮,或使用手柄上
的空气阀。*•
7 调节吸力(遥控型号):按手柄上的+/-按钮。显示屏上的MIN/
MAX和标志指示灯将显示功率水平。*•
8 调节吸力(带有自动功能的遥控型号):吸尘器以AUTO模式启动•
(自动功率调节)。显示屏显示AUTO指示灯,MIN/MAX指示灯闪
烁。要手动调节功率,请按手柄上的+/-按钮。按AUTO键返回自动
功能。*
9 清洁后,按下收线按钮,将电源线卷起。
收纳位置•
10 将吸嘴插入侧面•(A)•或底部•(C)•的收纳位置来携带和存放吸尘器。•
清洁时如需暂停片刻,可使用后侧•(B)•的收纳位置。
更换集尘袋SBAG®
11 请在下列情况更换s-bag
- P*•旋钮型号:S-BAG 指示灯亮起红灯•
- Q*•遥控型号:S-BAG标志变为红色。
- R*•遥控和自动型号:S-BAG指示灯亮起红灯(绿灯:尘袋良好,
黄灯:即将需要更换尘袋)。
注意:如果S-BAG 指示灯亮起或尽管s-bag未满但是红灯亮起(可能
被堵塞),以及使用地毯去污粉后,请务必更换s-bag。要获得理想
性能,请使用超长性能尘袋,它是专为您的吸尘器开发的。也可以
使用其他的合成s-bag。请勿使用集尘纸袋!www.s-bag.com
12 拉动S-BAG按钮打开集尘仓。s-bag支架的手柄将向上移动。拉动手
柄取下s-bag及支架。不要按下释放按钮。
13 将s-bag及支架举在垃圾桶上方。按下按钮释放s-bag。将硬板或塑
料插入支架后面即可将新的s-bag插入支架。
14 将s-bag与支架一起沿导槽向下直推即可将其插入。确保s-bag没有
卡在支架下面。盖上盖子。如果s-bag安放位置错误或丢失,盖子
将无法关闭。
• 注意:如果在更换s-bag后开始清洁,则S-BAG指示灯需要10秒才会•
关闭(P*•旋钮型号和Q*•遥控型号)或变绿(R*•遥控和自动型号)。
更换滤网
15 请在下列情况更换/清洁**•滤网(**仅限可清洗滤网)
-•P*•旋钮型号:已经更换s-bag 5次
-•Q*•遥控型号:滤网标志变成红色
-•R*•遥控和自动型号:滤网指示灯变为红色。绿灯表示滤网正常。
启动吸尘器时绿灯会短暂亮起。
16 拉动“FILTER”按钮打开滤网盖。使用原装滤网。拆下滤网并查看框
架上的参考信息以确定型号。换上新的滤网或清洗原滤网**。在温
水中清洗内侧(脏的一侧)。轻敲滤网框除去水分。重复进行四
次。(**仅限可清洗滤网)
注意:请勿使用清洁剂。请勿触摸滤网表面。在滤网完全干燥•
(常温下最少放置24小时)后才可以装回!一年至少更换可清洗滤
网一次,如果非常脏或发生损坏时也需更换。请勿拆除滤网下的L
型海绵。
17 更换滤网后,关闭滤网盖,直到它被按回原位并发出咔嗒声。如果
滤网盖脱落,将底部的铰链放在正确位置上,按压滤网盖,直到它
被按回原位并发出咔嗒声。
• 注意:更换滤网后启动吸尘器时,滤网指示灯需要10秒才会变成绿
色(遥控和自动型号)或熄灭(遥控型号)。*
18 如果电机滤网变脏或每更换s-bag五次后,请更换电机滤网。向下
按滤网架,将其拉出。更换滤网并合上盖子。
使用万能吸嘴(V*、W*)吸尘
19 使用踏板改变吸嘴设置。图标显示推荐的地面类型。
20 FlowMotion LED (high)吸嘴*:将吸嘴向前推。几秒钟后前灯将自动
打开。当不使用吸嘴时,前灯将在几秒钟后自动关闭。
清洁万能吸嘴(V*、W**)
21 从管子上取下吸嘴。使用软管手柄进行清洁。
清洁涡轮吸嘴•(X*)
22 从管子上取下吸嘴,然后用剪刀剪除缠结的线头等。用软管手柄清
洁吸嘴。*
三合一配套工具
23 拉动织物垂片取出三合一工具。该工具有3种功能,见下一页的•
图片。
24 使用后,请把它放回原处。

GB
CS
CT
ID
KO
TH
VI
8
www.electrolux.com
Electrolux保留更改产品、信息和规格的权利,恕不另行通知。
更换电池*
25 带前灯吸嘴*:前灯开始快速闪烁时请更换电池。使用2节AA电池。
26 具有遥控功能的手柄*:当指示灯变为红色或按任何按钮均无反应时
请更换电池。仅可使用CR1632型号锂电池。
• 注意:在丢弃之前从产品中取出电池。请遵守您所在国家/地区收集
电池和电气产品的规定。
PURED9给您带来极佳清洁体验!
如何发挥理想效果的提示
吸嘴/配件 用途: 吸嘴/配件 用途:
K.•三合一配套工具*
三合 一工 具: •
1. 适用于硬质表面(书架、踢脚
板等)的除尘工具。
2. 适用于纺织品(窗帘、装饰
等)的清洁工具。
3. 适用于狭窄空间(暖气后角落
等)的缝隙清洁工具。
V. FlowMotion吸嘴*
W. FlowMotion LED
(high)吸嘴
(带有前灯)*
通 用 吸 嘴:
-•适合所有地板类型,可以在地毯和硬地
板上获得最理想的除尘效果。
-•使用踏板改变吸嘴设置。图标将显示建
议的地板类型。
-•前灯有助于发现暗处(家具下方等位
置)的灰尘和污垢。仅限
FlowMotion•LED•(high)•吸嘴
1 2 3
X.•涡轮吸嘴* 地 毯 吸 嘴:
-•同时使用刷子和真空除尘(清除
头发、纤维等的理想工具)。
-•辊刷由真空吸尘器的气流驱动。
-•不适合长绒和长毛边地毯以及门
垫或防水地毯等防滑地毯。请使
用通用吸嘴。
Y.•微型涡轮吸嘴* 饰品吸 嘴:
-•同时使用刷子和真空除尘(清除头发、
纤维等的理想工具)。
-•适合纺织家私、汽车座椅、床垫等。
-•辊刷由真空吸尘器的气流驱动。
-•不适合长绒和长毛边地毯,因为它可能
卡在旋转的辊刷上。
Z.•ParkettoPro吸嘴* 硬地板 吸 嘴:
-•对硬地板(拼花地板、木地板、
瓷砖等)进行柔和清洁。
-•非常适合为带有缝隙的硬地板
除尘。
AA.•FlexProPlus吸嘴* 硬 地 板 吸 嘴:
-•可以清洁家具、转角和其他障碍物下方
或之间的灰尘。
-•可以轻松转动180度,伸入狭窄空间。
AB.•长缝隙吸嘴* 加 长 工具:
-•用于清洁很难够到的地方(置物
架顶部等)。
-•适合狭窄空间(暖气后面、汽车
座椅下方等区域)。
手动功率调节型号
-•按照吸尘器上的图片操作以达到理想性能。
具备自动功能的型号可以自动调节吸力,
从而在任何表面都可以提供理想的清洁性能和舒适性。要进行手动调节,请遵
循图片操作获得理想性能。
故障排除•
问题 解决方法
真空吸尘器无法启动
• 检查电缆是否已连接电源。
• 检查插头与电源线是否受损。
• 检查保险丝。
• 检查遥控手柄上的电池指示灯是否响应(只针对某些型号)。
s-bag®指示灯亮起
• 检查s-bag®是否已满或是否被阻塞。
• 如果您已经更换了s-bag®,请更换电机滤网。
滤网指示灯亮起(只适用于特定型号) 更换或清洗(如果可清洗)出风口滤网。
吸尘器停止工作
吸尘器可能过热:断开电源;检查吸嘴、管子、软管或滤网是否堵塞。让吸尘器冷却30分钟后再插入电源。
如果吸尘器仍然无法正常工作,请联系授权的Electrolux服务中心。
吸力低于正常吸力
• 检查s-bag是否已满或是否被阻塞。
• 检查电机滤网是否堵塞及需要更换。
• 检查吸嘴是否堵塞及需要清洁。
• 轻轻挤压软管,检查是否被堵塞。但是,当玻璃或针卡在软管中造成阻塞时要小心处理。
注意:清洗所引起的软管损坏不属于保修范围。
吸尘器内部进水
请务必在授权的Electrolux服务中心更换电机。
由进水引起的电机损坏不在保修范围之列。
任何其他问题,请联系Electrolux授权服务中心。

GB
CS
CT
ID
KO
VI
9
www.electrolux.com
TH
安全注意事项
对于8岁及以上的儿童和存在身体、感觉或精神障碍以及缺乏相关经验和知识的人士,在得到有关安
全使用的监督或指导并能理解相关危害的情况下,才可以使用设备。
儿童不能玩弄器具,也不能当玩具使用。
儿童不应在没有监管的情况下清洁和维护本产品。
警告:涡轮吸嘴*带有一个旋转的刷子,零件可能会卡住。请只在适合的表面小心使用这些吸嘴。请在
拆卸卡住的零件或清洗刷子之前关闭真空吸尘器。
在丢弃产品**之前,必须从手柄的遥控器*/LED照明吸嘴*上拆下电池。
*仅限特定型号。
**折叠插页剖视图25和26中包含如何移除电池的信息。
在清洁或保养设备或拆卸电池前,务必先断开电源插头。电池应安全处理。
如果电源线损坏,则必须由授权Electrolux服务中心进行替换,以免发生危险。
PURED9只能用于室内和家庭环境中的正常吸尘用途。确保真空吸尘器存
放在干燥的地方。
所有维护或修理必须由授权的 Electrolux•服务中心提供。
所有包装材料(如塑料袋)应置于儿童接触不到的地方,以防窒息。
切勿在下列情况使用真空吸尘器:
潮湿的地方。
接近易燃气体等。
产品出现明显的损坏迹象。
存在尖锐物体或液体。
地板吸嘴出现明显的损坏迹象时。
存在热或冷的灰烬、点燃的烟头等
存在细粉尘,例如石膏、水泥、面粉、热或冷的灰烬。
请勿将真空吸尘器置于阳光直射的地方。
避免将真空吸尘器暴露在强热或冰点温度中。
切勿使用没有安装滤网的真空吸尘器。
在吸尘器打开且辊刷转动时,切勿尝试触摸辊刷。
当轮子被阻塞时。
电源线的预防措施
定期检查插头和电源线。如果插头或电源线受损,切勿使用该真空吸尘
器。
真空吸尘器的电源线损坏不在保修范围之内。
切勿用电源线拉扯或抬高真空吸尘器。
在上述情况下使用吸尘器可能会导致严重的人身伤害或产品损坏。此类损
伤或损坏均不在保修范围内或由Electrolux承担责任。
服务和保修
所有维护或修理必须由授权的Electrolux服务中心提供。
真空吸尘器的电源线损坏不在保修范围之内。真空吸入液体、设备浸入液
体或设备的软管和吸嘴已损坏而引致的电机损坏不在保修范围内。
始终使用适合这一真空吸尘器的s-bag集 尘 袋 ,见 第 11节 。错 误 使 用 非 原 装
集尘袋而导致吸尘器受损不在保修范围内。
弃置
产品上的此符号表示本产品包含电池,不得与普通生活垃圾一
起处理。
产品或包装上的此符号表示该产品不能作为家庭废弃物来弃
置。
要回收您的产品,请将其送至官方收集点或Electrolux服务中
心,以便以安全和专业的方式移除和回收电池和电气部件。按照
您所在国家的规定,单独收集电气产品和可充电电池。
Electrolux Home Care and SDA特 此 声 明 ,带 有 HER2和HER3型无线电设备
的真空吸尘器符合2014/53/EU法令。

繁體中文
感謝您選用伊萊克斯 PURED9 吸塵器。為確保獲得最佳使用效果,請
一律使用原廠配件及零件。本產品以環保概念為設計理念。所有塑膠
零件均標有回收標誌。
使用前
•• 請仔細閱讀本手冊。
•• 確保所述所有零件均已包含在內。
•• 請特別注意安全預防措施!
PURED9•吸塵器說明
A. 顯示器(各型號版本請參考項
目•P、Q、R)
B. 排氣濾網蓋
C. 排氣濾網
D. 伸縮管收納槽
E. 電源線
F. 馬達濾網
G. 馬達濾網固定座
H. S-bag® 集塵袋
I. S-bag® 集塵袋固定座
J. 集塵室蓋
K. AeroPro 3 合 1 吸頭
L. AeroPro 軟管
M. AeroPro 把手(各型號版本請
參考項目S、T、U)
N. AeroPro 伸縮管
O. 收納卡榫
P. 顯示器(針對具備旋鈕手動控
制功能的型號)*
Q. 顯示器(針對具備遙控功能的
型號)*
R. 顯示器(針對具備遙控以及自
動功能的型號)*
S. AeroPro 經典把手*
T. AeroPro Ergo 人體工學把手*
U. AeroPro 遙控把手*
V. FlowMotion 吸頭*
W. FlowMotion LED (high) 吸頭(
配備前置燈)*
X. AeroPro 渦輪吸頭*
Y. AeroPro 迷你渦輪吸頭*
Z. ParkettoPro 木質地板吸頭*
AA. AeroPro FlexProPlus
超扁平地板吸頭*
AB. AeroPro 長細縫吸頭*
* 僅特定型號
吸塵器使用說明•
1
拉提 S-BAG 按扣以開啟集塵室蓋。檢查集塵袋 (s-bag) 是否安裝在
正確位置。
2
將軟管插入吸塵器中(按下兩側按鈕並拉動軟管,即可鬆開並取出
軟管)。將軟管插入軟管把手,直到鎖定按鈕發出卡嗒聲(按住鎖
定按鈕並拉動,即可將其鬆開)。
3
將伸縮管接到吸頭。將伸縮管接到軟管把手(按住鎖定按鈕並拉
動,即可將其取出)。
4
調整伸縮管,方法是一隻手按住鎖定按鈕,再用另一隻手拉動把
手。
啟動/停止吸塵器並調整吸力•
5
拉出電源線並將它連接到電源。按下機身上「ON/OFF」按鈕以啟
動/關閉吸塵器。指示燈亮起,「MIN/MAX」(最小/最大)指示燈
從左至右亮起並返回(具備自動功能的型號)。* 具備遙控功能的
吸塵器,也可以使用把手上的「ON/OFF」按鈕來操作。*
6
調整吸力(具備手動控制功能的型號):使用吸塵器上的旋鈕或把
手上的洩氣閥。*
7
調整吸力(具備遙控功能的型號):按下把手上的 +/- 按鈕。顯示
器上的「MIN/MAX」以及符號指示燈將顯示吸力等級。*
8
調整吸力(具備自動功能的遙控型號):吸塵器以「自動」•
(自動吸力調節)模式啟動。顯示器上的「AUTO」(自動)指示燈
亮起,「MIN/MAX」指示燈閃爍。如需手動調節吸力,請按下把手
上的 +/- 按鈕。按下「AUTO」按鈕可返回自動功能。*
9
吸塵之後,按下機身上的「REWIND」(回捲)按鈕回捲電源線。
收納位置•
10
使用側面 (A) 或底部 (C) 的收納卡榫,可拿取與存放吸塵器。清潔時
如需暫停片刻,請使用背面的卡榫 (B)(您便無須俯身)。
更換集塵袋•SBAG®
11
出現以下情形時請更換•s-bag•集塵袋:
- P*•配備旋鈕的型號:
S-BAG 指示燈亮起紅燈
- Q*•具備遙控功能的型號:
S-BAG 符號指示燈亮起紅燈。
- R*•具備遙控和自動功能的型號:
S-BAG 指示燈亮起紅燈(綠燈:
集塵袋正常,黃燈:即將要更換集塵袋)。
注意:S-BAG 指示燈亮起或即使 s-bag 集塵袋未滿但發出紅光時•
(可能被阻塞),以及在使用地毯清潔粉之後,均務必要更換
s-bag 集塵袋。為獲得最佳使用效能,請使用專為您的吸塵器而研
發設計的特長效集塵袋。亦可使用其他合成•s-bag•集塵袋。請勿使
用紙質集塵袋!www.s-bag.com
12
拉提 S-BAG 按扣以開啟集塵室。s-bag 集塵袋固定座的把手會上升。
拉動把手以同時取下 s-bag 集塵袋和固定座。不要按下釋放按鈕。
13
將 s-bag 集塵袋(隨固定座一起)放置於垃圾桶上方。按下釋放按
鈕以鬆開 s-bag 集塵袋。在固定座背面插入紙板,以將新 s-bag 集
塵袋插入固定座。
14
將•s-bag 集塵袋(隨固定座一起)直接向下推入其軌道,將其插入。
確保•s-bag 集塵袋未卡在固定座下方。蓋上蓋子。如果•s-bag 集塵
袋未正確放置或缺少•s-bag 集塵袋,則蓋子將無法合上。•
注意:更換 s-bag 集塵袋後再啟動吸塵器時,S-BAG 指示燈在 10 秒
後才會熄滅(P* 配備旋鈕的型號以及 Q* 具備遙控功能的型號)或
變綠(R* 具備遙控和自動功能的型號)。
更換濾網
15
出現以下情形時請更換/清潔**濾網(**僅限可洗濾網)•
- P*•配備旋鈕的型號:
已更換 s-bag 集塵袋 5 次
- Q* 具備遙控功能的型號:
「濾網」符號指示燈亮起紅燈
- R* 具備遙控和自動功能的型號:
濾網指示燈亮起紅燈。綠燈表示
濾網正常。啟動吸塵器時綠燈會短暫亮起。
16
拉提「FILTER」(濾網)按扣以開啟濾網蓋。使用原廠 s-濾網。取
下濾網並查看外框上的參考資料以確定類型。更換新濾網或清潔該
濾網**。用常溫自來水沖洗內部(髒污的一側)。輕敲濾網外框以
去除水分。重複此程序四次。(**僅限可洗濾網)
注意:請勿使用清潔劑。避免觸碰濾網表面。將濾網充分蔭乾後•
(室溫下至少24 小時),才可將其裝回!至少一年更換一次可洗濾
網或者在濾網髒污程度比較高或受損後,也應予以更換。切勿取下
濾網下的 L 型海綿。
17
更換濾網後,合上濾網蓋,直到其發出入位卡嗒聲。如果濾網蓋脫
離,則定位底部的轉軸並推動濾網蓋,直至其發出入位卡嗒聲。
注意:更換濾網後再啟動吸塵器時,「濾網」指示燈在 10 秒後才
會變綠(具備遙控和自動功能的型號)或者熄滅(具備遙控功能的
型號)。*
18
馬達濾網變髒或每更換 5 次 s-bag 集塵袋後,請更換馬達濾網。向
下推動濾網固定座並將其拉出。更換濾網並合上濾網蓋。
使用通用吸頭(V*、W*)吸塵
19
使用踏板變更吸頭設定。圖示顯示所建議的地板類型。
20
FlowMotion LED (high) 吸頭*:向前移動吸頭。數秒後,前置燈將自
動開啟。不使用吸頭時,前置燈會在數秒後自動熄滅。
清潔通用吸頭(V*、W**)
21
斷開吸頭與伸縮管的連接。使用軟管把手進行清潔。
清潔渦輪吸頭•(X*)
22
斷開吸頭與伸縮管的連接,並用剪刀將纏住的絲線等異物剪除。使
用軟管把手清潔吸頭。*
3•合•1•配件吸頭
23
拉動線緞,將•3•合•1•吸頭拉出。此工具具備•3•種功能,請參閱下頁
的圖片。
24
使用後,請將其裝回原處。
GB
CS
CT
ID
KO
TH
VI
10
www.electrolux.com

伊萊克斯保留隨時變更產品、資訊與規格之權利,恕不事先通知。
更換電池*
25
配備前置燈的吸頭*:前置燈開始快速閃爍時,請更換電池。使用
2 枚 AA 電池。
26
具備遙控功能的把手*:指示燈變紅或在按下任何按鈕後均無反應
時,請更換電池。請使用鋰電池 CR1632 這一電池類型。
注意:請先從產品中取下電池,再進行報廢處理。請遵循您所在國
家的規範,來回收電池和電子產品。
請享受•PURED9•帶來的絕佳清潔體驗!
獲致最佳清掃效果的技巧
吸頭/配件 用途: 吸頭/配件 用途:
K.•3•合•1•配件吸頭*
3 合 1 吸頭:
1. 用於硬質表面的除塵工具(書
架、壁腳板等)。
2. 用於裝飾織物的清潔工具(窗
簾、裝飾織物等)。
3. 用於狹窄空間的細縫清潔工具
(散熱器後方等)。
V. FlowMotion 吸頭*
W. FlowMotion LED
(high) 吸頭
(配備前置燈)*
通用吸頭:
- 適用於所有地板類型,可在地毯和硬質
地板上獲致最佳吸塵效果。
- 使用踏板變更吸頭設定。圖示將顯示建
議的地板類型。
- 前置燈有助於發現暗區(傢俱下方等位
置)的灰塵和污物。
僅限
FlowMotion LED
(high) 吸頭
1 2 3
X.•渦輪吸頭* 地毯用吸頭:
- 同時進行拍打和吸塵(最適宜用
於收集髮絲、纖維等)。
- 滾刷由吸塵器的氣流驅動。
- 不適用於含有長絨毛和長花邊的
地毯,以及門墊或防水地毯等的
防滑地毯。這種情況下請使用通
用吸頭。
Y. 迷你渦輪吸頭* 裝飾織物用吸頭:
- 同時進行拍打和吸塵(最適宜用於收集
髮絲、纖維等)。
- 適用於清掃傢俱裝飾織物、汽車座椅、
床墊等。
- 滾刷由吸塵器的氣流驅動。
- 不適用於含有長絨毛和長花邊的地毯,
因為滾刷旋轉時,地毯可能會卡入其中。
Z.•ParkettoPro•木質地板吸頭* 硬質地板用吸頭:
-•適用於溫和清潔硬質地板(嵌木
地板、木質地板、瓷磚等)。
-•可在硬質地板上獲得最佳的細縫
除塵效果。
AA. FlexProPlus
超扁平地板吸頭*
硬質地板用吸頭:
- 適用於清潔傢俱下方/傢俱之間的位置、
角落以及其他障礙物。
- 可輕鬆轉動 180 度,直接到達狹窄空
間。
AB.•長細縫吸頭* 超長工具:
-•適用於難以到達的區域(書架頂
部等)。
-•適用於狹窄空間(散熱器後方、
汽車座椅下方等)。
具備手動吸力調節功能的型號
-•遵循吸塵器上的圖示,以獲致最佳效能。
具備自動功能的型號可自動調整吸力,
以便在每種表面上均實現最佳清潔效能及舒適感。對於手動調節,請遵循圖
示以獲致最佳效能。
疑難排解•
問題 解決方法
吸塵器不啟動
•• 確定電源線已連接到電源。
•• 確認插頭和電源線並未損壞。
•• 檢查保險絲是否熔斷。
•• 檢查遙控把手的電池指示燈是否有回應(僅限特定型號)。
s-bag® 指示燈已亮起
•• 檢查 s-bag® 集塵袋是否已滿或阻塞。
•• 如果您已經更換 s-bag® 集塵袋,請更換馬達濾網。
濾網指示燈亮起(僅限於特定型號) •• 更換或清洗(若可洗)排氣濾網。
吸塵器停止運作
•• 吸塵器可能溫度過高:中斷與電源的連接;檢查吸頭、伸縮管、軟管或濾網是否阻塞。讓吸塵器冷卻
30 分鐘,然後再重新連接電源。
•• 如果吸塵器仍然無法運作,請聯絡伊萊克斯客戶服務中心。
吸力低於正常水平
•• 檢查 s-bag 集塵袋是否已滿或阻塞。
•• 檢查馬達濾網是否已阻塞並需要更換。
•• 檢查吸頭是否已阻塞並需要清潔。
•• 輕柔擠壓軟管,以確認其是否已阻塞。然而,如果是因為軟管內部的玻璃或針狀物造成阻塞,請務
必小心處理。
•• 注意:因清潔而導致軟管受損並未在保固範圍內。
•吸塵器吸入水
•• 必須至伊萊克斯客戶服務中心更換馬達。
•• 因水滲入造成馬達損壞並未在保固範圍內。
如有任何其他問題,請聯絡伊萊克斯客戶服務中心。
GB
CS
ID
KO
VI
11
www.electrolux.com
TH
CT

安全預防措施
本機設計不適合 8 歲以下兒童、體格、感官或精神能力不健全,或者是缺少經驗和知識的人士
使用,除非他們已透過負責他們安全的人士獲得有關使用本機的監督或說明。
請不要讓兒童把玩本機。
若無人監督,不可由兒童執行清潔與保養。
警告:渦輪吸頭*採用可能會將零件卡入其中的旋轉式毛刷。請小心使用此吸頭,而且只能用
於指定表面。在取下卡住的零件或清潔毛刷前,請先關閉吸塵器的電源。
必須先從具備遙控功能的把手*•/配備•LED•指示燈的吸頭*中取下電池,再將產品報廢**。
*僅特定型號。
**有關如何取下電池的資訊,請參閱折頁第 25 和第 26 小節。
清潔或保養本機前或者取下電池前,務必先斷開插頭與電源的連接。電池應以安全的方式棄置。
如果電源線損壞,則必須由伊萊克斯客戶服務中心予以更換,以避免發生危險。
PURED9•僅適用於室內及居家環境的一般清掃。請確保吸塵器存放在乾
爽的地方。
所有的服務或維修皆必須由伊萊克斯客戶服務中心執行。
包裝物料(例如塑膠袋)皆不應放置在兒童可接觸到的地方,以免導致窒
息。
在 以 下 情 形 中 ,請 勿 使 用 吸 塵 器:
潮濕的地方。
在易燃氣體等附近。
產品出現明顯損壞跡象時。
在尖銳的物品或液體上。
地板吸頭出現明顯損壞跡象時。
熱 或 冷 的 灰 燼 、點 燃 的 菸 頭 上 等 。
在石膏、混凝土、麵粉、熱或冷灰燼等微細粉塵上。
請勿讓吸塵器受到日光直射。
請避免吸塵器承受高熱或凍溫。
請勿在未安裝濾網的情況下使用吸塵器。
若吸塵器已啟動且滾刷正在轉動,請勿嘗試觸碰滾刷。
輪子阻塞時。
電源線預防措施
定期檢查插頭及電源線。切勿使用插頭或電源線受損的吸塵器。
吸塵器電源線的損壞不在保固範圍內。
切勿利用電源線拉扯或抬高吸塵器。
於上述情況下使用吸塵器可能導致嚴重人身傷害或產品損壞。本機的保
固或伊萊克斯公司對此等傷害或損壞不予負責。
維修與保固
所有服務或維修皆必須由伊萊克斯客戶服務中心執行。
吸塵器電源線的損壞不在保固範圍內。由於以下原因造成的馬達損壞皆不
在保固範圍內:清掃液體、將本機浸入液體中或者在軟管和吸頭
受損的情況下使用本機。
務必使用適用於本特定吸塵器的原裝 s-bag 集塵袋,具體資訊請參閱第
11 小節。因不當使用非原廠集塵袋而導致的吸塵器受損並不在保固範圍
內。
廢棄處理
產品上的• •這個標記表示產品包含電池,而電池不應隨一
般家庭垃圾棄置。
產品或其包裝上的• •這個標記表示不能將產品視為家庭垃圾
進行處理。
若要回收產品,請將其送到正式回收站點或伊萊克斯客戶服
務中心,這些地方能夠以安全、專業的方式來移除和回收電
池與電器零件。請遵循您所在國家的規範,分別回收電器產
品和可充電電池。
Electrolux Home Care 和 SDA 在此聲明,本款吸塵器(配備 HER2 和
HER3 類型無線電設備)符合指令 2014/53/EU。
客戶服務
有鑒於世界各國對綠色環保意識的重視,伊萊克斯依循
RoHS「危害性限制物質指令」誠實標示產品化學物質含量,
關於本產品的•RoHS 聲明書,請上伊萊克斯官網•-->「支援服
務」-->「RoHS 聲明書」,依產品類別及型號檢索。••
http://www.electrolux.com.tw/Support/Customer-Care/
GB
CS
CT
ID
KO
TH
VI
12
www.electrolux.com

BAHASA INDONESIA
Terima kasih telah memilih pengisap debu Electrolux PURED9.
Selalu gunakan aksesori dan suku cadang asli untuk mendapatkan
hasil terbaik. Produk ini dirancang dengan mempertimbangkan
lingkungan hidup. Semua komponen plastik ditandai untuk tujuan
daur ulang.
SEBELUM MEMULAI
• Baca buku petunjuk ini dengan saksama.
• Pastikan bahwa semua komponen yang diuraikan ada di dalam
kemasan.
• Perhatikan baik-baik langkah pencegahan untuk keselamatan.
DESKRIPSI PENGISAP DEBU PURED9
A. Tampilan (lihat versi kemudian)
B. Tutup lter buang
C. Filter buang
D. Slot parkir
E. Kabel daya
F. Filter motor
G. Penahan lter motor
H. S-bag®
I. Penahan S-bag®
J. Penutup ruang debu
K. Alat AeroPro 3in1
L. Slang AeroPro
M. Gagang AeroPro (lihat versi
kemudian)
N. Tuba teleskopik AeroPro
O. Klip parkir
P. Tampilan untuk model dengan
kontrol manual kenop putar*
Q. Tampilan untuk model dengan
remote kontrol*
R. Tampilan untuk model dengan
remote kontrol dan fungsi
AUTO*
S. Gagang AeroPro Classic*
T. Gagang AeroPro Ergo*
U. Gagang Remote Kontrol
AeroPro*
V. Nozel FlowMotion*
W. Nozel FlowMotion LED (high)
nozel (dengan lampu depan)*
X. Nozel AeroPro Turbo*
Y. Nozel AeroPro Mini Turbo*
Z. Nozel ParkettoPro*
AA. Nozel AeroPro FlexProPlus*
AB. Nozel Panjang pipih AeroPro*
*Hanya model tertentu
CARA MENGGUNAKAN PENGISAP DEBU INI
1 Buka penutup ruang debu dengan menarik tombol S-BAG. Pastikan
bahwa kantung debu (s-bag) berada di tempatnya.
2 Masukkan slang ke dalam pengisap debu (untuk melepaskannya,
tekan tombol kunci dan tarik). Masukkan slang ke dalam gagang slang
sampai tombol kunci mengeklik (untuk melepaskannya, tekan tombol
kunci
lalu tarik).
3 Pasang tuba teleskopik pada nozel. Pasang tuba teleskopik pada
gagang slang (untuk melepaskan, tekan tombol kunci lalu tarik).
4 Sesuaikan tuba teleskopik dengan cara memegang kunci dengan satu
tangan dan menarik gagang dengan tangan satunya.
HIDUPKAN/HENTIKAN PENGISAP DEBU DAN SESUAIKAN DAYA ISAPNYA
5 Tarik keluar kabel daya dan tancapkan ke stopkontak listrik. Tekan
tombol ON/OFF untuk menghidupkan/mematikan pengisap debu.
Indikator-indikator menyala, indikator MIN/MAX menyala dari kiri ke
kanan dan kembali (model fungsi otomatis).* Model dengan remote
kontrol juga dapat dioperasikan dengan tombol ON/OFF pada
gagangnya.*
6 Sesuaikan daya isap (model kontrol manual): Putar kenop putar pada
pengisap debu atau gunakan katup udara pada gagang.*
7 Sesuaikan daya isap (model remote kontrol): Tekan tombol +/-
pada gagang. MIN/MAX dan indikator simbol pada tampilan akan
memperlihatkan tingkat daya.*
8 Sesuaikan daya isap (model remote kontrol dengan AUTO): Pengisap
debu menyala dalam mode AUTO (pengaturan daya otomatis).
Indikator AUTO menyala pada tampilan dan indikator MIN/MAX
berkedip-kedip. Untuk mengatur daya secara manual, tekan tombol
+/- pada gagang. Tekan tombol AUTO untuk kembali ke fungsi
otomatis.*
9 Setelah membersihkan, tekan tombol REWIND untuk menggulung
kabel.
POSISI PARKIR
10 Gunakan posisi parkir pada sisi (A) atau di bawah (C) untuk membawa
dan menyimpan pengisap debu. Pada bagian belakang (B) ketika
Anda beristirahat (mengistirahatkan punggung Anda).
MENGGANTI KANTUNG DEBU, SBAG®
11 Ganti s-bag bila
- Model P* dengan kenop putar: Indikator S-BAG menyala merah
- Model Q* dengan remote kontrol: Simbol S-BAG menyala merah.
- Model R* dengan remote kontrol dan AUTO: Indikator S-BAG
menyala merah (lampu hijau: kantung OK, lampu kuning: sebentar
lagi kantung perlu diganti).
NB: Selalu ganti s-bag bila indikator S-BAG menyala atau
memancarkan cahaya merah meskipun s-bag belum penuh (mungkin
kantung ini tersumbat) dan setelah menggunakan bubuk pembersih
karpet. Untuk mendapatkan kinerja yang terbaik, gunakan kantung
Ultra Long Performance yang secara khusus dibuat untuk pengisap
debu Anda. S-bag sintetis lain juga dapat digunakan. Jangan gunakan
kantung debu kertas! www.s-bag.com
12 Tarik tombol S-BAG untuk membuka ruang debu. Gagang penahan
s-bag akan naik. Tarik gagang untuk melepaskan s-bag dengan
penahannya. Jangan menekan tombol pelepas.
13 Pegang s-bag dengan penahan di atas wadah pembuangan debu.
Tekan tombol untuk melepaskan s-bag. Masukkan s-bag baru ke
penahan dengan memasukkan kardus di bagian belakang penahan.
14 Masukkan s-bag dengan penahan dengan cara mendorongnya
lurus ke dalam jalurnya. Pastikan bahwa s-bag tidak macet di bawah
penahan. Pasang tutup. Jika s-bag tidak terpasang dengan benar atau
tidak ada/tidak terpasang, tutup tidak akan mau menutup.
NB: Bila Anda menjalankan pengisap debu setelah mengganti s-bag,
akan dibutuhkan 10 detik sebelum indikator S-BAG mati (Model P*
dengan kenop putar dan Model Q* dengan remote kontrol) atau
berubah menjadi hijau (Model R* dengan remote kontrol dan AUTO).
MENGGANTI FILTER
15 Ganti/bersihkan** lter ketika (**khusus lter yang dapat dicuci)
- Model P* dengan kenop putar: Anda telah mengganti s-bag 5 kali
- Model Q* dengan remote kontrol: Simbol FILTER menyala merah
- Model R* dengan remote kontrol dan AUTO: indikator lter
menyala merah. Lampu hijau menunjukkan bahwa lter dalam
keadaan baik. Lampu ini menyala sesaat ketika Anda menghidupkan
pengisap debu.
16 Tarik tombol FILTER untuk membuka tutup lter. Gunakan s-lter asli.
Lepaskan lter dan periksa referensi pada bingkai untuk menentukan
tipenya. Ganti dengan lter baru atau bersihkan**. Bilas bagian dalam
(sisi kotor) dalam air keran hangat-hangat kuku. Ketuk-ketuk bingkai
lter untuk meniriskan air. Ulangi proses ini empat kali. (*
*khusus lter
yang dapat dicuci)
NB: Jangan gunakan zat pembersih. Hindari menyentuh permukaan
lter. Biarkan lter menjadi kering sepenuhnya (min. 24 jam dalam
suhu ruangan) sebelum memasangnya! Ganti lter yang dapat dicuci
sedikitnya sekali setahun atau ketika lter sudah sangat kotor atau
rusak. Jangan melepaskan busa berbentuk L di bawah lter.
17 Setelah mengganti lter, tutupkan tutup lter sampai mengeklik
kembali di tempatnya. Jika tutup lter terlepas, posisikan engsel-
engselnya di bagian bawah dan tekan tutup lter sampai mengeklik
kembali di tempatnya.
NB: Bila Anda menjalankan pengisap debu setelah mengganti lter,
akan dibutuhkan 10 detik sebelum indikator FILTER berubah menjadi
hijau (model dengan remote kontrol dan fungsi AUTO) atau mati
(model remote kontrol).*
18 Ganti lter motor bila sudah kotor atau setiap kali setelah 5 kali
mengganti s-bag. Tekan penahan lter ke bawah dan tarik keluar.
Ganti lter dan pasang tutupnya.
MENGISAP DEBU DENGAN NOZEL UNIVERSAL V*, W*
19 Ubah pengaturan nozel dengan pedal. Ikon mengilustrasikan jenis
lantai yang direkomendasikan.
20 Nozel FlowMotion LED (high)*: Gerakkan nozel ke depan. Lampu
depan menyala secara otomatis setelah beberapa detik. Ketika nozel
tidak digunakan, lampu akan mati secara otomatis setelah beberapa
detik.
MEMBERSIHKAN NOZEL UNIVERSAL V*, W**
21 Lepaskan nozel dari tuba. Bersihkan dengan gagang nozel.
MEMBERSIHKAN NOZEL TURBO X*
22 Lepaskan nozel dari tuba dan lepaskan benang dan segala benda
yang tersangkut dengan gunting. Gunakan gagang slang untuk
GB
CS
CT
ID
KO
TH
VI
13
www.electrolux.com

membersihkan nozel. *
ALAT AKSESORI 3IN1
23 Tarik tab tekstil untuk mengeluarkan alat 3in1. Alat ini memiliki 3
fungsi; lihat gambar pada halaman berikutnya.
24 Setelah digunakan, letakkan kembali di tempatnya.
MENGGANTI BATERAI*
25 Nozel dengan lampu depan*: Ganti baterai bila lampu depan mulai
berkedip cepat. Gunakan 2 baterai AA.
KIATKIAT CARA MENDAPATKAN HASIL YANG TERBAIK
NOZEL/AKSESORI DIGUNAKAN UNTUK: NOZEL/AKSESORI DIGUNAKAN UNTUK:
K. Alat aksesori 3in1*
3 alat dalam 1:
1. Alat pembersih debu untuk
permukaan keras (rak buku, papan
dasar dinding, dll).
2. Alat pembungkus sofa untuk
tekstil (tirai, pembungkus sofa dll).
3. Alat pipih untuk ruang sempit (di
belakang radiator dll).
V. Nozel FlowMotion*
W. Nozel FlowMotion
LED (high)
(dengan lampu depan)*
Nozel Universal:
- Untuk semua jenis lantai, memastikan
pembersihan debu yang terbaik pada
lantai karpet dan lantai keras.
- Ubah pengaturan nozel dengan pedal.
Ikon akan memperlihatkan jenis lantai
yang direkomendasikan.
- Lampu depan membantu mendeteksi
debu dan kotoran di tempat gelap (di
bawah perabotan dll). Khusus FlowMotion
LED (high) nozel
1 2 3
X. Nozel Turbo* Nozel karpet:
- Menyikat dan mengisap secara
bersamaan (sangat baik untuk
membersihkan rambut, serat, dll).
- Roler sikat digerakkan oleh aliran
udara dari pengisap debu.
- Tidak sesuai untuk karpet dengan
bulu sangat dalam dan juntai
panjang, karpet anti-selip seperti
keset pintu, atau karpet tahan air.
Untuk penggunaan demikian,
gunakan nozel universal.
Y. Nozel Mini Turbo* Nozel kain pembungkus sofa:
- Menyikat dan mengisap secara
bersamaan (sangat baik untuk
membersihkan rambut, serat, dll).
- Untuk furnitur tekstil, kursi mobil, kasur,
dll.
- Roler sikat digerakkan oleh aliran udara
dari pengisap debu.
- Tidak sesuai untuk karpet dengan bulu
sangat dalam dan juntai panjang karena
dapat tersangkut pada rol sikat yang berputar.
Z. Nozel ParkettoPro* Nozel lantai keras:
- Untuk pembersihan lembut lantai
keras (parket, lantai kayu, keramik, dll).
- Membersihkan debu pada lantai
keras paling baik dengan alat pipih.
AA. Nozel FlexProPlus* Nozel lantai keras:
- Untuk menjangkau di bawah/di antara
furnitur, sudut, dan halangan lain.
- Dapat dengan mudah diputar 180 derajat
untuk akses langsung ke ruang sempit.
AB. Nozel pipih panjang* Alat ekstra panjang:
- Untuk area yang sulit dijangkau
(bagian atas rak dll).
- Untuk ruang sempit (di belakang
radiator, di bawah kursi mobil dll).
Model dengan pengaturan daya manual
– ikuti gambar pada mesin pengisap untuk kinerja optimal.
Model dengan fungsi-AUTO secara otomatis menyesuaikan daya isap
untuk memberikan kinerja pembersihan yang optimal dan kenyamanan di setiap
permukaan. Untuk pengaturan manual, ikuti gambar untuk kinerja optimal.
PEMECAHAN MASALAH
MASALAH SOLUSI
Pengisap debu tidak mau hidup
• Pastikan bahwa kabel terhubung ke jala-jala listrik.
• Pastikan bahwa steker dan kabel tidak rusak.
• Periksa apakah sekring putus.
• Periksa apakah lampu indikator baterai pada gagang remote kontrol merespons (hanya model tertentu).
Lampu indikator s-bag® menyala
• Periksa apakah s-bag® penuh atau tersumbat.
• Jika Anda sudah mengganti s-bag®, ganti lter motor.
Lampu indikator lter menyala (hanya
pada model tertentu)
Ganti, atau cuci (jika dapat dicuci), lter buang.
Pengisap debu berhenti
Pengisap debu mungkin terlalu panas: cabut stekernya dari stopkontak; periksa apakah nozel, tuba, slang,
atau lternya tersumbat. Biarkan pengisap debu mendingin selama 30 menit sebelum menancapkannya lagi.
Jika pengisap debu masih belum mau hidup, hubungi pusat servis resmi Electrolux.
Kapasitas pengisapan berkurang
dibandingkan normal
• Periksa apakah s-bag penuh atau tersumbat.
• Periksa apakah lter motor tersumbat dan perlu diganti.
• Periksa apakah nozel tersumbat dan perlu dibersihkan.
• Periksa apakah slang tersumbat dengan meremasnya perlahan. Namun, berhati-hatilah, siapa tahu
sumbatan disebabkan oleh pecahan kaca atau jarum yang tersangkut di dalam slang.
Catatan: Garansi tidak mencakup kerusakan pada slang yang terjadi ketika membersihkannya.
Air telah tersedot masuk ke dalam
pengisap debu.
Anda perlu mengganti motor ke pusat servis resmi Electrolux.
Kerusakan motor yang disebabkan karena masuknya air tidak dilindungi oleh garansi.
Untuk masalah yang lebih jauh, hubungi pusat servis resmi Electrolux.
26 Gagang dengan remote kontrol*: Ganti baterai bila indikator lampu
berubah merah atau tidak merespons ketika tombol mana pun
ditekan.
Gunakan hanya baterai tipe LITHIUM CR1632.
NB: Lepaskan baterai dari produk sebelum membuang produk
yang sudah tidak digunakan. Ikuti peraturan negara Anda untuk
pengumpulan baterai dan produk-produk listrik.
Nikmati pengalaman membersihkan yang luar biasa dengan
PURED9!
Electrolux berhak untuk mengubah produk, informasi, dan
spesikasinya tanpa pemberitahuan.
GB
CS
CT
ID
KO
TH
VI
14
www.electrolux.com

LANGKAH PENCEGAHAN UNTUK KESELAMATAN
Alat ini dapat digunakan oleh anak-anak berusia setidaknya 8 tahun atau lebih serta orang dengan
kemampuan mental, indra, dan sik yang kurang atau memiliki hanya sedikit pengalaman dan
pengetahuan jika mereka diberi pengawasan dan pengarahan tentang cara menggunakan alat ini
secara aman dan mengetahui bahaya-bahaya yang ada.
Anak-anak hendaknya tidak bermain dengan perangkat ini.
Pembersihan dan perawatan tidak boleh dilakukan oleh anak-anak tanpa pengawasan.
PERINGATAN: Nozel Turbo* dilengkapi sikat berputar yang dapat memerangkap benda apa saja.
Gunakan dengan hati-hati dan hanya pada permukaan yang dimaksudkan. Matikan pengisap debu
sebelum melepaskan benda yang terperangkap atau membersihkan sikat.
Baterai harus dilepas dari remote kontrol pada gagang* / nozel berlampu LED* sebelum membuang
produk yang sudah tidak digunakan**.
*Hanya model tertentu.
**Informasi mengenai cara melepas baterai di bagian lipatan bagian 25 dan 26.
Selalu cabut steker dari stopkontak listrik sebelum membersihkan atau merawat perangkat atau
ketika melepaskan baterai. Baterai harus dibuang dengan aman.
Jika rusak, kabel listrik perangkat ini harus diganti hanya oleh pusat servis resmi Electrolux untuk
menghindari bahaya.
PURED9 harus digunakan hanya untuk pengisapan debu di dalam
ruangan secara normal dan di lingkungan rumah tangga. Pastikan bahwa
pengisap debu disimpan di tempat yang kering.
Semua servis atau perbaikan harus dilakukan oleh pusat servis resmi
Electrolux.
Bahan kemasan, misalnya kantung plastik harus dijauhkan dari jangkauan
anak-anak agar tidak tertelan.
Jangan pernah menggunakan pengisap debu:
Di tempat basah.
Di dekat gas yang mudah terbakar, dll.
Saat produk menunjukkan tanda-tanda kerusakan yang jelas.
Di atas permukaan benda cair atau tajam.
Bila nozel lantai menunjukkan tanda-tanda kerusakan yang jelas.
Pada abu yang panas atau dingin, puntung rokok yang menyala, dll.
Pada debu halus, misalnya dari plester, beton, tepung, serta abu panas
atau dingin.
Jangan letakkan pengisap debu di bawah sinar matahari langsung.
Hindari mendekatkan pengisap debu ke panas yang tinggi atau suhu
dingin.
Jangan sekali-kali menggunakan pengisap debu tanpa lternya.
Jangan coba untuk menyentuh rol sikat saat pembersih menyala dan rol
sikat sedang berputar.
Saat roda-rodanya terblokir.
Langkah pencegahan kabel daya
Periksa steker dan kabel secara teratur. Jangan sekali-kali menggunakan
pengisap debu jika steker atau kabelnya rusak.
Kerusakan pada kabel pengisap debu tidak dilindungi oleh garansi.
Jangan sekali-kali menarik atau mengangkat pengisap debu dari
kabelnya.
Menggunakan pengisap debu di lingkungan di atas dapat menyebabkan
cedera serius atau kerusakan pada produk. Cedera atau kerusakan
tersebut tidak dilindungi oleh garansi atau oleh Electrolux.
SERVIS DAN GARANSI
Semua servis atau perbaikan harus dilakukan oleh pusat servis resmi
Electrolux.
Kerusakan pada kabel pengisap debu tidak dilindungi oleh garansi.
Kerusakan pada motor yang disebabkan oleh; terisapnya cairan,
terendamnya perangkat dalam cairan, atau digunakannya perangkat
dengan slang dan nozel rusak tidak dilindungi oleh garansi.
Selalu gunakan kantung debu s-bag asli yang sesuai untuk pengisap
debu ini, lihat bagian 11. Kerusakan yang disebabkan oleh penggunaan
kantung debu non-asli secara tidak benar tidak dilindungi oleh garansi.
PEMBUANGAN
Simbol ini pada produk menunjukkan bahwa pada produk
ini terpasang baterai yang tidak boleh dibuang sembarangan
dengan limbah rumah tangga biasa.
Simbol ini pada produk atau kemasannya menunjukkan bahwa
produk tersebut tidak boleh diperlakukan seperti limbah rumah
tangga.
Untuk mendaur ulang produk Anda, bawa produk ke tempat
pengumpulan resmi atau ke pusat servis Electrolux yang dapat
melepas dan mendaur ulang baterai serta aneka komponen
listrik dengan cara yang aman dan profesional. Patuhi peraturan
negara Anda untuk pengumpulan aneka produk listrik yang
terpisah serta baterai yang dapat diisi ulang.
Dengan ini, Electrolux Home Care and SDA, menyatakan bahwa Pengisap
Debu (Vacuum Cleaner) dengan peralatan radio tipe HER2 dan HER3
adalah sesuai dengan Directive 2014/53/EU.
GB
CS
CT
ID
KO
TH
VI
15
www.electrolux.com

GB
CS
CT
ID
TH
VI
16
www.electrolux.com
KO
한국어
Electrolux PURED9 진공 청소기를 선택해 주셔서 감사합니다.
최상의 결과를 얻기 위해 항상 순정 액세서리 및 예비 부품을
사용하십시오. 이 제품은 환경을 감안해 설계되었습니다. 모든
플라스틱 부품에는 재활용을 위한 표시가 되어 있습니다.
시작하기 전에
• 이 설명서를 주의깊게 정독하십시오.
• 설명되어 있는 모든 부품들이 포함되어 있는지 확인하십시오.
• 안전 주의 사항 내용에 특별히 주의를 기울여 주십시오.
PURED9 진공 청소기 설명
A. 디스플레이 (모델별 상이함)
B. 배기 필터 덮개
C. 배기 필터
D. 고정 슬롯
E. 전원코드
F. 모터 필터
G. 모터 필터 홀더
H. S-bag®
I. S-bag® 홀더
J. 먼지통 덮개
K. AeroPro 3in1 툴
L. AeroPro 호스
M. AeroPro 손잡이 (다음 버전
참조)
N. AeroPro 텔레스코픽 튜브
O. 고정용 클립
P. 회전식 노브를 이용한 수동
제어 지원 모델용 디스플레이*
Q. 리모콘 지원 모델용
디스플레이*
R. 리모콘 및 AUTO 기능 지원
모델용 디스플레이*
S. AeroPro Classic 손잡이*
T. AeroPro Ergo 손잡이*
U. AeroPro 리모콘 손잡이*
V. FlowMotion 노즐*
W. FlowMotion LED (high) 노즐 (
전면등 포함)*
X. AeroPro 터보 노즐*
Y. AeroPro 미니 터보 노즐*
Z. ParkettoPro 노즐*
AA. AeroPro FlexProPlus 노즐*
AB. AeroPro 긴 틈새 노즐*
* 특정 모델에만 적용
진공 청소기 사용 방법
1 S-BAG 버튼을 당겨 먼지통 덮개를 엽니다. 먼지 봉투(s-bag)가 제
위치에 있는지 확인합니다.
2 호스를 청소기에 끼웁니다(분리하려면 잠금 버튼을 누른 뒤 당김).
잠금 버튼이 찰칵하고 잠길 때까지 호스를 호스 손잡이에 끼웁니다
(분리하려면 잠금 버튼
을
누른 채 당김)
3 노즐에 텔레스코픽 튜브를 부착합니다. 호스 손잡이에 텔레스코픽
튜브를 부착합니다(분리하려면 잠금 버튼을 누른 뒤 당김).
4 한 손으로 잠금 버튼을 누르고 다른 손으로 손잡이를 당겨 텔레스
코픽 튜브를 조절합니다.
진공 청소기를 가동시킨 뒤 흡입력을 조정합니다.
5 전원코드를 당겨 콘센트에 꽂습니다. 청소기를 켜거나 끄려면 ON/
OFF 버튼을 누릅니다. 표시등이 켜지고 왼쪽에서 오른쪽으로, 그
리고 다시 반대 방향으로 MIN/MAX 표시등이 움직입니다(자동 기
능 모델).* 리모콘 지원 모델도 손잡이의 ON/OFF 버튼으로 작동시
킬 수 있습니다.*
6 흡입력 조절(수동 제어 모델): 청소기의 회전식 노브를 돌리거나 에
어 밸브를 이용합니다.*
7 흡입력 조절(리모콘 지원 모델): 손잡이의 +/- 버튼을 누릅니다. 디
스플레이의 MIN/MAX 및 기호 표시등이 흡입력 단계를 보여 줍니
다.*
8 흡입력 조절(AUTO 기능 및 리모콘 지원 모델): 청소기가 AUTO 모
드로 시작됩니다(자동 출력 조절). 디스플레이에 AUTO 표시등이
켜지고 MIN/MAX 표시등이 깜박입니다. 흡입력을 수동 조절하려면
손잡이의 +/- 버튼을 누르십시오. 자동 기능으로 돌아가려면 AUTO
버튼을 누릅니다.*
9 청소 후 전원코드를 감으려면 REWIND 버튼을 누릅니다.
노즐 고정용 홈
10 청소기를 옮기거나 보관할 때는 측면 (A) 또는 바닥 (C)의 노즐 고정
용 홈을 이용하고 잠깐 쉴 때는 뒷면 (B)에 고정하십시오.
먼지 봉투(S-BAG®) 교체
11 다음과 같은 경우 s-bag을 교체하십시오.
- P* 회전식 노브가 장착된 P* 모델: 적색 S-BAG 표시등이 켜짐
- 리모콘 지원 Q* 모델: 적색 S-BAG 기호 표시등이 켜짐.
- 리모콘 및 AUTO 기능 지원 R* 모델: 적색 S-BAG 표시등 켜짐(녹
색등: 봉투 상태 좋음, 노란 등: 봉투 교체 시기 임박).
NB: s-bag이 가득 차지 않았더라도 S-BAG 표시등이 켜지거나
적색등이 켜졌거나 카펫 청소용 세제를 사용한 후에는 항상 봉투를
교체하십시오
(봉투가 막혀 있을 수 있음). 최고의 성능을 유지하려면 사용하는
청소기에 맞게 특별히 개발된 울트라 롱 퍼포먼스 백을
사용하십시오. 다른 합성 s-bag도 사용할 수 있습니다. 종이
재질의 먼지 봉투는 사용하지 마십시오! www.s-bag.com
12 S-BAG 버튼을 당겨 먼지통을 엽니다. s-bag 홀더 손잡이가 위로
올라옵니다. 손잡이를 당겨 홀더와 함께 s-bag을 분리합니다. 분리
버튼을 누르지 마십시오.
13 홀더에 삽입된 상태의 s-bag을 쓰레기통으로 옮깁니다. 버튼을 눌
러 s-bag을 분리합니다. 홀더 뒤쪽에 보드지/플라스틱을 끼워 홀더
에 새 s-bag을 삽입합니다.
14 홀더에 끼운 s-bag을 아래로 눌러 제 위치에 끼웁니다. s-bag이 홀
더 아래 눌리지 않도록 하십시오. 뚜껑을 닫으십시오. s-bag 위치가
올바르지 않거나 빠뜨렸을 경우 뚜껑이 닫히지 않습니다.
NB: s-bag 교체 후 청소기를 가동하면 S-BAG 표시등이 꺼지거나
(회전식 노브 장착 P* 모델과 리모콘 지원 Q* 모델) 녹색으로 바뀔
때까지(리모콘 및 AUTO 기능 지원 R* 모델) 10초가 소요됩니다.
필터 교체
15 다음과 같은 경우 필터를 교체/세척하십시오**(**세척 가능 필터에 한
함)
- 회전식 노브 장착 P* 모델: s-bag 5회 교체 시마다
- 리모콘 지원 Q* 모델: FILTER 기호가 적색으로 표시됨
- 리모콘 및 AUTO 기능 지원 R* 모델: 적색 필터 표시등 켜짐. 녹색
표시등은 필터 상태가 정상임을 나타냅니다. 진공 청소기 가동을
시작할 때 잠깐 켜집니다.
16 FILTER 버튼을 당겨 필터 덮개를 엽니다. 정품 s-필터를 사용하십
시오. 필터를 분리한 뒤 프레임의 참조 번호를 통해 필터 종류를 확
인합니다. 새 필터로 교체하거나 청소합니다**. 미지근한 수돗물로
안쪽(더러운 쪽)을 헹굽니다. 필터 프레임을 두드려 물을 털어내십
시오. 헹굼 과정을 네 번 반복합니다. (**세척 가능 필터에 한함)
NB: 세제는 사용하지 마십시오. 필터 표면에 손을 대는 일은
피하십시오. 필터를 다시 장착하기 전에 완전히 말리십시오(실내
온도에서 최소 24시간 )! 세척 가능 필터는 최소 일년에 한 번 또는
더럽거나 손상되었을 때 교체하십시오. 필터 아래에 있는 L자형
폼은 제거하지 마십시오.
17 필터를 교체한 뒤 필터 덮개를 딸깍 소리가 날 때까지 눌러 닫아두
십시오. 필터 덮개가 분리된 경우에는 힌지가 아래를 향하도록 한
뒤 딸깍 소리가 날 때까지 필터 덮개를 눌러 원위치시키십시오.
NB: 필터 교체 후 청소기를 가동하면 녹색 FILTER 표시등이
켜지거나(리모콘 및 AUTO 기능 지원 모델) 꺼질 때까지(리모콘
지원 모델) 10초가 소요됩니다.*
18 모터 필터는 더러워지거나 s-bag을 5회 교체한 경우 교체합니다.
필터 홀더를 아래쪽으로 누른 뒤 당겨 빼냅니다. 필터를 교체한 뒤
덮개를 닫습니다.
일반 노즐을 사용한 진공 청소(V*, W*)
19 페달을 이용해 노즐 설정을 변경합니다. 적합한 바닥 유형을 나타
내는 아이콘이 표시됩니다.
20 FlowMotion LED (high) 노즐*: 노즐을 앞으로 밉니다. 몇 초 뒤 전
면등이 자동으로 켜집니다. 노즐을 사용하지 않으면 몇 초 뒤 조명
이 자동으로 꺼집니다.
일반 노즐 청소(V*, W*)
21 튜브에서 노즐을 분리합니다. 호스 손잡이로 청소합니다.
터보 노즐 청소 (X*)
22 튜브에서 노즐을 분리한 뒤 실이 얽혀 있으면 가위로 잘라 제거하
십시오. 호스 손잡이를 이용해 노즐을 청소합니다. *
3IN1 액세서리 툴
23 천 소재 끈을 당겨 3in1 툴을 꺼냅니다. 툴은 3가지 기능을 갖고 있
습니다. 다음 페이지를 참조하십시오.
24 사용 후에는 원래 위치에 넣으십시오.
배터리 교체*

GB
CS
CT
ID
TH
VI
17
www.electrolux.com
KO
Electrolux는 통보 없이 제품, 정보 및 사양을 변경할 권한이
있습니다.
25 전면등 내장 노즐*: 전면등이 빠르게 깜박이기 시작하면 건전지를
교체하십시오. AA 건전지 2개를 사용합니다.
26 리모콘 내장 손잡이*: 적색 표시등이 켜지거나 버튼을 눌러도 아무
런 응답이 없으면 건전지를 교체하십시오.
CR1632 리튬 전지 유형
만 사용하십시오.
NB: 폐기하기 전에 제품에서 건전지를 제거하십시오. 건전지 및
전기 제품 수거에 대한 거주 국가 규정을 따르십시오.
PURED9과 함께 멋진 청소 경험을 누려보세요!
최상의 결과를 얻기 위한 팁
노즐/액세서리 용도: 노즐/액세서리 용도:
K. 3in1 액세서리 툴*
3개의 툴을 1개로 결합:
1. 단단한 면(예: 책장, 가구 위)의
먼지 제거용 툴.
2. 섬유 소재 실내장식용(예: 커튼,
실내 장식).
3. 좁은 공간(예: 라디에이터 뒤쪽)
을 위한 틈새용 툴.
V. FlowMotion 노즐*
W. FlowMotion LED
(high) 노즐
(전면등 포함)*
일반 노즐:
- 모든 바닥 유형용, 카펫 및 단단한
바닥의 먼지 제거에 최적입니다.
- 페달을 이용해 노즐 설정을
변경합니다. 적합한 바닥 유형을
나타내는 아이콘이 표시됩니다.
- 전면등이 있어 어두운 곳(예: 가구
아래)에서의 먼지 및 오물 감지에 도움이
됩니다. FlowMotion LED (high) 노즐
전용
1 2 3
X. 터보 노즐* 카펫 노즐:
- 빗질 및 진공 청소를 동시에
수행합니다(머리카락, 섬유 등의
청소에 최적).
- 브러쉬 롤러는 진공 청소기의
공기 흐름에 의해 구동됩니다.
- 아주 두껍고 털이 긴 카펫,
도어 매트와 같은 미끄럼
방지 카펫이나 방수 카펫에는
부적합합니다. 일반 노즐을 대신
사용하십시오.
Y. 미니 터보 노즐* 실내 장식용 노즐:
- 빗질 및 진공 청소를 동시에
수행합니다(머리카락, 섬유 등의 청소에
최적).
- 섬유 소재 가구, 카시트, 매트리스 등.
- 브러쉬 롤러는 진공 청소기의 공기
흐름에 의해 구동됩니다.
- 회전 브러쉬 롤이 걸릴 수 있어 아주
두껍고 털이 긴 카펫에는 부적합합니다.
Z. ParkettoPro 노즐* 단단한 바닥용 노즐:
- 단단한 바닥의 가벼운 청소용
(조각 세공 나무 소재 또는 목재
마루, 타일 등).
- 틈새가 있는 단단한 바닥의 먼지
제거에 최적.
AA. FlexProPlus 노즐* 단단한 바닥용 노즐:
- 가구, 코너 및 기타 장애물 아래나 그
사이를 청소합니다.
- 손쉽게 180도 돌려 좁은 공간에 바로
접근할 수 있습니다.
AB. 긴 틈새 노즐* 아주 긴 툴:
- 접근이 힘든 곳(예: 선반 위)의
청소용.
- 좁은 공간(예: 라디에이터 뒤쪽)
을 위한 툴.
흡입력 수동 조절 모델
- 최적의 성능을 위한 청소기 안내도를 참조하십시오.
AUTO 기능 지원 모델들은 흡입력을 자동으로 조절합니다.
이로 인해 최적의 청소 성능을 제공하고 어떤 곳이든 편안하게 청소할 수
있습니다. 수동 조절의 경우 최적 성능을 위한 안내도를 참조하십시오.
문제해결
문제 해결책
진공 청소기가 시작되지 않습니다.
• 전원코드가 콘센트에 꽂혀 있는지 확인하십시오.
• 플러그와 전원코드가 훼손되지 않았는지 점검하십시오.
• 퓨즈가 끊어졌는지 확인하십시오.
• 리모콘 손잡이의 건전지 표시등에 반응이 있는지 확인하십시오(일부 모델에 한함).
s-bag® 표시등이 켜집니다.
• s-bag®이 가득 찼거나 막혔는지 확인하십시오.
• s-bag®을 이미 교체했다면 모터 필터를 교체하십시오.
필터 표시등이 켜집니다(특정 모델에
한함).
배기 필터를 교체하거나 세척 가능하면 세척하십시오.
청소기가 멈춤
청소기가 과열되었을 수 있습니다: 콘센트에서 분리한 뒤 노즐, 튜브, 호스 또는 필터가 막혔는지
확인하십시오. 30분 간 청소기를 식힌 뒤 전원을 다시 연결하십시오.
그래도 청소기가 작동하지 않으면 Electrolux 공인 서비스 센터에 문의하십시오.
정상 출력 대비 갑작스러운 흡입 능력
감소
• s-bag이 가득 찼거나 막혔는지 확인하십시오.
• 모터 필터가 막혀 교체해야 하는지 확인하십시오.
• 노즐이 막혀 청소해야 하는지 확인하십시오.
• 호스를 가볍게 눌러 막히지 않았는지 확인하십시오. 하지만 호스 안의 유리나 바늘이 막 원인일
경우 주의하십시오.
참고: 청소로 인해 발생한 호스 손상은 보증 서비스를 받을 수 없습니다.
진공 청소기에 물이 들어갔습니다.
모터 교체는 공인 Electrolux 서비스 센터에서 수행해야 합니다.
물이 스며들어 발생한 모터 손상은 보증 서비스를 받을 수 없습니다.
그 밖에 추가 문제가 있을 경우 공인 Electrolux 서비스 센터에 연락하십시오.

GB
CS
CT
ID
TH
VI
18
www.electrolux.com
KO
안전 주의 사항
8세 이상 어린이 및 신체, 감각 또는 지적 능력이 낮거나 경험과 지식이 부족한 사람의 경우
안전한 제품 사용과 관련된 지시 또는 감독을 받고 제품 사용과 관련된 위험을 이해하는 경우 이
제품을 사용할 수 있습니다.
어린이가 제품을 갖고 놀지 못하게 해야 합니다.
감독 없이 어린이가 청소 및 정비를 수행해서는 안됩니다.
경고: 터보 노즐*에는 부품들이 걸릴 수 있는 회전 브러쉬가 있습니다. 적합한 면에서만 주의하여
사용하십시오. 걸린 부품을 분리하거나 브러쉬를 청소하기 전에 진공 청소기를 먼저 끄십시오.
제품을 폐기하기 전에 먼저 손잡이 리모콘*/LED 조명 노즐에서 건전지를 분리해야 합니다**.
*특정 모델에만 적용
**건전지 제거 방법에 대한 정보는 부품 설명도 섹션 25 및 26 참조.
진공 청소기를 청소하거나 유지보수하거나 건전지를 제거하려면 항상 먼저 콘센트에서 플러그를
뽑으십시오. 배터리는 안전하게 폐기해야 합니다.
전원코드가 손상된 경우 위험 방지를 위해 공인 Electrolux 서비스 센터를 통해서만 교체해야
합니다.
PURED9는 실내 및 가정에서의 일반 진공 청소용으로만 사용해야
합니다. 진공 청소기는 반드시 건조한 장소에 보관하십시오.
모든 정비나 수리는 공인 Electrolux 서비스 센터에서 수행해야 합니다.
질식을 방지하기 위해 아이들이 비닐 백과 같은 포장재에 접근하지
못하도록 하십시오.
다음과 같은 경우에는 절대 진공 청소기를 사용하지 마십시오.
공간이 습한 경우.
가연성 가스 가까이 있는 경우
제품이 손상된 징후가 보이는 경우.
날카로운 물체 또는 액체가 있는 경우.
바닥용 노즐에 손상된 징후가 보이는 경우.
뜨겁거나 식은 재, 불씨가 있는 담배 꽁초 등이 있는 경우.
석고, 콘크리트 먼지, 밀가루, 뜨겁거나 식은 재와 같은 먼지가 있는
경우.
직사광선에 진공 청소기를 방치하지 마십시오.
강한 열기나 영하의 온도에 진공 청소기를 노출시키지 마십시오.
필터를 제거한 채로는 절대 진공 청소기를 사용하지 마십시오.
청소기가 켜져 있고 브러쉬 롤이 회전하는 중에 브러쉬 롤에 손을 대지
마십시오.
휠이 움직이지 않는 경우
전원코드 주의 사항
플러그와 전원코드를 정기적으로 점검하십시오. 전원코드가 훼손된
경우 절대 진공 청소기를 사용하지 마십시오.
진공 청소기 전원코드 손상은 보증 대상이 아닙니다.
절대 전원코드로 진공 청소기를 당기거나 들어올리지 마십시오.
위의 환경에서 진공 청소기를 사용할 경우 심각한 부상을 입거나
제품 손상을 가져올 수 있습니다. 이러한 부상 또는 손상에 대해서는
Electrolux의 보증 서비스를 받을 수 없습니다.
정비 및 보증
모든 정비나 수리는 공인 Electrolux 서비스 센터에서 수행해야 합니다.
진공 청소기 전원코드 손상은 보증 대상이 아닙니다. 물을
빨아들이거나 청소기를 액체에 담그거나 호스 및 노즐이 손상된
청소기를 사용해 발생한 모터 손상은 보증 서비스를 받을 수 없습니다.
항상 이 진공 청소기에 적합한 정품 s-bag 먼지 봉투를 사용하십시오.
섹션 11을 참조하십시오. 정품이 아닌 먼지 봉투를 잘못 사용해 발생한
청소기 손상에 대해서는 보증이 적용되지 않습니다.
폐기
이 기호는 이 제품에 일반 가정용 폐기물로 버릴 수 없는
건전지가 들어 있음을 나타냅니다.
제품 또는 포장에 이 기호가 있으면 이 제품을 가정용
폐기물로 처리할 수 없다는 표시입니다.
제품을 재활용하려면 안전하고 전문적인 방식으로 배터리 및
부품을 분리할 수 있는 공식 수거 장소 또는 Electrolux 서비스
센터에 가져가십시오. 전기 제품 및 충전지 분리 수거를 위한
거주 국가의 규정에 따르십시오.
이 문서에 의해 Electrolux Home Care 및 SDA는 무선 기기 유형
HER2 및 HER3가 내장된 진공 청소기가 유럽 무선장비지침(Directive
2014/53/EU)을 준수함을 선언합니다.

GB
CS
CT
ID
KO
VI
19
www.electrolux.com
TH
D9
!
A.
B.
C.
D.
E.
F.
G.
H. bag
®
I. bag
®
J.
K.
L.
M.
N.
O.
P.
1
2
3
4
5
6
7
8
9
10
®
11
12
13
14
15
16
17
18
19
20 FlowMotion LED (high)
21
22
23
24

GB
CS
CT
ID
KO
TH
VI
20
www.electrolux.com
25
26
2
®
®
®
®
ページが読み込まれています...
ページが読み込まれています...
ページが読み込まれています...
ページが読み込まれています...
ページが読み込まれています...
ページが読み込まれています...
ページが読み込まれています...
ページが読み込まれています...
-
 1
1
-
 2
2
-
 3
3
-
 4
4
-
 5
5
-
 6
6
-
 7
7
-
 8
8
-
 9
9
-
 10
10
-
 11
11
-
 12
12
-
 13
13
-
 14
14
-
 15
15
-
 16
16
-
 17
17
-
 18
18
-
 19
19
-
 20
20
-
 21
21
-
 22
22
-
 23
23
-
 24
24
-
 25
25
-
 26
26
-
 27
27
-
 28
28


関連論文
その他のドキュメント
-
Hitachi CV-BA22V ユーザーマニュアル
-
-
-
DeWalt DWV902L ユーザーマニュアル
-
Bosch BGL8SI59GB ユーザーマニュアル
-
-
-
Elecom DE-KD03BK 取扱説明書
-
Roche uPath IVD ユーザーマニュアル
-
IKEA 294.355.87 ユーザーマニュアル