
_
( )
_
4-437-553-12(1)
KD-84X9000
4-437-553-12(1)
LCD TV
KD-84X9000
Operating Instructions GB
ợ䒌存㕲᷊
CS
ᐇհЙы
CT
VN
Mode d’emploi FR
TH
Инструкция по эксплуатации
RU
คูมือการใชงาน
ﻞﻴﻐﺸﺘﻟا تﻴﻠﻌﺗ
AR
ﻨﻫار ﻪﭼﱰﻓد
PR

2
GB
D:\TV's JOB\SONY TV\SY120107_A32\4437553111_GB\GB02REG.fm
KD-84X9000
4-437-553-11(1)
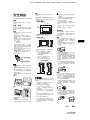
Introduction
Thank you for choosing this Sony
product. Before operating the TV,
please read this manual thoroughly and
retain it for future reference.
~
• Instructions about “Installing Wall
Mount Bracket” are included within
this TV’s instructions manual.
• The illustrations used in this manual
are of the KD-84X9000 series unless
otherwise state.
• The illustrations of the remote used in
this manual are of the RM-GD025
unless otherwise stated.
• Before operating the TV, please read
page 33 (Safety Information). Retain
this manual for future reference.
Trademark information
The terms HDMI and HDMI High-
Definition Multimedia Interface, and the
HDMI Logo are trademarks or
registered trademarks of HDMI
Licensing LLC in the United States and
other countries.
DLNA®, the DLNA Logo and DLNA
CERTIFIED® are trademarks, service
marks, or certification marks of the
Digital Living Network Alliance.
Manufactured under license from Dolby
Laboratories. Dolby and the double-D
symbol are trademarks of Dolby
Laboratories.
“BRAVIA” and are
trademarks of Sony Corporation.
TrackID is a trademark or registered
trademark of Sony Mobile
Communications AB.
Music and video recognition technology
and related data are provided by
Gracenote®. Gracenote is the industry
standard in music recognition
technology and related content delivery.
For more information, please visit
www.gracenote.com.
CD, DVD, Blu-ray Disc, and music and
video-related data from Gracenote, Inc.,
copyright © 2000-present Gracenote.
Gracenote Software, copyright © 2000-
present Gracenote. One or more
patents owned by Gracenote apply to
this product and service. See the
Gracenote website for a nonexhaustive
list of applicable Gracenote patents.
Gracenote, CDDB, MusicID,
MediaVOCS, the Gracenote logo and
logotype, and the “Powered by
Gracenote” logo are either registered
trademarks or trademarks of Gracenote
in the United States and/or other
countries.
Opera® Browser from Opera Software
ASA. Copyright 1995-2012 Opera
Software ASA. All rights reserved.
Wi-Fi Direct is a mark of the Wi-Fi
Alliance.
“Blu-ray Disc”, “Blu-ray” and “Blu-ray
Disc” logo are trademarks of Blu-ray
Disc Association.
“Sony Entertainment Network logo” and
“Sony Entertainment Network” are
trademarks of Sony Corporation.
“ ” and “SimulView”
are trademarks of Sony Computer
Entertainment Inc.
(except Hong Kong)
is a registered trademark of the
DVB Project.

3
GB
D:\TV's JOB\SONY TV\SY120107_A32\4437553111_GB\GB02REG.fm
KD-84X9000
4-437-553-11(1)
GB
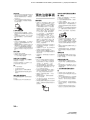
Notes for Australia and
New Zealand model
This product is ENERGY RATING
qualified in the “Home” mode. ENERGY
RATING is a program designed to
promote energy efficient products and
practices.
• When the TV is initially set up, it is
designed to meet ENERGY RATING
requirements while maintaining
optimum picture quality.
• Changes to certain features, settings,
and functionalities of this TV (e.g. TV
Guide, Picture/Sound, Eco-Setting)
can slightly change the power
consumption.
Depending upon such changed
settings (e.g. “Shop” mode), the power
consumption may vary which possibly
could exceed the stated energy rating.
To reset the TV to ENERGY RATING
qualified settings, select “Home” mode
from the initial set-up procedure in
“Factory Settings” under the “Set-up”
menu.
IMPORTANT
INFORMATION
If a television is not positioned in a
sufficiently stable location, it can be
potentially hazardous due to falling.
Many injuries, particularly to children,
can be avoided by taking simple
precautions such as:
• Using cabinets or stands
recommended by the manufacturer of
the television.
• Only using furniture that can safely
support the television.
• Ensuring the television is not
overhanging the edge of the
supporting furniture.
• Not placing the television on tall
furniture (for example, cupboards or
bookcases) without anchoring both
the furniture and the television to a
suitable support.
• Not standing the televisions on cloth
or other materials placed between the
television and supporting furniture.
• Educating children about the dangers
of climbing on furniture to reach the
television or its controls.
Notice for customers in
Thailand
This telecommunication equipment
conforms to NTC technical requirement.
Notice for customers in
Singapore
Notice for customers in
Jordan
All models covered by this Instruction
Manual contains wireless module
DWM-W046 with approval number
TRC/SS/2010/135.
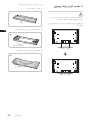
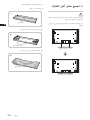
Location of the
identification label
Labels for Model No. and Power Supply
rating (in accordance with applicable
safety regulation) are located on the
rear of the TV.
This television is designed for use
in Hong Kong and ensured the
usage in Hong Kong only.
Complies with IDA
Standards
DB00353

D:\TV's JOB\SONY TV\SY120107_A32\4437553111_GB\GB01TOC.fm
KD-84X9000
4-437-553-11(1)
4
GB
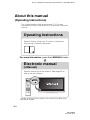
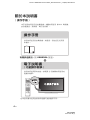
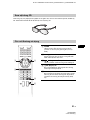
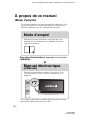
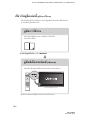
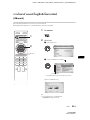
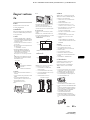
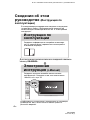
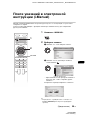
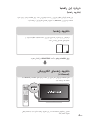
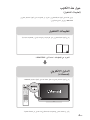
About this manual
(Operating Instructions)
This manual explains how to set up your TV. For more
information on how to use BRAVIA TV, refer to the “Electronic
manual”.
Operating Instructions
Electronic manual
(i-Manual)
Explains how to set up your TV such as connections,
initial set-up, and basic operations.
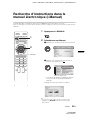
For more information, press the i-MANUAL button
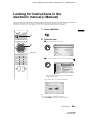
Explains how to use all the features. See page 25 on
how to use the i-Manual.
Images and illustrations used in this manual may differ from
the actual screen.

D:\TV's JOB\SONY TV\SY120107_A32\4437553111_GB\GB01TOC.fm
KD-84X9000
4-437-553-11(1)
5
GB
GB
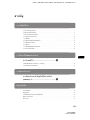
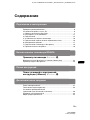
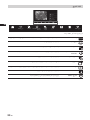
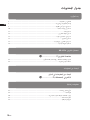
Table of Contents
Getting Started
Checking the accessories.........................................................................6
Inserting batteries into the remote.............................................................6
1: Assembling the Table-Top Stand..........................................................7
2: Adjusting the Speakers angle .............................................................10
3: Connections ........................................................................................11
4: Preventing the TV from toppling over..................................................15
5: Connecting the AC power cord...........................................................16
6: Bundling the cables ............................................................................16
7: Connecting the TV to the Internet........................................................17
8: Performing the initial set-up.................................................................18
Using Your BRAVIA TV
Watching TV
B
............................. w;
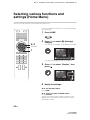
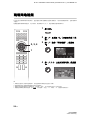
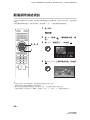
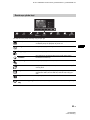
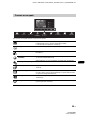
Selecting various functions and settings (Home Menu)..........................22
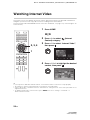
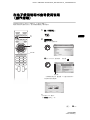
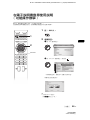
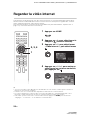
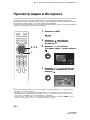
Watching Internet Video..........................................................................24
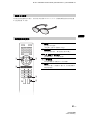
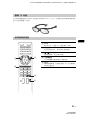
Looking for Instructions
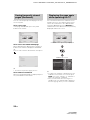
Looking for instructions in the
electronic manual
(i-Manual)
B
.................................. wg
Additional Information
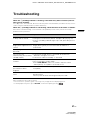
Troubleshooting.......................................................................................27
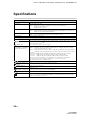
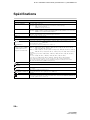
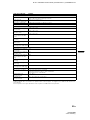
Specifications..........................................................................................28
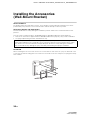
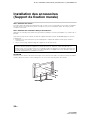
Installing the Accessories (Wall-Mount Bracket).....................................30
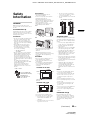
Safety Information....................................................................................33
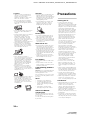
Precautions..............................................................................................34

D:\TV's JOB\SONY TV\SY120107_A32\4437553111_GB\GB03STU.fm
KD-84X9000
4-437-553-11(1)
6
GB
Getting Started
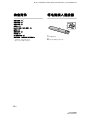
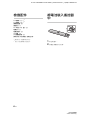
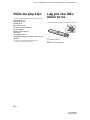
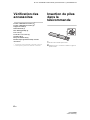
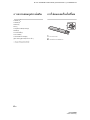
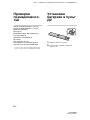
Checking the
accessories
AC Power Cord (1)*
1
AC Power Cord (6)*
2
Cable holder (5)
Remote (1)
Size AAA batteries (R03 type) (2)
Short Neck (2)
Short Neck Cover (2)
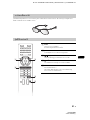
3D Glasses (2)
Pouch for 3D Glasses (2)
Operating Instructions (this manual) and other
documents
*
1
Hong Kong, New Zealand and Australia only
*
2
except Hong Kong, New Zealand and Australia
Inserting batteries
into the remote
1 Remove the protection sheet.
2 Push and slide the cover to open.

D:\TV's JOB\SONY TV\SY120107_A32\4437553111_GB\GB03STU.fm
KD-84X9000
4-437-553-11(1)
7
GB
GB
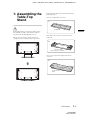
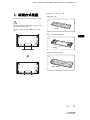
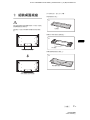
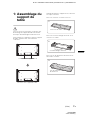
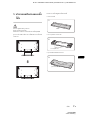
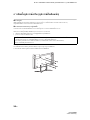
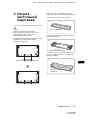
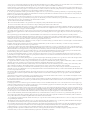
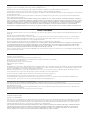
1: Assembling the
Table-Top
Stand
Read and follow the instructions below when
assembling the Table-Top Stand in order to
avoid any risk of damaging the TV set.
Refer to the instructions below on how to
change the Floor Stand to Table-Top Stand.
Before detaching the Floor Stand, perform the
following steps.
Place the carton lid on the floor.
Place both lower corner cushions onto the
carton lid.
Place the TV protection bag on top of the
cushions.
TV with Floor Stand
TV with Table-Top Stand
1
Carton lid
2
Lower corner cushions
3
TV protection
bag
(Continued)

D:\TV's JOB\SONY TV\SY120107_A32\4437553111_GB\GB03STU.fm
KD-84X9000
4-437-553-11(1)
8
GB
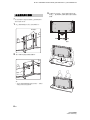
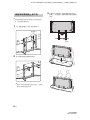
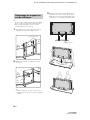
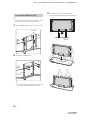
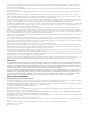
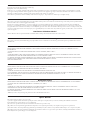
~
• Do not remove the Floor Stand for any reason
other than to attach the Table-Top Stand or to
install corresponding accessories on the TV.
1 Slide the Neck Covers upward to remove
them from the Floor Stand.
2 Remove the screws that attach the Floor
Stand to the TV.
~
• Be sure to store the removed screws in a safe
place. Reuse the screws when attaching the
Table-Top Stand.
3 Detach the TV set from the Floor Stand, and
place it in the carton lid. Support the TV set
when changing the Necks to prevent it from
toppling over.
Detaching the Floor Stand
from the TV
Neck Covers
Screw
(M5 × 20)
Floor Stand

D:\TV's JOB\SONY TV\SY120107_A32\4437553111_GB\GB03STU.fm
KD-84X9000
4-437-553-11(1)
9
GB
GB
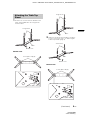
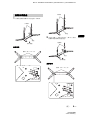
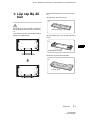
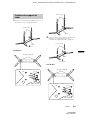
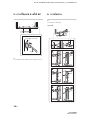
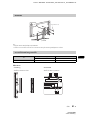
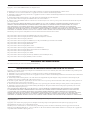
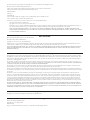
1 Remove the screws from the bottom of the
Floor Stand and detach the Long Necks
from the Base.
Bottom view
2 Attach the Short Necks to the Base using the
screws removed in step 1 of “Attaching the
Table-Top Stand” (page 9).
Bottom view
Attaching the Table-Top
Stand
Long Necks
Base
Bottom view
Screw (M6 × 20) (8)
Screw (M6 × 20) (4)
Long Necks
Base
Short Necks
Base
Bottom view
Screw (M6 × 20) (8)
Screw (M6 × 20) (4)
(Continued)

D:\TV's JOB\SONY TV\SY120107_A32\4437553111_GB\GB03STU.fm
KD-84X9000
4-437-553-11(1)
10
GB
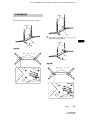
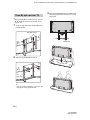
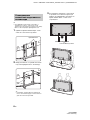
3 Place the TV set on the Table-Top Stand.
4 Attach the Table-Top Stand using the screws
previously removed in step 2 of Detaching
the Floor Stand from the TV (page 8).
5 Attach the Short Neck Covers to the Table-
Top Stand.
~
• Ensure that there are no objects in front of the
TV.
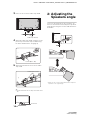
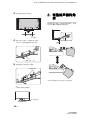
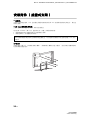
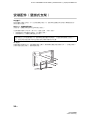
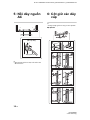
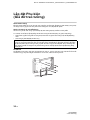
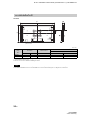
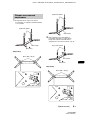
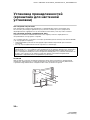
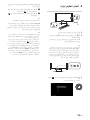
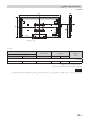
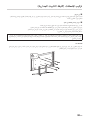
2: Adjusting the
Speakers angle
To access the terminals on the rear of the TV
when it is mounted to a wall, adjust the Speakers
angle by loosening the screw as indicated in the
illustration.
* Make sure the screw is tightened back after adjust the
Speakers to the original angle.
Table-Top Stand
Screw (M5 × 20)
Short Neck Covers
IR Sensor
*

D:\TV's JOB\SONY TV\SY120107_A32\4437553111_GB\GB03STU.fm
KD-84X9000
4-437-553-11(1)
11
GB
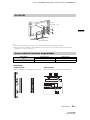
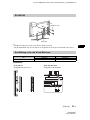
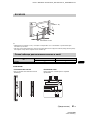
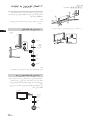
GB
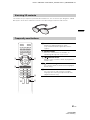
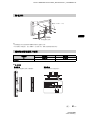
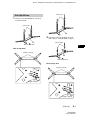
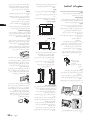
The Speakers can be detached from the TV if
you wish to use a separate audio system (e.g.
Home Theatre System). Refer to the instructions
below on how to detach the Speakers.
1 Disconnect the Speaker cable.
2 Remove the screw from the lower Speaker
Joint.
3 Remove the screw from the upper Speaker
Joint.
4 Pull the Speaker out horizontally to detach
the Speaker.
Repeat steps 1 to 4 to remove the other
Speaker.
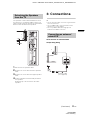
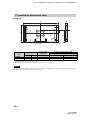
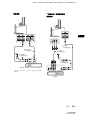
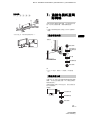
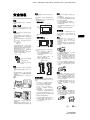
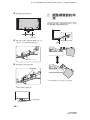
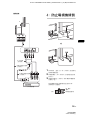
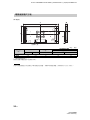
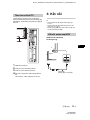
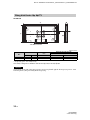
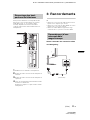
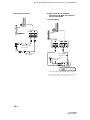
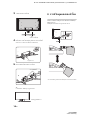
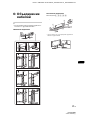
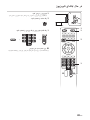
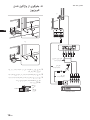
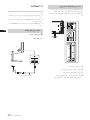
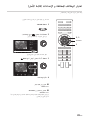
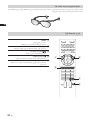
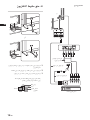
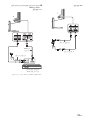
3: Connections
~
• Use an antenna cable connector no greater than
14 mm in thickness.
• Use an HDMI cable connector within 12 mm
(thickness) × 21 mm (width).
• Use Sony HDMI cable with “High Speed”
indication for HDMI connection.
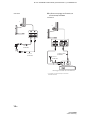
x To connect an antenna/cable
except Hong Kong
Detaching the Speakers
from the TV
3
2
4
1
Connecting an antenna/
cable/VCR
Antenna cable
(not supplied)
(Continued)

D:\TV's JOB\SONY TV\SY120107_A32\4437553111_GB\GB03STU.fm
KD-84X9000
4-437-553-11(1)
12
GB
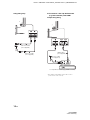
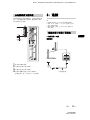
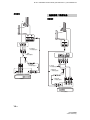
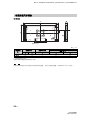
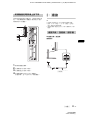
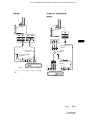
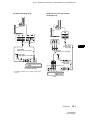
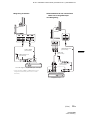
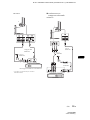
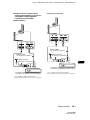
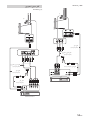
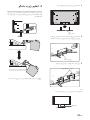
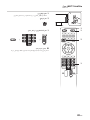
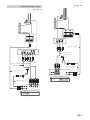
Hong Kong only x To connect a Set Top Box/recorder
(e.g. DVD recorder) with HDMI
except Hong Kong
* Only HDMI 2 and HDMI 3 support 4K resolution
(located at the side of the TV).
Antenna cable
(not supplied)
Antenna cable
(not supplied)
*
Set Top Box/recorder (e.g. DVD recorder)
Antenna cable
(not supplied)
HDMI cable
(not supplied)

D:\TV's JOB\SONY TV\SY120107_A32\4437553111_GB\GB03STU.fm
KD-84X9000
4-437-553-11(1)
13
GB
GB
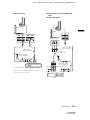
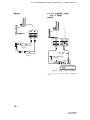
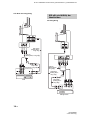
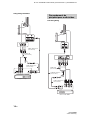
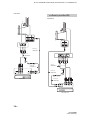
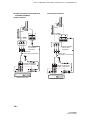
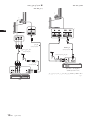
Hong Kong only
* Only HDMI 2 and HDMI 3 support 4K resolution
(located at the side of the TV).
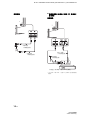
x Connecting an antenna/cable and
VCR
except Hong Kong
*
Set Top Box/recorder (e.g. DVD recorder)
Antenna cable
(not supplied)
HDMI cable
(not supplied)
Antenna cable
(not supplied)
Antenna cable
(not supplied)
AV cable
(not supplied)
VCR
(Continued)

D:\TV's JOB\SONY TV\SY120107_A32\4437553111_GB\GB03STU.fm
KD-84X9000
4-437-553-11(1)
14
GB
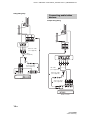
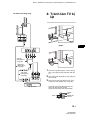
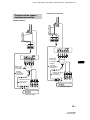
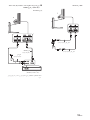
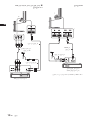
Hong Kong only
except Hong Kong
Antenna cable
(not supplied)
Antenna cable
(not supplied)
AV cable
(not supplied)
VCR
Connecting audio/video
devices
DVD recorder
Antenna cable
(not supplied)
AV cable
(not supplied)
Antenna cable
(not supplied)

D:\TV's JOB\SONY TV\SY120107_A32\4437553111_GB\GB03STU.fm
KD-84X9000
4-437-553-11(1)
15
GB
GB
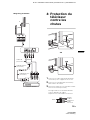
Hong Kong only
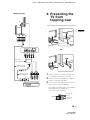
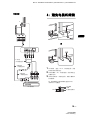
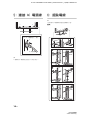
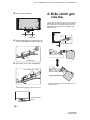
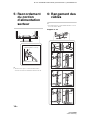
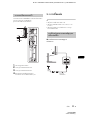
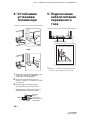
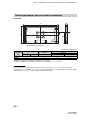
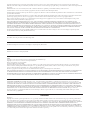
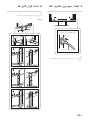
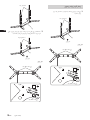
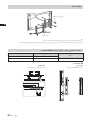
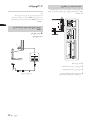
4: Preventing the
TV from
toppling over
OR
1 Install a wood screw (3.8 mm in diameter,
not supplied) to the floor or TV stand.
2 Install a machine screw (M4, not supplied)
into the screw hole of the Base.
3 Tie the wood screw and the machine screw
with a strong cord (not supplied).
The length of the M4 machine screw differs
depending on the cord diameter.
Please see below illustration.
AV cable
(not supplied)
Antenna cable
(not supplied)
Antenna cable
(not supplied)
DVD recorder
10mm
Screw M4
Cord
TV’s Floor
Stand

D:\TV's JOB\SONY TV\SY120107_A32\4437553111_GB\GB03STU.fm
KD-84X9000
4-437-553-11(1)
16
GB
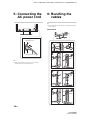
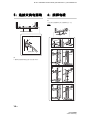
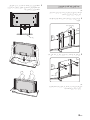
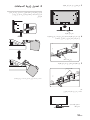
5: Connecting the
AC power cord
~
• Make sure that the AC power cord is fully
inserted into the AC IN terminal.
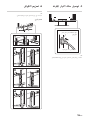
6: Bundling the
cables
~
• Do not bundle the AC power cord together with
other cables.
Floor Stand
AC IN (power supply
input) terminal
AC power cord
*

D:\TV's JOB\SONY TV\SY120107_A32\4437553111_GB\GB03STU.fm
KD-84X9000
4-437-553-11(1)
17
GB
GB
Table-Top Stand
Use 1, 2, 3, 4, 5*
* When installing on the wall, attach the cable holder
under the terminals.
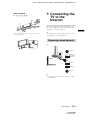
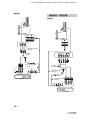
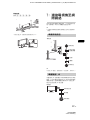
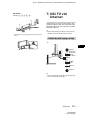
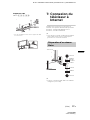
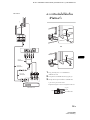
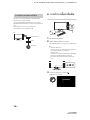
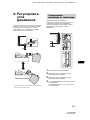
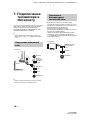
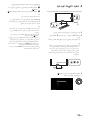
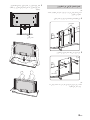
7: Connecting the
TV to the
Internet
When you connect this TV to the Internet, you
can enjoy multiple functions. For details on the
functions, refer to the i-Manual.
~
• You will need to contract with an Internet service
provider to connect to the Internet.
~
• For LAN connections, use a Category 7 cable
(not supplied).
1
3
4
2
5
Preparing a wired network
TV
Internet
Modem
with router
functions
Router
Modem
Internet
or
(Continued)

D:\TV's JOB\SONY TV\SY120107_A32\4437553111_GB\GB03STU.fm
KD-84X9000
4-437-553-11(1)
18
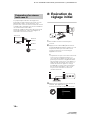
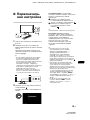
GB
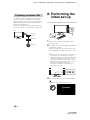
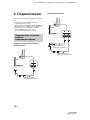
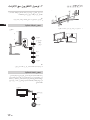
The built-in wireless LAN device allows you to
access the Internet and your home network.
With this feature, you can connect to a wireless
LAN and enjoy the benefits of networking in a
cable-free environment.
Before setting up the wireless LAN function of
the TV, be sure to set up a wireless LAN router.
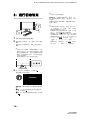
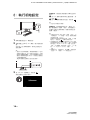
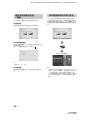
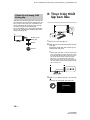
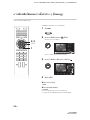
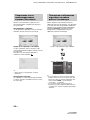
8: Performing the
initial set-up
1 Connect the TV to your AC power outlet
(mains socket).
2 Press =/1 on the TV. The = (power) indicator
will light up in green.
When you switch on the TV for the first time,
the Language menu appears on the screen.
~
• When you turn on the TV for the first time, the
TV requires some internal processing for
optimisation before you can perform the initial
setup. There will be no picture and sound,
and the timer indicator on the front of the TV
blinks orange for about 40 seconds. Do not
turn off the TV during this process.
This process has been completed at the
factory for some TVs.
3 Press F/f/G/g to select an item, then press
.
Follow the instructions on the screen.
Preparing a wireless LAN
Wireless
router
Modem
Internet
TV

D:\TV's JOB\SONY TV\SY120107_A32\4437553111_GB\GB03STU.fm
KD-84X9000
4-437-553-11(1)
19
GB
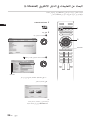
GB
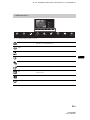
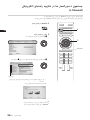
Programme Sorting: Changes the order of
analogue channels stored in the TV.
1 Press F/f to select the channel you want
to move to a new position, then press .
2 Press F/f to select the new position for
the channel, then press .
~
• You can also tune channels manually.
Network Set-up: Sets up the Internet
settings. Select “Auto” to connect to the
network automatically. Select “Custom” to
connect manually.
If you do not access the Internet, or to set up
later, select “Skip”.
~
• If you use WEP security, select “Custom” t
“Wireless Set-up” t “Scan”. Then, select the
network name (SSID) you want to connect.
If you cannot find the required network name,
select “[Manual Entry]” and press
to
enter network name.
• Use the optional USB Wireless LAN Adapter
to connect with your wireless router (or
access point) at 5GHz. Insert USB Wireless
LAN Adapter and set “Standby for Wi-Fi
Direct” to “Off”. Press HOME, then select
“Settings” t “Network” t “Standby for Wi-
Fi Direct” t “Off”.
• To set “Network Set-up” later, press HOME,
then select “Settings” t “Network” t
“Network Set-up”.

D:\TV's JOB\SONY TV\SY120107_A32\4437553111_GB\GB04SAF.fm
KD-84X9000
4-437-553-11(1)
20
GB
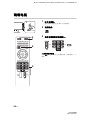
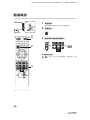
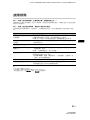
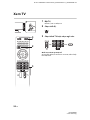
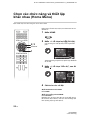
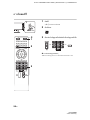
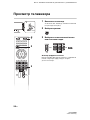
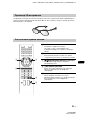
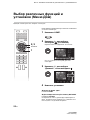
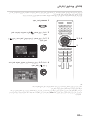
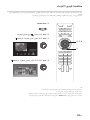
Using Your BRAVIA TV
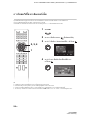
Watching TV
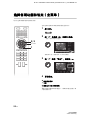
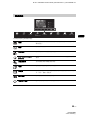
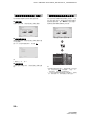
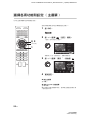
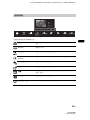
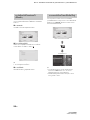
1 Turn on the TV.
Press =/1 on the TV or remote to turn on the TV.
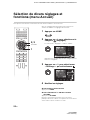
2 Select a mode.
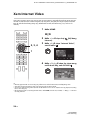
3 Select a TV channel or select an
input.
x To select digital channels
Use 0-9. For channel numbers 10 and above, press the
next digit quickly.
1
3
3
2
1
or or
ページが読み込まれています...
ページが読み込まれています...
ページが読み込まれています...
ページが読み込まれています...
ページが読み込まれています...
ページが読み込まれています...
ページが読み込まれています...
ページが読み込まれています...
ページが読み込まれています...
ページが読み込まれています...
ページが読み込まれています...
ページが読み込まれています...
ページが読み込まれています...
ページが読み込まれています...
ページが読み込まれています...
ページが読み込まれています...
ページが読み込まれています...
ページが読み込まれています...
ページが読み込まれています...
ページが読み込まれています...
ページが読み込まれています...
ページが読み込まれています...
ページが読み込まれています...
ページが読み込まれています...
ページが読み込まれています...
ページが読み込まれています...
ページが読み込まれています...
ページが読み込まれています...
ページが読み込まれています...
ページが読み込まれています...
ページが読み込まれています...
ページが読み込まれています...
ページが読み込まれています...
ページが読み込まれています...
ページが読み込まれています...
ページが読み込まれています...
ページが読み込まれています...
ページが読み込まれています...
ページが読み込まれています...
ページが読み込まれています...
ページが読み込まれています...
ページが読み込まれています...
ページが読み込まれています...
ページが読み込まれています...
ページが読み込まれています...
ページが読み込まれています...
ページが読み込まれています...
ページが読み込まれています...
ページが読み込まれています...
ページが読み込まれています...
ページが読み込まれています...
ページが読み込まれています...
ページが読み込まれています...
ページが読み込まれています...
ページが読み込まれています...
ページが読み込まれています...
ページが読み込まれています...
ページが読み込まれています...
ページが読み込まれています...
ページが読み込まれています...
ページが読み込まれています...
ページが読み込まれています...
ページが読み込まれています...
ページが読み込まれています...
ページが読み込まれています...
ページが読み込まれています...
ページが読み込まれています...
ページが読み込まれています...
ページが読み込まれています...
ページが読み込まれています...
ページが読み込まれています...
ページが読み込まれています...
ページが読み込まれています...
ページが読み込まれています...
ページが読み込まれています...
ページが読み込まれています...
ページが読み込まれています...
ページが読み込まれています...
ページが読み込まれています...
ページが読み込まれています...
ページが読み込まれています...
ページが読み込まれています...
ページが読み込まれています...
ページが読み込まれています...
ページが読み込まれています...
ページが読み込まれています...
ページが読み込まれています...
ページが読み込まれています...
ページが読み込まれています...
ページが読み込まれています...
ページが読み込まれています...
ページが読み込まれています...
ページが読み込まれています...
ページが読み込まれています...
ページが読み込まれています...
ページが読み込まれています...
ページが読み込まれています...
ページが読み込まれています...
ページが読み込まれています...
ページが読み込まれています...
ページが読み込まれています...
ページが読み込まれています...
ページが読み込まれています...
ページが読み込まれています...
ページが読み込まれています...
ページが読み込まれています...
ページが読み込まれています...
ページが読み込まれています...
ページが読み込まれています...
ページが読み込まれています...
ページが読み込まれています...
ページが読み込まれています...
ページが読み込まれています...
ページが読み込まれています...
ページが読み込まれています...
ページが読み込まれています...
ページが読み込まれています...
ページが読み込まれています...
ページが読み込まれています...
ページが読み込まれています...
ページが読み込まれています...
ページが読み込まれています...
ページが読み込まれています...
ページが読み込まれています...
ページが読み込まれています...
ページが読み込まれています...
ページが読み込まれています...
ページが読み込まれています...
ページが読み込まれています...
ページが読み込まれています...
ページが読み込まれています...
ページが読み込まれています...
ページが読み込まれています...
ページが読み込まれています...
ページが読み込まれています...
ページが読み込まれています...
ページが読み込まれています...
ページが読み込まれています...
ページが読み込まれています...
ページが読み込まれています...
ページが読み込まれています...
ページが読み込まれています...
ページが読み込まれています...
ページが読み込まれています...
ページが読み込まれています...
ページが読み込まれています...
ページが読み込まれています...
ページが読み込まれています...
ページが読み込まれています...
ページが読み込まれています...
ページが読み込まれています...
ページが読み込まれています...
ページが読み込まれています...
ページが読み込まれています...
ページが読み込まれています...
ページが読み込まれています...
ページが読み込まれています...
ページが読み込まれています...
ページが読み込まれています...
ページが読み込まれています...
ページが読み込まれています...
ページが読み込まれています...
ページが読み込まれています...
ページが読み込まれています...
ページが読み込まれています...
ページが読み込まれています...
ページが読み込まれています...
ページが読み込まれています...
ページが読み込まれています...
ページが読み込まれています...
ページが読み込まれています...
ページが読み込まれています...
ページが読み込まれています...
ページが読み込まれています...
ページが読み込まれています...
ページが読み込まれています...
ページが読み込まれています...
ページが読み込まれています...
ページが読み込まれています...
ページが読み込まれています...
ページが読み込まれています...
ページが読み込まれています...
ページが読み込まれています...
ページが読み込まれています...
ページが読み込まれています...
ページが読み込まれています...
ページが読み込まれています...
ページが読み込まれています...
ページが読み込まれています...
ページが読み込まれています...
ページが読み込まれています...
ページが読み込まれています...
ページが読み込まれています...
ページが読み込まれています...
ページが読み込まれています...
ページが読み込まれています...
ページが読み込まれています...
ページが読み込まれています...
ページが読み込まれています...
ページが読み込まれています...
ページが読み込まれています...
ページが読み込まれています...
ページが読み込まれています...
ページが読み込まれています...
ページが読み込まれています...
ページが読み込まれています...
ページが読み込まれています...
ページが読み込まれています...
ページが読み込まれています...
ページが読み込まれています...
ページが読み込まれています...
ページが読み込まれています...
ページが読み込まれています...
ページが読み込まれています...
ページが読み込まれています...
ページが読み込まれています...
ページが読み込まれています...
ページが読み込まれています...
ページが読み込まれています...
ページが読み込まれています...
ページが読み込まれています...
ページが読み込まれています...
ページが読み込まれています...
ページが読み込まれています...
ページが読み込まれています...
ページが読み込まれています...
ページが読み込まれています...
ページが読み込まれています...
ページが読み込まれています...
ページが読み込まれています...
ページが読み込まれています...
ページが読み込まれています...
ページが読み込まれています...
ページが読み込まれています...
ページが読み込まれています...
ページが読み込まれています...
ページが読み込まれています...
ページが読み込まれています...
ページが読み込まれています...
ページが読み込まれています...
ページが読み込まれています...
ページが読み込まれています...
ページが読み込まれています...
ページが読み込まれています...
ページが読み込まれています...
ページが読み込まれています...
ページが読み込まれています...
ページが読み込まれています...
ページが読み込まれています...
ページが読み込まれています...
ページが読み込まれています...
ページが読み込まれています...
ページが読み込まれています...
ページが読み込まれています...
ページが読み込まれています...
ページが読み込まれています...
ページが読み込まれています...
ページが読み込まれています...
ページが読み込まれています...
ページが読み込まれています...
ページが読み込まれています...
ページが読み込まれています...
ページが読み込まれています...
ページが読み込まれています...
ページが読み込まれています...
ページが読み込まれています...
ページが読み込まれています...
ページが読み込まれています...
ページが読み込まれています...
ページが読み込まれています...
ページが読み込まれています...
ページが読み込まれています...
ページが読み込まれています...
ページが読み込まれています...
ページが読み込まれています...
ページが読み込まれています...
ページが読み込まれています...
ページが読み込まれています...
ページが読み込まれています...
ページが読み込まれています...
ページが読み込まれています...
ページが読み込まれています...
ページが読み込まれています...
ページが読み込まれています...
ページが読み込まれています...
ページが読み込まれています...
ページが読み込まれています...
ページが読み込まれています...
ページが読み込まれています...
ページが読み込まれています...
ページが読み込まれています...
ページが読み込まれています...
ページが読み込まれています...
ページが読み込まれています...
ページが読み込まれています...
ページが読み込まれています...
ページが読み込まれています...
ページが読み込まれています...
ページが読み込まれています...
ページが読み込まれています...
ページが読み込まれています...
ページが読み込まれています...
ページが読み込まれています...
ページが読み込まれています...
ページが読み込まれています...
ページが読み込まれています...
ページが読み込まれています...
ページが読み込まれています...
ページが読み込まれています...
ページが読み込まれています...
ページが読み込まれています...
-
 1
1
-
 2
2
-
 3
3
-
 4
4
-
 5
5
-
 6
6
-
 7
7
-
 8
8
-
 9
9
-
 10
10
-
 11
11
-
 12
12
-
 13
13
-
 14
14
-
 15
15
-
 16
16
-
 17
17
-
 18
18
-
 19
19
-
 20
20
-
 21
21
-
 22
22
-
 23
23
-
 24
24
-
 25
25
-
 26
26
-
 27
27
-
 28
28
-
 29
29
-
 30
30
-
 31
31
-
 32
32
-
 33
33
-
 34
34
-
 35
35
-
 36
36
-
 37
37
-
 38
38
-
 39
39
-
 40
40
-
 41
41
-
 42
42
-
 43
43
-
 44
44
-
 45
45
-
 46
46
-
 47
47
-
 48
48
-
 49
49
-
 50
50
-
 51
51
-
 52
52
-
 53
53
-
 54
54
-
 55
55
-
 56
56
-
 57
57
-
 58
58
-
 59
59
-
 60
60
-
 61
61
-
 62
62
-
 63
63
-
 64
64
-
 65
65
-
 66
66
-
 67
67
-
 68
68
-
 69
69
-
 70
70
-
 71
71
-
 72
72
-
 73
73
-
 74
74
-
 75
75
-
 76
76
-
 77
77
-
 78
78
-
 79
79
-
 80
80
-
 81
81
-
 82
82
-
 83
83
-
 84
84
-
 85
85
-
 86
86
-
 87
87
-
 88
88
-
 89
89
-
 90
90
-
 91
91
-
 92
92
-
 93
93
-
 94
94
-
 95
95
-
 96
96
-
 97
97
-
 98
98
-
 99
99
-
 100
100
-
 101
101
-
 102
102
-
 103
103
-
 104
104
-
 105
105
-
 106
106
-
 107
107
-
 108
108
-
 109
109
-
 110
110
-
 111
111
-
 112
112
-
 113
113
-
 114
114
-
 115
115
-
 116
116
-
 117
117
-
 118
118
-
 119
119
-
 120
120
-
 121
121
-
 122
122
-
 123
123
-
 124
124
-
 125
125
-
 126
126
-
 127
127
-
 128
128
-
 129
129
-
 130
130
-
 131
131
-
 132
132
-
 133
133
-
 134
134
-
 135
135
-
 136
136
-
 137
137
-
 138
138
-
 139
139
-
 140
140
-
 141
141
-
 142
142
-
 143
143
-
 144
144
-
 145
145
-
 146
146
-
 147
147
-
 148
148
-
 149
149
-
 150
150
-
 151
151
-
 152
152
-
 153
153
-
 154
154
-
 155
155
-
 156
156
-
 157
157
-
 158
158
-
 159
159
-
 160
160
-
 161
161
-
 162
162
-
 163
163
-
 164
164
-
 165
165
-
 166
166
-
 167
167
-
 168
168
-
 169
169
-
 170
170
-
 171
171
-
 172
172
-
 173
173
-
 174
174
-
 175
175
-
 176
176
-
 177
177
-
 178
178
-
 179
179
-
 180
180
-
 181
181
-
 182
182
-
 183
183
-
 184
184
-
 185
185
-
 186
186
-
 187
187
-
 188
188
-
 189
189
-
 190
190
-
 191
191
-
 192
192
-
 193
193
-
 194
194
-
 195
195
-
 196
196
-
 197
197
-
 198
198
-
 199
199
-
 200
200
-
 201
201
-
 202
202
-
 203
203
-
 204
204
-
 205
205
-
 206
206
-
 207
207
-
 208
208
-
 209
209
-
 210
210
-
 211
211
-
 212
212
-
 213
213
-
 214
214
-
 215
215
-
 216
216
-
 217
217
-
 218
218
-
 219
219
-
 220
220
-
 221
221
-
 222
222
-
 223
223
-
 224
224
-
 225
225
-
 226
226
-
 227
227
-
 228
228
-
 229
229
-
 230
230
-
 231
231
-
 232
232
-
 233
233
-
 234
234
-
 235
235
-
 236
236
-
 237
237
-
 238
238
-
 239
239
-
 240
240
-
 241
241
-
 242
242
-
 243
243
-
 244
244
-
 245
245
-
 246
246
-
 247
247
-
 248
248
-
 249
249
-
 250
250
-
 251
251
-
 252
252
-
 253
253
-
 254
254
-
 255
255
-
 256
256
-
 257
257
-
 258
258
-
 259
259
-
 260
260
-
 261
261
-
 262
262
-
 263
263
-
 264
264
-
 265
265
-
 266
266
-
 267
267
-
 268
268
-
 269
269
-
 270
270
-
 271
271
-
 272
272
-
 273
273
-
 274
274
-
 275
275
-
 276
276
-
 277
277
-
 278
278
-
 279
279
-
 280
280
-
 281
281
-
 282
282
-
 283
283
-
 284
284
-
 285
285
-
 286
286
-
 287
287
-
 288
288
-
 289
289
-
 290
290
-
 291
291
-
 292
292
-
 293
293
-
 294
294
-
 295
295
-
 296
296
-
 297
297
-
 298
298
-
 299
299
-
 300
300
-
 301
301
-
 302
302
-
 303
303
-
 304
304
-
 305
305
-
 306
306
-
 307
307
-
 308
308
-
 309
309
-
 310
310
-
 311
311
-
 312
312
-
 313
313
-
 314
314
-
 315
315
-
 316
316
-
 317
317
-
 318
318
-
 319
319
-
 320
320
-
 321
321
-
 322
322
-
 323
323
-
 324
324
-
 325
325
-
 326
326
-
 327
327
-
 328
328
-
 329
329
-
 330
330
-
 331
331


