BenQ V5000i インストールガイド

カテゴリー
プロジェクターアクセサリー
タイプ
インストールガイド

BenQ V5000iは、4K解像度に対応した高性能プロジェクターです。HDR10にも対応しているので、よりリアルで臨場感あふれる映像を楽しむことができます。また、高輝度で明るい部屋でも見やすいのが特徴です。設置性にも優れており、天吊りや卓上など、様々な場所に設置することができます。さらに、Android TVを搭載しているので、様々なアプリやゲームを楽しむことができます。

自宅での映画鑑賞やゲームをより大画面で楽しみたい方におすすめのプロジェクターです。

BenQ V5000iは、4K解像度に対応した高性能プロジェクターです。HDR10にも対応しているので、よりリアルで臨場感あふれる映像を楽しむことができます。また、高輝度で明るい部屋でも見やすいのが特徴です。設置性にも優れており、天吊りや卓上など、様々な場所に設置することができます。さらに、Android TVを搭載しているので、様々なアプリやゲームを楽しむことができます。

自宅での映画鑑賞やゲームをより大画面で楽しみたい方におすすめのプロジェクターです。

1
Safety precautions Getting started Screen assembly Screen mounting
Digital Projector
Installation Guide
Ambient Light Rejecting Screen | SNS21
IMPORTANT
To install the product properly,
you are strongly recommended
to follow the steps and safety
precautions in this document.
V 1.00
How-to video
Installation guide
2
Safety precautions Getting started Screen assembly Screen mounting
Topics
Safety precautions
The screen frames may be sharp. Hold the
parts carefully to avoid possible personal
injury or damage to the floor/product.
Make sure the wall for screen mounting
is stable enough to support the weight of
your ambient light rejecting (ALR) screen.
Never fold the screen material. Avoid
any scratches or wrinkles on the screen
material.
To protect the screen, always wear gloves
before touching or moving the screen
material.
Installation tips
Fix all screws halfway so you can make
adjustments easily. Tighten all screws after
adjustments.
Use appropriate tools to fix different
screws.
Fix screws halfway Tighten after adjustment
K
L
M
Q
R
Q
2
2
3
5
12
15
15
Safety precautions
Installation tips
Getting started
Screen assembly
Wall mounting
Screen cleaning
Product support
3
Safety precautions Getting started Screen assembly Screen mounting
Note
• In the illustrations of this document, steps to complete a task are numbered with 1, and order of
installation is marked with
1
.
• Items in the package are labeled and mentioned by English letters.
• Illustrations in this document are for reference only. The actual content may vary by the product
supplied for your region.
Getting started
1 Prepare the installation space. It should be at least 450 cm x 260 cm with a blanket to protect your floor.
Blanket for protection
177.16” (450 cm)
102.36”
(260 cm)
2 Open the package. Start with reading the installation guide. Do not roll out the screen material yet.
Installation
Guide
Installation
Guide
3
Most of the package contents are inside the rolled screen material. Take package contets out. Be
careful not to fold or scratch the screen material.
4
Safety precautions Getting started Screen assembly Screen mounting
4 Check all package contents.
All package contents
E
G
A
H
E
D IF BB FI D
J
C C
C C
G
A
H
Kx 30 P x 4 U x 2
Lx 24 Q x 2 V x 8
Mx 26 R x 1 Level x 1
Nx 26 S x 2
Installation
Guide Installation
Guide
x 1
Ox 1 T x 2
5
Safety precautions Getting started Screen assembly Screen mounting
Screen assembly
Box contents for screen assembly
No. Name Picture Quantity
A Long inner frame 4
B Short inner frame 2
C Bracket 4
D Long fiberglass rod 2
E Short fiberglass rod 4
F Long edge trim 2
G Short edge trim 4
H Long outer frame 4
I Short outer frame 2
J Center support bar 1
K M5 x 10 screw 30
L M4 x 4 screw 24
MM4 x 60 screw with washer and
spring 26
N Nuts 26
O Screen material 1
P Corner sleeve 4
Q 3mm hex wrench 2
R Phillips screwdriver 1
S Gloves 2 pairs
6
Safety precautions Getting started Screen assembly Screen mounting
1. Inner frame assembly.
A
J
A
B
C C
C C
B
3
3
22
4
22
13
31
Connect the left and right parts of the long
inner frame (A). Fasten them with three M5x10
screws (K).
Complete the inner frame assembly of two
long sides.
1
Insert the bracket (C) to the short inner frame
(B). Fasten them with two M5x10 screws (K).
Complete the inner frame assembly of two
short sides.
2
A
A
K
K
C
B
7
Safety precautions Getting started Screen assembly Screen mounting
Align the short inner frame (B) with the brackets (C) on both ends to the long inner
frames (A) together. Fasten them together with M5 x 10 screws (K). Follow the
illustrations to install the other short side and make the inner frame a square.
B
3
Align the center support bar (J) to the screw holes on the upper and lower inner
frames. Fasten the center support bar (J) with M4 x 4 screws (L).
4
5The inner frame is a square now. Leave it aside and free the space for screen material
installation.
L
L
A
J
A
A
BK
A
8
Safety precautions Getting started Screen assembly Screen mounting
2. Screen material installation.
1
Wear the gloves (S) to protect the screen surface.
2
Roll out the screen material together with the protection of the supplied nonwoven
sheet carefully. The front side of the screen material is facing downwards. It should
be protected by the protection sheet at all times. Do not remove the UP sticker from
the back of the screen material. You will need the indication of the right screen
direction during installation.
UP
3
3
3
4
3
3
34
4
44
4
O
F FD D
G
G
E
E
Insert the fiberglass rods (D & E) through the
openings on the screen material edges. Follow
the illustration to complete the long and the short
sides.
D & E
O
3
Snap the edge trims (F & G) to the screen material
edges to hold the screen material and the
fiberglass rods together. Follow the illustration to
complete the long and the short sides.
4
D & E
F & G
O
How-to video
Screen assembly
9
Safety precautions Getting started Screen assembly Screen mounting
5 While the screen material is still placed and facing downards on the floor, place the assembled inner
frame gently on top of the screen material. Adjust the edge trims (F & G) so they are alignted with the
inner frame on the same side.
UP
6
Insert nuts (N) to the edge trims as illustrated. Insert the number of nuts to each side as specified in the
illustration. That will be 8 nuts on each long side, and 4 nuts on each short side. Slide the nuts evenly to
align with the screw holes inside each inner frame as illustrated by the circles.
N x 8
N x 4
UP
N x 8
N x 4
NF & G
O
N
F & G
O
7 Flip the trims back towards the inner frame.
UP
10
Safety precautions Getting started Screen assembly Screen mounting
8 Fix the inner frame with the edge trim using the M4 x 60 screws (M). The screws should be fixed from
the screw holes inside the frame all the way out to the nuts just inserted into the edge trims. Follow the
order specified in the illustration to complete fixing 24 screws. Start from the middle of each side (as
indicated by
1
~
24
) in order to stretch the screen material properly.
Note
A standard set of M4 x 60 screw (M) comes with a
screw, a washer and a spring. Check and remove the
cap before use.
UPUPUP
1 2 12 18 23111724
4 3 9 19 22102021
13
7
8
14
16
6
5
15
9 Lift the screen material and the frame carefully without touching the screen surface. Check if the screen
material is properly stretched.
To adjuist the stretch, work from the screws.
Once the adjustment is done, lay down the screen gently facing downward again (with the protection of
the supplied nonwoven sheet). Secure all screws.
11
Safety precautions Getting started Screen assembly Screen mounting
3. Outer frame assembly.
UP
UP
H
H
I I
P
P
P
P
3
1 2
+1 2
+
1 2
+
1 2
+
3
3
3
Screen assembly is complete. Proceed with wall mounting.
Align the outer frames (H & I) to the inner frame.
Fasten the frames with M4 x 4 (L) screws. There will be 6 screws for each long side and
3 screws for each short side.
1 2
+
Attach the corner sleeves (P) to the frame corners to complete the screen assembly.
3
UP
2
1
P
L
12
Safety precautions Getting started Screen assembly Screen mounting
Wall mounting
Box contents for wall mounting
Note The supplied M5 x 40 screws (V) are for screen mounting on a solid concrete wall only.
For other wall materials, you need to prepare appropriate rivets or screws separately.
No. Name Picture Quantity
T Mounting bracket 2
U Spring screw 2
VM5 x 40 screw and anchor
(for solid concrete walls only) 8 sets
Additional tools for wall mounting
BenQ TV projector Tape measure (purchased separately)
BenQ TV projector installation guide Level (supplied)
Screwdriver with 8mm drill bit
(suitable for your wall material, purchased
separately)
Pencil (for marking the screw holes, purchased
separately)
Stud finder (optional, purchased separately)
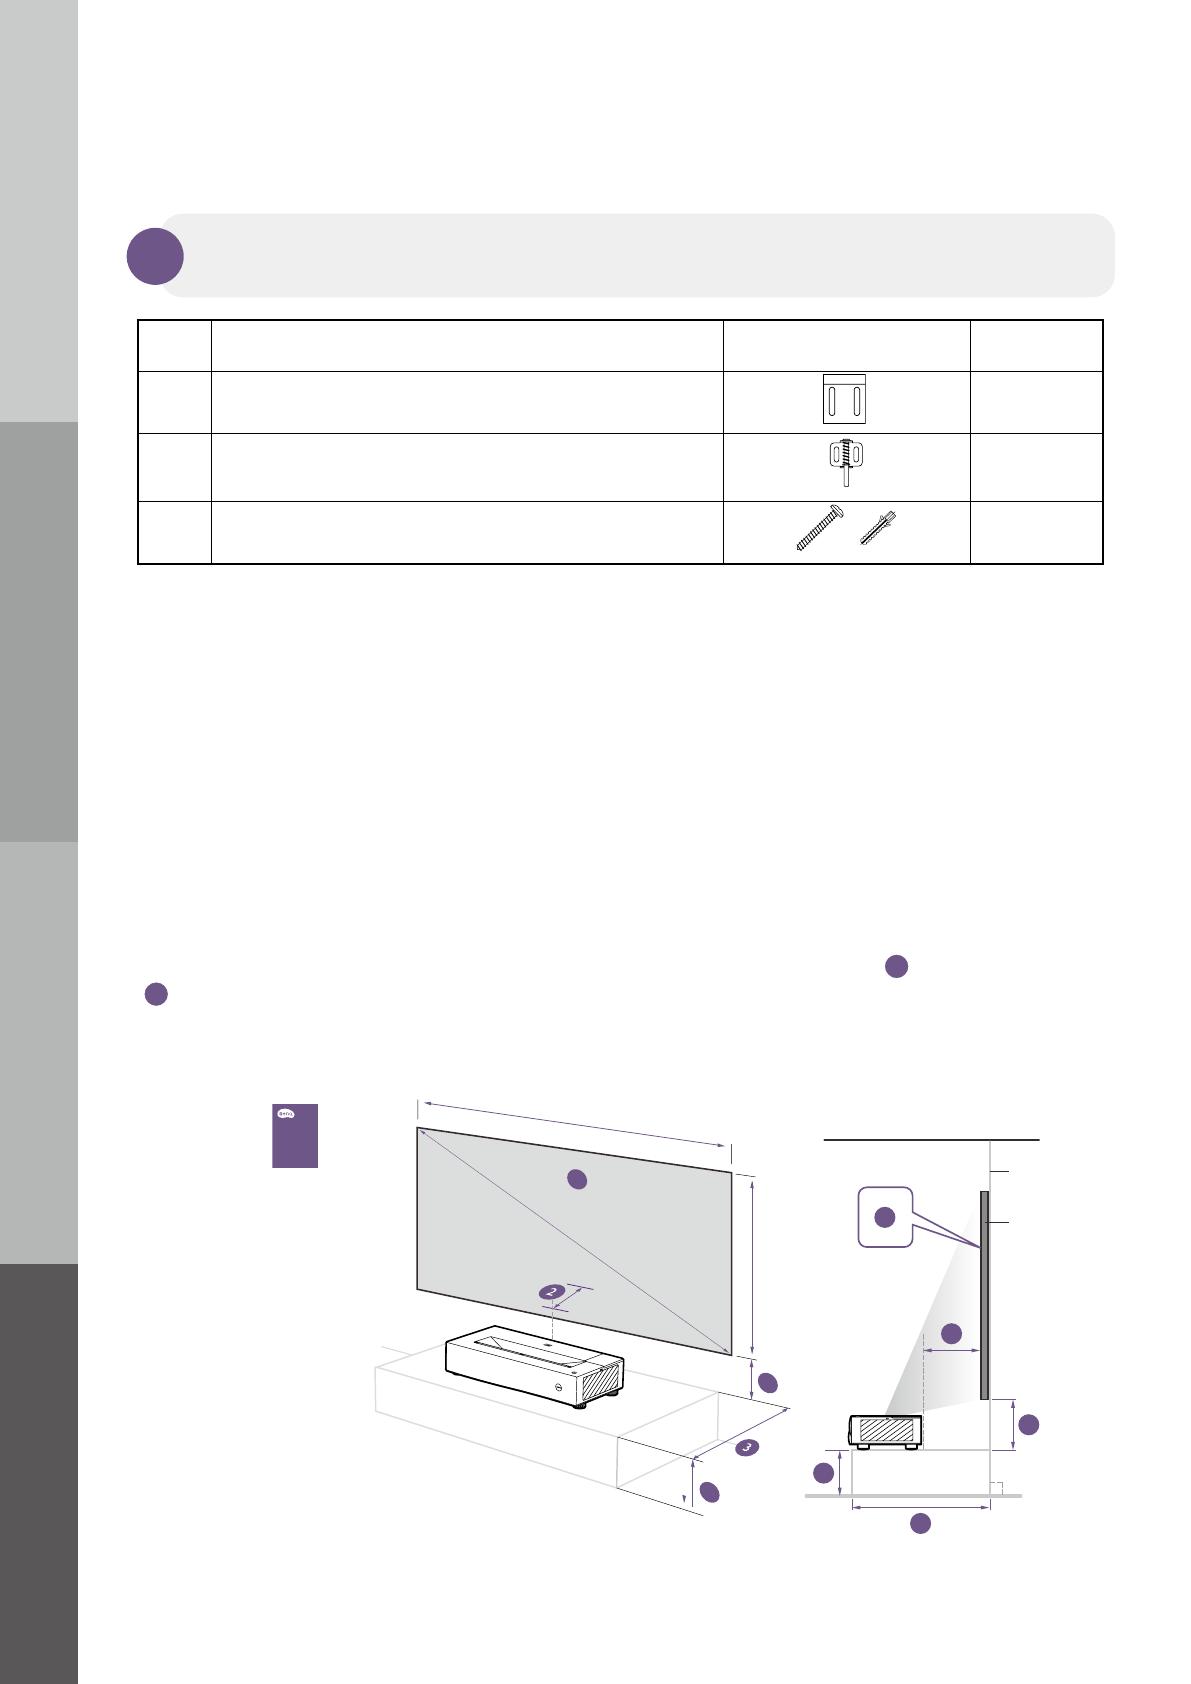
1. Decide the screen height.
Check the installation guide of your BenQ TV projector to find out the proper image size and the recommended
projector placement, including the screen height information. As indicated in the following illustration, the
height of the screen bottom comes from image bottom - TV stand surface distance (
4
) and TV stand height
(
5
). The values vary according to your needs. You are recommended to power on the projector and get to
know the desired screen height by the projected image.
TV projector
installation guide
3
1
5
4
5
2
3
4
1
Installation
Guide
100"
13
Safety precautions Getting started Screen assembly Screen mounting
2. Installing mounting brackets and spring screws.
1 Now you know the distance from the floor to the screen bottom from the previous step. Follow the
illustration below to line up the mounting brackets (T) and spring screws (U). Mark where you want to
drill the screw holes.
Note
• The supplied M5 x 40 screws (V) are for screen mounting on a solid concrete wall only. Make sure
you have the right screwdriver and screws for your wall material before drilling.
You might need a stud nder (purchased separately) to help locate the proper screw holes for mount-
ing.
47.2” (121 cm)
42.9”
(109 cm)
3.5” (9 cm)
T
U
T
U
19.7” (50 cm) 2.6”
(6.5 cm)
18.7” (47.5 cm)
18.9”
(48 cm)
87.2” (221.4 cm)
49.0” (124.5 cm)
Floor
Wall
100"
projection
screen
33
22
Use a level to ensure that the screw holes for
mounting brackets (T) are aligned horizontally
before drilling.
Each mounting bracket (T) should be fastened
by two M5 x 40 screws (V). If you might need to
adjust the screen height, fix the screws to the
center of slots as illustrated.
2
Use a level to ensure that the screw holes for
spring screws (U) are aligned horizontally before
drilling.
Each spring screw (U) should be fastened by two
M5 x 40 screws (V) screws. If you might need to
adjust the height, fix the screws to the center of
slots as illustrated.
3
V
V
V
V
14
Safety precautions Getting started Screen assembly Screen mounting
3. Hanging the screen.
1 Wear the gloves (S) to protect the screen surface.
2 Hold the screen frame with the UP sticker on the upper part of the screen and the rear side facing
towards the wall. Attach the bottom of the screen to the spring screws (U) fixed on the wall.
3 While the bottom of the screen is attached to the spring screws (U), lift the screen up a little bit from
both sides so you can put the upper part on the mounting brackets (T). Hold the screen frame carefully.
Avoid any finger pressure on the screen surface.
UP
UP
Wall Wall
4 Check if the screen is mounted properly. Hold the screen from both sides and slide it up and down gently.
If it is stable, the screen mounting is complete.
2
3
15
Safety precautions Getting started Screen assembly Screen mounting
Screen cleaning
Clean the screen surface once every two weeks. Wipe the screen surface gently with a wet lint-free, non-
abrasive cloth. Avoid using any liquid, aerosol, alcohol, or glass cleaners.
Product support
Should you need assistance, visit Support.BenQ.com for local product support.
Support.BenQ.com Product Support
Online Manual
SNS21
User
Manual
PDF
16
主題
安全注意事項
布幕框架可能很銳利。請小心握住組裝零件,
以免可能造成人身傷害或損壞地板 /產品。
請確認用於布幕安裝的牆面足夠穩固,能
夠承受抗光幕 (ALR) 的重量。
請勿折疊布幕。避免布幕上出現任何刮痕或
皺紋。
為了保護布幕,在接觸或搬動布幕之前,
請務必戴上手套。
安裝訣竅
將所有螺絲固定一半,以便輕鬆進行調整。
調整後鎖緊所有螺絲。
使用適合的工具固定不同的螺絲。
將螺絲固定一半 調整後鎖緊
K
L
M
Q
R
Q
16
16
17
19
26
29
29
安全注意事項
安裝訣竅
準備開始
布幕組裝
牆面安裝
布幕清潔
產品支援
17
注 意: 在本文件的插圖中,完成任務的步驟用
1
編號,安裝順序用
1
標記。
包裝內的物品用英文字母標註和提及。
本文件中的插圖僅供參考。實際內容依各地產品供貨不同而有所差異。
準備開始
1 請準備至少 450 公分 x 260 公分的安裝空間,並請鋪設毯子以保護地板。
保護毯
177.16"450 公分)
102.36
260 公分)
2 打開包裝後,請先參閱安裝指南,先不要攤開布幕。
Installation
Guide
Installation
Guide
3
大部分包裝內容物都在捲起的布幕內。請取出包裝內容物,並小心不要折疊或刮傷布幕。
18
4 檢查所有包裝內容物。
所有包裝內容物
E
G
A
H
E
D IF BB FI D
J
C C
C C
G
A
H
Kx 30 P x 4 U x 2
Lx 24 Q x 2 V x 8
Mx 26 R x 1 水平儀 x 1
Nx 26 S x 2
安裝指南 Installation
Guide
x 1
Ox 1 T x 2
19
布幕組裝
布幕組裝的包裝內容物
編號 名稱 圖片 數量
A長內框 4
B短內框 2
C托架 4
D長玻璃纖維桿 2
E短玻璃纖維桿 4
F長飾邊 2
G短飾邊 4
H長外框 4
I短外框 2
J中心支撐桿 1
K M5 x 10 螺絲 30
L M4 x 4 螺絲 24
M含墊圈和彈簧的 M4 x 60 螺絲 26
N螺帽 26
O布幕 1
P角套 4
Q 3 公釐六角扳手 2
R十字型螺絲起子 1
S手套 兩副
20
1. 內框組裝。
A
J
A
B
C C
C C
B
3
3
22
4
22
13
31
連接長內框 (A) 的左右部分,並使用三顆
M5x10 螺絲 (K) 固定這些部分。
請再完成兩個長邊的內框組裝。
1
將托架 (C) 插入短內框 (B),並使用兩顆 M5x10
螺絲 (K) 固定這些部分。
請再完成兩個短邊的內框組裝。
2
A
A
K
K
C
B
  • Page 1 1
  • Page 2 2
  • Page 3 3
  • Page 4 4
  • Page 5 5
  • Page 6 6
  • Page 7 7
  • Page 8 8
  • Page 9 9
  • Page 10 10
  • Page 11 11
  • Page 12 12
  • Page 13 13
  • Page 14 14
  • Page 15 15
  • Page 16 16
  • Page 17 17
  • Page 18 18
  • Page 19 19
  • Page 20 20
  • Page 21 21
  • Page 22 22
  • Page 23 23
  • Page 24 24
  • Page 25 25
  • Page 26 26
  • Page 27 27
  • Page 28 28
  • Page 29 29
  • Page 30 30

BenQ V5000i インストールガイド

カテゴリー
プロジェクターアクセサリー
タイプ
インストールガイド

BenQ V5000iは、4K解像度に対応した高性能プロジェクターです。HDR10にも対応しているので、よりリアルで臨場感あふれる映像を楽しむことができます。また、高輝度で明るい部屋でも見やすいのが特徴です。設置性にも優れており、天吊りや卓上など、様々な場所に設置することができます。さらに、Android TVを搭載しているので、様々なアプリやゲームを楽しむことができます。

自宅での映画鑑賞やゲームをより大画面で楽しみたい方におすすめのプロジェクターです。

他の言語で