
FlexCare Platinum
Question?
有疑问?
Contact Philips
请联系飞利浦
4235_020_9724_1_Booklet_Simp_A6_v1.indd 1 17/04/15 14:54

4235_020_9724_1_Booklet_Simp_A6_v1.indd 2 17/04/15 14:54

3
1
1
2
3
4
5
6
8
9
10
13
7
11
12
4235_020_9724_1_Booklet_Simp_A6_v1.indd 3 17/04/15 14:54

1
4235_020_9724_1_Booklet_Simp_A6_v1.indd 4 17/04/15 14:54

Sonicare FlexCare Platinum
ENGLISH 6
繁體中文 18
简体中文 28
4235_020_9724_1_Booklet_Simp_A6_v1.indd 5 17/04/15 14:54

6
Introduction
Congratulations on your purchase and welcome to Philips! To fully
benet from the support that Philips offers, register your product at
www.philips.com/welcome.
Important
Read this user manual carefully before you use the appliance and save it
for future reference.
Danger
- Keep the charger and/or sanitiser away from water. Do not place or
store it over or near water contained in a bathtub, washbasin, sink etc.
Do not immerse the charger and/or sanitiser in water or any other
liquid. After cleaning, make sure the charger and/or sanitiser is
completely dry before you connect it to the mains.
Warning
- The mains cord cannot be replaced. If the mains cord is damaged,
discard the charger and/or sanitiser.
- Always have the charger and/or sanitiser replaced with one of the
original type in order to avoid a hazard.
- Do not use the charger and/or sanitiser outdoors or near heated
surfaces. Do not operate the sanitiser where aerosol (spray) products
are being used or where oxygen is being administered.
- The appliance is suitable for mains voltages ranging from 100 to
240 volts.
- If the appliance is damaged in any way (brush head, toothbrush handle,
charger and/or sanitiser), stop using it. This appliance contains no
serviceable parts. If the appliance is damaged, contact the Consumer
Care Centre in your country (see chapter ‘Guarantee and support’).
- This appliance is not intended for use by persons (including children)
with reduced physical, sensory or mental capabilities, or lack of
experience and knowledge, unless they have been given supervision
or instruction concerning use of the appliance by a person
responsible for their safety.
ENGLISH
4235_020_9724_1_Booklet_Simp_A6_v1.indd 6 17/04/15 14:54

- Children should be supervised to ensure that they do not play with
the appliance.
- Discontinue use of the sanitiser if the UV light bulb remains on when
the door is open. UV light can be harmful to the human eye and skin.
Keep the sanitiser out of the reach of children at all times.
Caution
- Do not clean the brush head, the handle, the charger and/or the
sanitiser in the dishwasher.
- If you have had oral or gum surgery in the previous 2 months, consult
your dentist before you use the toothbrush.
- Consult your dentist if excessive bleeding occurs after using this
toothbrush or if bleeding continues to occur after 1 week of use.
Also consult your dentist if you experience discomfort or pain when
you use the Sonicare.
- The Sonicare toothbrush complies with the safety standards for
electromagnetic devices. If you have a pacemaker or other implanted
device, contact your physician or the device manufacturer of the
implanted device prior to use.
- If you have medical concerns, consult your doctor before you use the
Sonicare.
- This appliance has only been designed for cleaning teeth, gums and
tongue. Do not use it for any other purpose. Stop using the appliance
and contact your doctor if you experience any discomfort or pain.
- The Sonicare toothbrush is a personal care device and is not
intended for use on multiple patients in a dental practice or
institution.
- Stop using a brush head with crushed or bent bristles. Replace the
brush head every 3 months or sooner if signs of wear appear.
- Do not use other brush heads than the ones recommended by the
manufacturer.
- If your toothpaste contains peroxide, baking soda or bicarbonate
(common in whitening toothpastes), thoroughly clean the brush head
with soap and water after each use. This prevents possible cracking of
the plastic.
ENGLISH 7
4235_020_9724_1_Booklet_Simp_A6_v1.indd 7 17/04/15 14:54

- Do not insert objects into the air openings of the sanitiser or block
these air openings by placing it on a soft surface or in a position or
location where objects will block these openings (examples of
objects: magazine, tissue paper and hair).
- The UV light bulb is hot during and immediately after the sanitising
cycle. Do not touch the UV light bulb when it is hot.
- Do not operate the sanitiser without the protective screen in place
to avoid contact with a hot bulb.
- If the sanitiser has been used for 3 consecutive UV clean cycles
(i.e. 3 times in a row), switch it off for at least 30 minutes before you
start another UV clean cycle.
Electromagnetic elds (EMF)
This Philips appliance complies with all applicable standards and
regulations regarding exposure to electromagnetic elds.
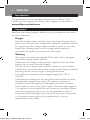
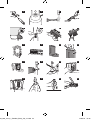
General description (Fig. 1)
1 Hygienic travel cap
2 Brush head with unique identier
3 Handle
4 Power on/off button
5 Intensity level indicator
6 Intensity level button (+ and -)
7 Brushing modes
8 Mode button
9 Battery level indicator
10 UV sanitiser and base with integrated charger and cord wrap (specic
types only)
- Not shown: UV light bulb
- Not shown: Sanitiser drip tray
- Not shown: Protective screen for UV light bulb
11 Mains cord with plug
12 Charger cover with brush head holders (specic types only)
13 Travel charger
- Not shown: Travel case
Note: The contents of the box may vary based on the type purchased.
ENGLISH8
4235_020_9724_1_Booklet_Simp_A6_v1.indd 8 17/04/15 14:54

Preparing for use
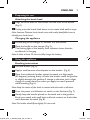
Attaching the brush head
1 Align the brush head so the bristles face the front of the handle.
(Fig. 2)
2 Firmly press the brush head down on the metal shaft until it stops.
Note: Sonicare Platinum brush heads come with easily identiable icons to
identify your brush head.
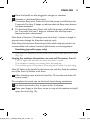
Charging the appliance
1 Put the plug of the charger or sanitiser in a wall socket.
2 Place the handle on the charger (Fig. 3).
, The ashing light of the battery level indicator shows that the
toothbrush is charging.
Note: It takes at least 24 hours to fully charge the battery.
Using the appliance
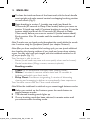
Brushing instructions
1 Wet the bristles (Fig. 4).
2 Apply a small amount of toothpaste on the bristles. (Fig. 5)
3 Place the toothbrush bristles against the teeth at a slight angle
(45 degrees), pressing rmly to make the bristles reach the gumline
or slightly beneath the gumline. A change in vibration (and a slight
change in sound) alerts you when you apply too much pressure
while brushing (Fig. 6).
Note: Keep the centre of the brush in contact with the teeth at all times.
4 Press the power on/off button to switch on the Sonicare (Fig. 7).
5 Gently keep the bristles placed on the teeth and in the gumline.
Brush your teeth with small back and forth motions so the bristles
reach between the teeth (Fig. 8).
Note: The bristles should are slightly. Do not scrub.
ENGLISH 9
4235_020_9724_1_Booklet_Simp_A6_v1.indd 9 17/04/15 14:54

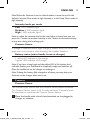
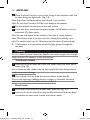
6 To clean the inside surfaces of the front teeth, tilt the brush handle
semi-upright and make several vertical overlapping brushing strokes
on each tooth (Fig. 9).
7 Begin brushing in section 1 (outside top teeth) and brush for
30 seconds (45 seconds in Deep Clean mode) before you move to
section 2 (inside top teeth). Continue brushing in section 3 (outside
bottom teeth) and brush for 30 seconds (45 seconds in Deep
Clean mode) before you move to section 4 (inside bottom teeth).
Brush section 4 for 30 seconds until the toothbrush switches off
(Fig. 10).
Note: To make sure you brush evenly throughout the mouth, divide the mouth
into 4 sections using the Quadpacer feature (see chapter ‘Features’).
Note: After you have completed the brushing cycle, you can spend additional
time brushing the chewing surfaces of your teeth and areas where staining
occurs. You may also brush your tongue, with the toothbrush switched on or
off, as you prefer (Fig. 11).
Your Sonicare is safe to use on:
- Braces (brush heads may wear out more quickly when used on braces).
- Dental restorations (llings, crowns, veneers, implants).
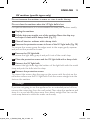
Brushing modes
1 Clean: For an exceptional everyday clean (default mode).
2 White: 2 minutes to remove surface stains and 30 seconds to
brighten and polish your front teeth.
3 Deep Clean: Provides an invigorating 3 minutes of alternating
cleaning and massaging to deliver an exceptionally clean experience.
Your Sonicare comes with the Clean mode activated.
Note: When the toothbrush is switched on, you cannot toggle between modes.
1 Before you switch on the Sonicare, press the mode button to
toggle between modes.
, The selected brushing mode lights up.
, Once a brushing mode has been selected, it remains active until
you select another brushing mode.
ENGLISH10
4235_020_9724_1_Booklet_Simp_A6_v1.indd 10 17/04/15 14:54

Note: When the Sonicare is used in clinical studies, it must be used in the
default 2-minute Clean mode at high intensity or in the Deep Clean mode at
high intensity.
Intensity levels per mode
- Low: 1 LED indicator light.
- Medium: 2 LED indicator lights.
- High: 3 LED indicator lights.
Note: to adjust the intensity level to the next higher or lower level, you can
press the + button to increase intensity or the - button to decrease intensity
at any time during the brushing cycle.
Pressure Sensor
A change in vibration (and a slight change in sound) alerts you when you
apply too much pressure while brushing. See chapter ‘Features’.
Battery status (when handle is not on charger)
- 1 yellow LED indicates a low charge.
- 3 green LEDs indicate a full charge.
Note: If you hear a long beep and the yellow LED of the battery level
indicator ashes, your toothbrush is completely empty and switches off.
Place the toothbrush on the charger to recharge it.
Note: To keep the battery fully charged at all times, you may keep your
Sonicare on the charger when not in use.
Features
Pressure Sensor
This Sonicare type comes with the Pressure Sensor feature activated.
The Pressure Sensor works in all 3 modes and at all 3 intensity levels.
To deactivate or reactivate the Pressure Sensor feature:
1 Place the handle with a brush head attached on the plugged-in
charger or sanitiser.
ENGLISH 11
4235_020_9724_1_Booklet_Simp_A6_v1.indd 11 17/04/15 14:54

2 Press and hold the power on/off button and the mode button for
2 seconds.
, You hear 1 beep to indicate that the Pressure Sensor has been
deactivated.
, You hear 2 beeps to indicate that the Pressure Sensor has been
activated.
Quadpacer
- The Quadpacer is an interval timer that has a short beep and pause
to remind you to brush the 4 sections of your mouth. Depending on
the brushing mode you have selected, the Quadpacer beeps at
different intervals during the brushing cycle. The Quadpacer works in
all 3 modes and at all 3 intensity levels (Fig. 10).
The Quadpacer feature on this type has been activated. To deactivate or
reactivate the Quadpacer feature:
1 Place the handle with a brush head attached on the plugged-in
charger or sanitiser.
2 Press and hold the mode button for 2 seconds.
, You hear 1 beep to indicate the Quadpacer has been deactivated.
, You hear 2 beeps to indicate the Quadpacer has been activated.
Smartimer
The Smartimer indicates that your brushing cycle is complete when
it automatically switches off the toothbrush at the end of the brushing
cycle. Dental professionals recommend brushing at least 2 minutes twice
a day.
Easy-start
The Easy-start feature gently increases power over the rst 14 brushings
to ease into the Sonicare experience. The Easy-start feature only works in
the Clean mode and at the High intensity level.
This Sonicare type comes with the Easy-start feature deactivated.
To activate or deactivate the Easy-start feature:
1 Attach your brush head to the handle.
ENGLISH12
4235_020_9724_1_Booklet_Simp_A6_v1.indd 12 17/04/15 14:54

2 Place the handle on the plugged-in charger or sanitiser.
3 Activate or deactivate Easy-start:
, To activate Easy-start: Press and hold the power on/off button for
2 seconds. You hear 2 beeps to indicate that the Easy-start feature
has been activated.
, To deactivate Easy-start: Press and hold the power on/off button
for 2 seconds. You hear 1 beep to indicate that the Easy-start
feature has been deactivated.
Note: Each of the rst 14 brushings must be at least 1 minute in length to
properly move through the Easy-start ramp-up cycle.
Note: Using the Easy-start feature beyond the initial ramp-up period is not
recommended and reduces Sonicare’s effectiveness in removing plaque.
Sanitising (specic types only)
- With the UV sanitiser you can clean your brush head after every use
(Fig. 12).
Unplug the sanitiser, discontinue use and call Consumer Care if:
- The UV light bulb remains on when the door is open.
- The window is broken or missing from the sanitiser.
- The sanitiser gives off smoke or a burning smell while it is operating.
Note: UV light can be harmful to the human eye and skin. Keep the sanitiser
out of the reach of children at all times.
1 After brushing, rinse the brush head for 15 seconds and shake off
excess water.
Do not place the travel cap on the brush head during sanitisation.
2 Let the brush head to dry in open air for 2 minutes.
3 Place your nger in the door recess on top of the sanitiser and pull
open the door (Fig. 13).
ENGLISH 13
4235_020_9724_1_Booklet_Simp_A6_v1.indd 13 17/04/15 14:54

4 Place the brush head on one of the 2 pegs in the sanitiser with the
bristles facing the light bulb. (Fig. 14)
Note: Only clean Sonicare snap-on brush heads in the sanitiser.
Note: Do not clean Sonicare for Kids brush heads in the sanitiser.
5 Put the plug of the sanitiser in the wall socket.
6 Close the door and press the green power on/off button once to
select the UV clean cycle.
Note: You can only switch on the sanitiser if the door is closed properly.
Note: The sanitiser stops if you open the door during the sanitising cycle.
Note: The sanitiser cycle runs for 10 minutes and then shuts off automatically.
, The sanitiser is in operation when the light glows through the
window.
Cleaning
Do not clean the brush head, the handle, the travel charger, the charger
cover and the UV sanitiser in the dishwasher.
Toothbrush handle
1 Remove the brush head and rinse the metal shaft area with warm
water (Fig. 15).
Do not push on the rubber seal on the metal shaft with sharp objects,
as this may cause damage.
2 Use a damp cloth to wipe the entire surface of the handle.
Do not use isopropyl rubbing alcohol, vinegar, or essential oil based
products to clean the handle or the brush head.
Brush head
1 Rinse the brush head and bristles after each use (Fig. 16).
2 Remove the brush head from the handle and rinse the brush head
connection at least once a week with warm water.
ENGLISH14
4235_020_9724_1_Booklet_Simp_A6_v1.indd 14 17/04/15 14:54

UV sanitiser (specic types only)
Do not immerse the sanitiser in water or rinse it under the tap.
Do not clean the sanitiser when the UV light bulb is hot.
For optimal effectiveness, it is recommended to clean your sanitiser weekly.
1 Unplug the sanitiser.
2 Pull the drip tray straight out of the sanitiser. Rinse the drip tray
and wipe it clean with a damp cloth (Fig. 17).
3 Clean all interior surfaces with a damp cloth.
4 Remove the protective screen in front of the UV light bulb. (Fig. 18)
To remove the screen, grasp the edges next to the snaps, gently squeeze
and pull out the protective screen.
5 Remove the UV light bulb.
To remove the light bulb, grasp it and pull it out of the metal clasp.
6
Clean the protective screen and the UV light bulb with a damp cloth.
7 Reinsert the UV light bulb.
To reinsert the light bulb, align the bottom of the light bulb with the metal
clasp and push the bulb into the clasp.
8 Reinsert the protective screen.
To reinsert the screen, align the pegs on the screen with the slots on the
reective surface near the UV light bulb. Push the screen straight into the
slots on the sanitiser.
Storage
If you are not going to use the appliance for an extended period of time,
remove the mains plug from the wall socket. Then clean the appliance and
store it in a cool and dry place away from direct sunlight. You can use the
cord wrap feature to store the mains cord neatly.
ENGLISH 15
4235_020_9724_1_Booklet_Simp_A6_v1.indd 15 17/04/15 14:54

Replacement
Brush head
Replace Sonicare brush heads every 3 months to achieve optimal results.
Only use genuine Philips Sonicare replacement brush heads.
Ordering accessories
To buy accessories or spare parts, visit www.shop.philips.com/
service or go to your Philips dealer. You can also contact the Philips
Consumer Care Centre in your country (see the worldwide guarantee
leaet for contact details).
Recycling
Do not throw away the appliance with the normal household waste at
the end of its life, but hand it in at an ofcial collection point for recycling.
By doing this, you help to preserve the environment.
Removing the rechargeable battery
Only remove the rechargeable battery when you discard the appliance.
Make sure the battery is completely empty when you remove it.
To remove the rechargeable battery, you need a at-head (standard)
screwdriver. Observe basic safety precautions when you follow the
procedure described below. Be sure to protect your eyes, hands, ngers,
and the surface on which you work.
1 Remove the toothbrush from the charger, switch it on and let it
operate until it stops. Continue to switch on the Sonicare until the
battery is completely empty.
2 Insert a athead (standard) screwdriver into the slot located at the
bottom of the handle. Turn the screwdriver anticlockwise to release
the bottom cap. (Fig. 19)
3 Place the handle on a solid surface with the buttons facing up and
lightly tap the housing 2.5cm from the bottom edge with a hammer.
ENGLISH16
4235_020_9724_1_Booklet_Simp_A6_v1.indd 16 17/04/15 14:54

4 Hold the handle upside down and push down on the shaft to
release the internal components of the handle (Fig. 20).
5 Insert the screwdriver under the circuit board, next to the battery
connections, and twist to break the connections. Remove the
circuit board and pry the battery from the plastic carrier (Fig. 21).
Guarantee and support
If you need information or support, please visit www.philips.com/
support or read the separate worldwide guarantee leaet.
Guarantee restrictions
The terms of the international guarantee do not cover the following:
- Brush heads.
- Damage caused by use of unauthorised replacement parts.
- Damage caused by misuse, abuse, neglect, alterations or unauthorised
repair.
- Normal wear and tear, including chips, scratches, abrasions,
discolouration or fading.
- UV light bulb.
ENGLISH 17
4235_020_9724_1_Booklet_Simp_A6_v1.indd 17 17/04/15 14:54

18
簡介
恭喜您購買本產品並歡迎加入飛利浦!請於 www.philips.com/
welcome 註冊您的產品,以善用飛利浦提供的支援。
重要事項
在使用本產品前,請先仔細閱讀本使用手冊,並保留使用手冊以
供日後參考。
危險
- 請勿讓充電器和/或殺菌器沾到水。請勿放置或存放於盛水的澡
盆、洗臉盆、洗手槽等等的上方或附近。不可讓充電器和/或殺
菌器浸入水或其他液體中。完成清潔程序之後,請先確定充電
器和/或殺菌器完全乾燥,再連接到主電源。
警示
- 本電線無法更換。如果電線損壞,請棄置充電器和/或殺菌器。
- 請務必以原型號的充電器和/或殺菌器更換,以免發生危險。
- 充電器和/或殺菌器不可在室外或高熱表面附近使用。請勿在使
用氣溶膠 (噴劑) 產品或注入氧氣的位置操作殺菌器。
- 本產品適用於 100 到 240 伏特的插座電壓。
- 本產品 (含刷頭、牙刷握柄、充電器和/或殺菌器) 若有任何破
損跡象,請立即停止使用。本產品未包含可自行維修的零件。
萬一損壞,請與您所在國家/地區的客戶服務中心聯繫 (請參閱
「保固與支援」單元)。
- 本產品不適合供下列人士 (包括孩童) 使用:身體官能或心智能
力退化者,或是經驗與使用知識缺乏者。他們需要有負責其安
全的人員在旁監督,或指示產品的使用方法,方可使用。
- 請勿讓孩童使用本產品或將本產品當成玩具。
-
殺菌器的門開啟時,若紫外線燈依舊亮著,請立即停止使用。
紫外光對人體的眼睛與皮膚有害。千萬不可讓兒童接觸殺菌器。
警告
- 刷頭、握柄、充電器和/或殺菌器不可放入洗碗機中清洗。
- 如果您的口腔或牙齦在過去 2 個月內曾動過手術,請在使用本
牙刷前諮詢您的牙醫。
繁體中文
4235_020_9724_1_Booklet_Simp_A6_v1.indd 18 17/04/15 14:54

- 如果您在使用本牙刷後有出血狀況,或者出血狀況持續超過
1 星期,請諮詢您的牙醫。若使用 Sonicare 電動牙刷之後感到
任何不適或疼痛,也請諮詢您的牙醫。
- Sonicare 電動牙刷符合電磁裝置之安全標準。若您身上裝有心
律調整器或曾植入其他裝置,請於使用前詢問您的醫師或植入
裝置的製造商。
- 若您有醫療方面的顧慮,使用 Sonicare 之前請先諮詢您的醫
師。
- 本產品只適用於清潔牙齒、牙齦與舌頭,請勿用作其他用途。
用後若感到任何不適或疼痛,請停止使用並尋求醫生協助。
- Sonicare 電動牙刷為個人保健用品,不宜在牙醫診所或醫療機
構供多名病患使用。
- 刷頭的刷毛若傾倒彎曲,請停止使用。請每 3 個月更換一次刷
頭,其間出現老化現象時則提早更換。
- 請勿使用非製造商推薦的刷頭。
- 如果牙膏內含過氧化氫、小蘇打或重碳酸鹽 (常見於美白用牙
膏),請在刷牙完畢後以肥皂及清水徹底清洗牙刷刷頭。如此可
預防塑膠部分龜裂。
- 請勿在殺菌器的通氣孔塞入任何物品,或是將殺菌器置於柔軟
的表面上或是放在有物品 (例如雜誌、衛生紙和毛髮) 會阻塞這
些通氣孔的地方,而阻塞這些通氣孔。
- 殺菌期間與剛完成時,紫外線燈泡具有高熱。紫外線燈泡未降
溫前不可碰觸。
- 殺菌器未加上護網時請勿操作,以避免與高熱燈泡接觸。
- 若殺菌器已連續使用 3 個紫外線清潔週期 (即連續使用 3 次),
請先至少關閉 30 分鐘以上,再開始另一個紫外線清潔週期。
電磁波 (EMF)
本飛利浦產品符合所有電磁波暴露的相關適用標準和法規。
繁體中文 19
4235_020_9724_1_Booklet_Simp_A6_v1.indd 19 17/04/15 14:54

一般說明 (圖 1)
1 旅行用衛生保護蓋
2 具獨特識別標記的刷頭
3 握柄
4 電源開關按鈕
5 強度等級指示燈
6 強度等級按鈕 (+ 和 -)
7 刷牙模式
8 模式按鈕
9 電池電量指示燈
10 紫外線殺菌器與機座,附內建充電器與黏束帶 (僅限特定機型)
- 圖中未顯示:紫外線燈泡
- 圖中未顯示:殺菌器滴盤
- 圖中未顯示:紫外線燈泡的護網
11 電源線附插頭
12 充電器蓋附刷頭固定座 (限特定機型)
13 旅行用充電器
- 圖中未顯示:旅行盒
注意: 包裝內容得視購買機型而定。
使用前準備
安裝刷頭
1 將刷頭對齊,使刷毛朝向握柄正面。 (圖 2)
2 將刷頭用力下壓到金屬軸上,至到底為止。
注意: Sonicare Platinum 刷頭附有容易辨識的圖示,方便您辨識
自己的刷頭。
為產品充電
1 將充電器或殺菌器的插頭插入牆上插座。
2 將握柄放到充電器上。 (圖 3)
, 電池電量指示燈若在閃爍,就表示牙刷正在充電中。
注意: 電池電力完全充滿至少需 24 小時。
繁體中文20
4235_020_9724_1_Booklet_Simp_A6_v1.indd 20 17/04/15 14:54
ページが読み込まれています...
ページが読み込まれています...
ページが読み込まれています...
ページが読み込まれています...
ページが読み込まれています...
ページが読み込まれています...
ページが読み込まれています...
ページが読み込まれています...
ページが読み込まれています...
ページが読み込まれています...
ページが読み込まれています...
ページが読み込まれています...
ページが読み込まれています...
ページが読み込まれています...
ページが読み込まれています...
ページが読み込まれています...
ページが読み込まれています...
ページが読み込まれています...
ページが読み込まれています...
ページが読み込まれています...
ページが読み込まれています...
ページが読み込まれています...
ページが読み込まれています...
ページが読み込まれています...
-
 1
1
-
 2
2
-
 3
3
-
 4
4
-
 5
5
-
 6
6
-
 7
7
-
 8
8
-
 9
9
-
 10
10
-
 11
11
-
 12
12
-
 13
13
-
 14
14
-
 15
15
-
 16
16
-
 17
17
-
 18
18
-
 19
19
-
 20
20
-
 21
21
-
 22
22
-
 23
23
-
 24
24
-
 25
25
-
 26
26
-
 27
27
-
 28
28
-
 29
29
-
 30
30
-
 31
31
-
 32
32
-
 33
33
-
 34
34
-
 35
35
-
 36
36
-
 37
37
-
 38
38
-
 39
39
-
 40
40
-
 41
41
-
 42
42
-
 43
43
-
 44
44


