ページを読み込んでいます...

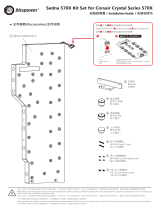
BPTA-909XYZ-KIT 組裝說明書
V3
繁中文
BPTA-XYZ-RES-PWM-V2
主件說明
.......................1個
.......................1個
.....................1個
........1個
........1個
...............1個
..............1個
.......................2支
.......................4個
...................1支
............1個
............1個
水箱
馬達
水流計
TA-GMALP1622-GS
TA-GFALP1622-GS
TA-90RE-GS
TA-EXAIR-GS
支架
螺絲
六角板手
大4PIN供電線材
BP-CADRGBY1
隨附接頭內容
其它配件內容
本公司保留對產品的設計更改以及解釋的權力,如有更動恕不另行通知,
產品顏色與配件以實物為準。
出水孔
入水孔
1
4
2
5 6 7
8
9
10
12
11
1
2
3
4
5
6
7
8
9
10
11
12
3

水箱與水泵不可拆解!一經拆解即不保固。
組裝完成樣式
A段組裝
B段組裝
水流計設計
3
A段組裝完成品
A 電源負極 -
B 電源正極 +
C 轉速信號
D 調速信號
A B C D
S1水泵規格
額定電壓:12V DC
功 耗:17W
最大流量:960L/h
噪 音:40~45dBA
最高系統溫度:60℃
PWM:有
使用壽命:50,000小時
保 固:2 年
供電與馬達
1
組裝示範(自由創作)
2
S1馬達除了可由主機板供電外,亦可
透過轉接線由電源供應器直接供電。
1.本產品設計帶有水流計,玩家可依葉扇轉動情況判斷水路是否流動順利,
2.水流計兩側水孔必須裝有水路才能啟動葉扇轉動(無固定出入水順序設定)。
3.葉扇水道為獨立水道,玩家可選擇串聯或併聯水路,亦可發揮雙色水路創意。
配合扭轉螺母
以完成組裝。
1
5
8
9
7
6
4
11

單一水路串聯接法:
水路分配
4
DRGB燈效啟動
6
填水注意事項
5
1.出水孔A銜接其它水冷配件入水孔(或者選擇銜接B、C其一孔)。
2.若選擇直接串連B/C孔,則B、C中另一孔銜接其它配件入水孔。
3.串接其它配件後由其出水孔銜接D/E其中一孔。
4.選擇D/E孔其一為填水孔。
雙水路併聯接法:
1.其一水路由出水孔A銜接其它水冷配件入水孔。
2.串接該配件後由其出水孔銜接D、E其中一孔。
3.另一水路選擇有B/C孔其一孔為入水或出水(自由分配),再銜接回
該水路。
4.選擇D/E孔其一為填水孔。
→燈條插頭可依方向順序接上主機板
與主板同步燈光效果,或選擇串接
BP-CADRGBY1與其它DRGB燈效配
件串連,共享燈效控制端。
主板
選擇喜好的水冷濃縮液顏色,以純淨水調合,由”填水孔”注入至水箱九分滿,接著利用”24PIN跳線開關”
啟動電源,讓水路中的空氣集中至水箱排出,再依水量繼續添加至水箱九分滿左右即可。
(24PIN跳線開關用途:需無經主板開啟ATX電源時, 使電源直接開啟供電。)
注意:Bitspower 建議消費者使用蒸餾水、純凈水,加入Bitspower的染劑作為水冷液使用;如客戶自
行選購的水冷液導致電鍍層剝落、水道堵塞、水泵轉動不正常、水箱管破裂或密封圈變型以致
漏水等及其它不可抗力之問題時,消費者自行承擔相關產品責任。
未注水前,請勿啟動水泵電源。
ABC
D
E
12
6

BPTA-CPUMS-SKI
注意,跑水前,請先確認所有零件已安裝在正確的位置上,在不開主機,單開水泵的情况下,進行24小時的跑水測試, 確保無漏水情况後再開主機,避免發生漏水而導致電腦零件的損壞。
本公司保留對產品的設計更改以及解釋的權力,如有更動恕不另行通知,產品顏色與配件以實物為準。
DRGB LED
80
75
72
INTEL LGA 775
INTEL LGA 115X
INTEL LGA 1366
INTEL LGA 2011
INTEL LGA 2011-V3
INTEL LGA 2066
INTEL LGA 775
INTEL LGA 115X
INTEL LGA 1366
INTEL LGA 2011
INTEL LGA 2011-V3
INTEL LGA 2066
請接主版或其他設備的DRGB插槽。
主版 DRGB控制器(不包括)
BPTA-DRGBMFC
IN
OUT

安裝方式1
請按照正確的順序安裝
安裝方式2
請按照正確的順序安裝
手轉螺絲不能鎖太緊,彈簧略有壓迫且保有間
隙如下圖。手轉螺絲不能旋轉到底,當鎖太緊
時,SCM3F6螺絲會被帶動,並會被帶離主板
,反而導致冷頭與CPU貼合效果不好。
注意,跑水前,請先確認所有零件已安裝在正確的位置上,在不開主機,單開水泵的情况下,進行24小時的跑水測試, 確保無漏水情况後再開主機,避免發生漏水而導致電腦零件的損壞。
本公司保留對產品的設計更改以及解釋的權力,如有更動恕不另行通知,產品顏色與配件以實物為準。
手轉螺絲
彈簧
冷頭
1毫米墊片
孔位固定螺絲
手轉螺絲
彈簧
冷頭
1毫米墊片
M3x32毫米螺絲
1毫米墊片
背板墊片
3M背膠絕緣片
金屬背板
SCM3F6螺絲

BP-VG2080RD-A2
注意,跑水前,請先確認所有零件已安裝在正確的位置上,在不開主機,單開水泵的情况下,進行24小時的跑水測試, 確保無漏水情况後再開主機,避免發生漏水而導致電腦零件的損壞。
本公司保留對產品的設計更改以及解釋的權力,如有更動恕不另行通知,產品顏色與配件以實物為準。
請接主版或其他設備的DRGB插槽
DRGB
1
8
9
6
7
4
5
2
3
Step 1
Step 2
5
7
8
A
C
C
B
BP-VG2080RD-A2
11 組
M3 x 8 毫米螺絲 4 支
8
Bitspower 背板 1 片
6
M2.5 x 8 毫米螺絲 15 支
5
M2.5 x 6 毫米螺絲 1 支
7
Bitspower擋板 1 片
9
4墊高螺絲 1 支
32.5 毫米導熱墊片 6 片
21.0 毫米導熱墊片 5 片
配件
for NVIDIA GEFORCE RTX 2080 / 2070 SUPER / 2080 SUPER

NVIDIA GEFORCE RTX 2080
注意,跑水前,請先確認所有零件已安裝在正確的位置上,在不開主機,單開水泵的情况下,進行24小時的跑水測試, 確保無漏水情况後再開主機,避免發生漏水而導致電腦零件的損壞。
本公司保留對產品的設計更改以及解釋的權力,如有更動恕不另行通知,產品顏色與配件以實物為準。
導熱墊片和導熱膏的正確應用位置
適量使用導熱膏
1 mm導熱墊片
2.5 mm導熱墊片

注意,跑水前,請先確認所有零件已安裝在正確的位置上,在不開主機,單開水泵的情况下,進行24小時的跑水測試, 確保無漏水情况後再開主機,避免發生漏水而導致電腦零件的損壞。
本公司保留對產品的設計更改以及解釋的權力,如有更動恕不另行通知,產品顏色與配件以實物為準。
BP-VG2080RD-A2
11 組
M3 x 8 毫米螺絲 4 支
8
Bitspower 背板 1 片
6
M2.5 x 8 毫米螺絲 15 支
5
M2.5 x 6 毫米螺絲 1 支
7
Bitspower擋板 1 片
9
4墊高螺絲 1 支
32.5 毫米導熱墊片 6 片
21.0 毫米導熱墊片 5 片
配件
for NVIDIA GEFORCE RTX 2080Ti
1
8
6
7
4
5
2
3
Step 1
Step 2
5
7
8
A
C
C
B
9
請接主版或其他設備的DRGB插槽
Digital RGB PIN on motherboard
or other equipment.
请接主版或其他设备的DRGB插槽
DRGB

注意,跑水前,請先確認所有零件已安裝在正確的位置上,在不開主機,單開水泵的情况下,進行24小時的跑水測試, 確保無漏水情况後再開主機,避免發生漏水而導致電腦零件的損壞。
本公司保留對產品的設計更改以及解釋的權力,如有更動恕不另行通知,產品顏色與配件以實物為準。
BP-VG2080RD-A2
11 組
M3 x 8 毫米螺絲 4 支
8
Bitspower 背板 1 片
6
M2.5 x 8 毫米螺絲 15 支
5
M2.5 x 6 毫米螺絲 1 支
7
Bitspower擋板 1 片
9
4墊高螺絲 1 支
32.5 毫米導熱墊片 6 片
21.0 毫米導熱墊片 5 片
配件
for NVIDIA GEFORCE RTX 2080Ti
1
3
2
請接主版或其他設備的DRGB插槽
Digital RGB PIN on motherboard
or other equipment.
请接主版或其他设备的DRGB插槽
DRGB
搭配原廠背板使用方式
Installation with the original backplate
搭配原厂背板使用方式
※ 背板內的原廠導熱墊片請按原位置貼回
The original thermal pads on the back plate should
be placed back to their original position.
背板内的原厂导热垫片请按原位置贴回
5
6
7
4
原廠擋板(不包括)
Original baffle(Not Included)
原厂挡板不包括()

注意,跑水前,請先確認所有零件已安裝在正確的位置上,在不開主機,單開水泵的情况下,進行24小時的跑水測試, 確保無漏水情况後再開主機,避免發生漏水而導致電腦零件的損壞。
本公司保留對產品的設計更改以及解釋的權力,如有更動恕不另行通知,產品顏色與配件以實物為準。
導熱墊片和導熱膏的正確應用位置
適量使用導熱膏
1 mm導熱墊片
2.5 mm導熱墊片
NVIDIA GEFORCE RTX 2080Ti

BPTA-FX1812NT-3
注意,跑水前,請先確認所有零件已安裝在正確的位置上,在不開主機,單開水泵的情况下,進行24小時的跑水測試, 確保無漏水情况後再開主機,避免發生漏水而導致電腦零件的損壞。
本公司保留對產品的設計更改以及解釋的權力,如有更動恕不另行通知,產品顏色與配件以實物為準。
安裝方式
A B C D
A 電源負極 -
B 電源負極 +
C 轉速訊息 FG
D 轉速調控 PWM
風 扇 規 格
PWM 4pin header / DRGB 5V 3pin header

TA-WTODP-DRGB
注意,跑水前,請先確認所有零件已安裝在正確的位置上,在不開主機,單開水泵的情况下,進行24小時的跑水測試, 確保無漏水情况後再開主機,避免發生漏水而導致電腦零件的損壞。
本公司保留對產品的設計更改以及解釋的權力,如有更動恕不另行通知,產品顏色與配件以實物為準。
安裝方式
應用
配件說明
水箱 2 個
1
1 個水流計
2
2 個接頭
3
未包含建議應用方式所需之配件
3
1
2
M4x10
BP-120UWTMP-BK
冷排
TA-WTODP-DRGB

BPTA-DRGBMFC
注意,跑水前,請先確認所有零件已安裝在正確的位置上,在不開主機,單開水泵的情况下,進行24小時的跑水測試, 確保無漏水情况後再開主機,避免發生漏水而導致電腦零件的損壞。
本公司保留對產品的設計更改以及解釋的權力,如有更動恕不另行通知,產品顏色與配件以實物為準。
安裝方式
供電
DRGB接口
上一模式 下一模式速度
此DRGB控制器作用是擴展主板上不足的RGB接口,一個DRGB接口可分出八個,用於統一控制多個支援主板燈效的風扇和燈條等設備;同時,控制器具備自有的燈
光效果,可透過控制器上的按鍵來切換。
注意事項:
1:此控制器不能提升主板DRGB接口的額外供電能力,一般DRGB接口最少能提供5V ╳ 1A = 5W供電能力,建議連接DRGB燈條總長度不要超過1米,若接口負載過
大後出現燈光亮度明顯變暗的情況,則需要減少設備。此控制器不能與主板的燈光軟件同步。
2:接線技巧—牢記接頭上的箭頭標誌對應DRGB接頭的5V針腳。
3:在獨立使用控制器時,請只接SATA端口。
規格:
工作電壓:直流電壓5V輸入
功率:小於1W
◆同時按MODE+和MODE-後同時鬆開進入自動模式
◆未使用接口請蓋上塑膠蓋或絕緣膠布隔絕,避免短路
◆To avoid short circuit, please cover the unused
headers with a plastic cover or electrical tape.
◆未使用接口请盖上塑胶盖或绝缘胶布替代,避免短路

BPTA-PFANMFH
注意,跑水前,請先確認所有零件已安裝在正確的位置上,在不開主機,單開水泵的情况下,進行24小時的跑水測試, 確保無漏水情况後再開主機,避免發生漏水而導致電腦零件的損壞。
本公司保留對產品的設計更改以及解釋的權力,如有更動恕不另行通知,產品顏色與配件以實物為準。
安裝方式
CPU_FAN
1:擴展10位風扇4針接口,解決主板接口不足,以及集中處理風扇線材
2:PWM接口接主板CPU_FAN接口,紅色接口帶測速功能。黑色接口為PWM常規風扇接口(無測速信號,但不影響PWM功能)
註:避免測速混亂,電腦死機,一個接口拓展出來的多路接口,只顯示其中一路風扇的測速
3:供電可以用電源直接供電,可以減輕主板負載壓力,溫控線PWM從主板分開接,供電和溫控兩不誤
4:適用於12V 主板3pin/4pin風扇。(3pin風扇也可以使用,但插上是全速運轉,因為3pin風扇無PWM調速功能)
5:集線器後面帶有3M背膠,方便粘貼在平整的地方。也帶有一個固定鏍絲孔位
供電
風扇接口(帶測速)
風扇接口(無測速)
BPTA-DTMC-V2
牙 規:G1/4"
額定電壓:DC 5V
顯示溫度:0~99°C
功率消耗:最大 0.07W
連接器:SATA
72
W
T
水溫
Water temperature
水温

注意:Bitspower建議消費者使用蒸餾水、純凈水,加入Bitspower的染劑作為水冷液使用;如客戶自行
選購的水冷液導致電鍍層剝落、水道堵塞、水泵轉動不正常、水箱管破裂或密封圈變型以致漏水
等及其它不可抗力之問題時,消費者自行承擔相關產品責任。
未注水前,請勿啟動水泵電源。
注意,跑水前,請先確認所有零件已安裝在正確的位置上,在不開主機,單開水泵的情况下,進行24小時的跑水測試, 確保無漏水情况後再開主機,避免發生漏水而導致電腦零件的損壞。
本公司保留對產品的設計更改以及解釋的權力,如有更動恕不另行通知,產品顏色與配件以實物為準。
裝機範例:
第三版

V3
BPTA-909XYZ-KIT Installation Guide
English
BPTA-XYZ-RES-PWM-V2
Accessories
Bitspower reserves the right to change the product design and
interpretations. These are subject to change without notice. Product
colors and accessories are based on the actual product.
...............1PCS
.....................1PCS
.............1PCS
.......1PCS
........1PCS
..............1PCS
.............1PCS
...................2PCS
...............4PCS
......1PCS
...1PCS
...........1PCS
Water Tank
Pump
Flow Indicator
TA-GMALP1622-GS
TA-GFALP1622-GS
TA-90RE-GS
TA-EXAIR-GS
Bracket
M3x8 Screw
Hex Wrench (2.5MM)
3PIN/4PIN Transfer4PIN
BP-CADRGBY1
Complimentary Fittings
Other Accessories
OUT
IN
1
4
3
2
5 6 7
8
9
10
12
11
1
2
3
4
5
6
7
8
9
10
11
12

The water tank and pump can’t
be disassembled! Once disassem-
bled, there is no guarantee.
Assembly Finished Sample
Section A Assembly
Section B Assembly
Designed For Flow Indicator
3
Section A Assembly
A Negative electrode -
B positive electrode +
C Speed signal
D Speed control signal
A B C D
S1 Pump Spec.
Rated voltage:12V DC
Power consumption:17W
Maximum flow:960L/h
Noise:40~45dBA
Maximum system temperature:60℃
PWM:Yes
MTBF:50,000 hours
Warranty:2 years
Power Supply and Pump
1
Assembly Demonstration (Free Creation)
2
Except the motherboard, S1 pump
can be powered from the power
supply via a patch cord.
1.The product comes with the Flow Indicator, and the water loop can be judged whether
flowing smoothly or not according to the impeller turning.
2.The water must be through into the two holes of the flow indicator to make the impeller
turning. (No fixed inlet and outlet)
3.The water loop in this product is the single loop. Players can choose to connect the water
in series or in parallel, and they can also create a two-color waterway.
Turned the
fitting to
finish the
assembly.
1
5
8
9
7
6
4
11

Single series connection:
DRGB Light Effect Start
6
Water Distribution
4
Water Filling Safeguard
5
1.The water goes from outlet A to the inlet of other water cooling parts. (Or
A choose to connect B or C)
2.If choose to connect to B, and then C has to connect to the inlet of the
other water cooling parts.
3.And then connect to the D or E.
4.Choose D or E as the hole for filling water.
Double waterway connection:
1.The water goes from outlet A to the inlet of other water cooling parts.
2.And then from the outlet of the other water cooling parts to D or E.
3.Choose B or C as the inlet or outlet , connect to other water cooling parts
(Free chosen) as a single finished water loop .
4.Choose D or E as the hole for filling water.
→The light bar plug can be connected to the
motherboard, in synchronization with the
motherboard lighting effect. Or select the
serial connection BP-CADRGBY1 and other
DRGB lighting effect accessories to share the
lighting effect control.
motherboard
Choose your desired dye color and mix it with pure distilled water. Pour the water mix into the reservoir via the water filling hole. Once the reservoir is
90% full, turn on the power supply for the pump to run and let the air exit the loop. Turn off the power supply when the reservoir is near empty. Repeat
until all the air has exited the loop. (In order to power the pump only, connect the power switch connector to the 24 pin cable of the power supply. This
will allow the power supply to bypass the motherboard and make the pump work alone.)
Notice:
Bitspower recommends that consumers add the Bitspower dye to distilled water or
purified water for their water-cooling liquid. If the consumer chooses different
water-cooling liquids, the resulting impurities may cause peeling of the coating on some
of the hardware, water channels blockage by built-up residue, improper operation of the
water pump, water tank tube breakage, and o-rings deformation leading to leakage.
Any issues related to the use of inappropriate water-cooling liquid will be the responsi-
bility of the consumer.
Do not turn on the pump if the reservoir is empty.
ABC
D
E
12
6

BPTA-CPUMS-SKI
Before fill in water,please make sure all the component be installed correctly,avoidingleaking happen and destroy the PC component.
Bitspower reserves the right to change the product design and interpretations. These are subject to change without notice. Product colors and accessories are based on the actual product.
DRGB LED
80
75
72
INTEL LGA 775
INTEL LGA 115X
INTEL LGA 1366
INTEL LGA 2011
INTEL LGA 2011-V3
INTEL LGA 2066
INTEL LGA 775
INTEL LGA 115X
INTEL LGA 1366
INTEL LGA 2011
INTEL LGA 2011-V3
INTEL LGA 2066
Digital RGB PIN on motherboard or other equipment.
motherboard DRGB Multi Function Controller(Not included)
BPTA-DRGBMFC
IN
OUT

Installation 1
Follow the right sequence to install.
Installation 2
Follow the right sequence to install.
The thumb screw cannot be locked too tightly,
the spring is slightly pressed and the gap is kept
as shown below. The thumb screw cannot be
rotated to the end. When the spring screws too
tight, the SCM3F6 screw will be driven and will
be taken away from the motherboard, which will
cause the water block and CPU not to be closed
well.
Before fill in water,please make sure all the component be installed correctly,avoidingleaking happen and destroy the PC component.
Bitspower reserves the right to change the product design and interpretations. These are subject to change without notice. Product colors and accessories are based on the actual product.
Thumb screw
SPRING
CPU Block
1mm SPACER
SCM4M3
Thumb screw
SPRING
CPU Block
1mm SPACER
M3x32毫米螺絲/M3x32mm SCREW/M3x32毫米螺丝
1mm SPACER
背板墊片/Back Pad/背板垫片
3M背膠絕緣片/3M Paste Pad/3M背胶绝缘片
金屬背板/Metal Backplane/金属背板
SCM3F6 screw
範例
EX.
范例
/