
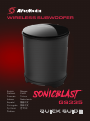
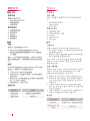
WIRELESS SUBWOOFER
QUICK GUIDE
GS335
English Magyar
Deutsch Polski
Français Türkçe
Italiano Nederlands
Español
繁體中文
Português
简体中文
Pусский
한국의
Čeština

02
Disclaimer
All pictures in this documentation are example images only. The images may vary depending on
the product and software version. Information presented in this documentation has been carefully
checked for reliability; however, no responsibility is assumed for inaccuracies. Information contained
in this manual is subject to change without notice.
Copyright and Trademark Information
© 2016 by AVerMedia Technologies, Inc. All rights reserved.
No part of this publication, in whole or in part, may be reproduced, transmitted, transcribed,
altered or translated into any language in any form by any means without the written permission of
AVerMedia Technologies, Inc. Product specifications and information contained in this manual are
subject to change without notice, and do not represent a commitment on the part of AVerMedia
Technologies, Inc. For the latest information on our products, visit www.avermedia.com.
AVerMedia and SonicBlast™ are trademarks of AVerMedia Technologies, Inc.
Headquarters
Address No.135, Jian 1st Rd., Zhonghe Dist., New Taipei City 23585, Taiwan
Website www.avermedia.com
Support www.avermedia.com/support
Telephone +886-2-2226-3630
US Office
Address 47358 Fremont Blvd., Fremont, CA 94538, United States
Website www.avermedia-usa.com
Telephone +1 (510) 403 0006
Europe Office
Address Distributieweg 13, 2742 RB Waddinxveen, The Netherlands
Telephone +31 10 7600 500
國際總部
地址 23585新北市中和區建一路135號
網址
www.avermedia.com
支援
www.avermedia.com/support
電話
+886-2-2226-3630
中国子公司
地址 上海市静安区武宁南路488号智慧广场1510室
网址
www.avermedia.com.cn
电话
+86-21-52987985

Important Safety Instructions
1. Read these instructions.
2. Keep these instructions.
3. Follow all instructions.
4. Heed all warnings.
5. Do not use the apparatus on uneven or unstable surfaces.
6. Do not use this apparatus in a wet environment or near water.
7. Unplug the apparatus before cleaning. Clean only with a dry cloth.
8. Use in a well ventilated environment. Do not block any ventilation openings.
9. Use the apparatus within ambient temperatures 32–104°F (0–40°C).
10. Use power sources within the specified voltage range.
11. Do not place heavy objects on the apparatus.
12. Do not install near heat sources such as radiators or stoves.
13. Do not defeat the safety purposes of the polarized or grounding-type plug.
14. Protect the power cord from being walked on or pinched, particularly where the cord connects
with plugs or adapters.
15. Only use the attachments and accessories specified by the manufacturer.
16. Unplug this apparatus during lightning or when unused for prolonged periods of time.
17. Do not modify or disassemble the apparatus in any way.
18. Refer all servicing to qualified personnel.
19. Do not dispose the apparatus as general household waste. Dispose in accordance with local
environmental laws.
重要安全說明
1.
仔細閱讀這些說明。
2.
妥善保存這些說明。
3.
遵守所有的指示。
4.
注意所有的警告。
5.
請勿將本產品安裝於不平穩的表面。
6.
請勿在潮濕或靠近水的地方使用本產品。
7.
清潔前請拔除電源。僅使用乾布清潔。
8.
請於通風的環境使用本產品。請勿堵住通風口。
9.
請於規格溫度範圍
32–104°F (0–40°C)
使用本產品。
10.
請使用額定電壓範圍內的電源。
11.
請勿放置重物於本產品上。
12.
請勿安裝於熱源附近如暖器或火爐旁。
13.
請勿破壞極性或接地插頭的安全防護設計。

14.
請保護電源線,勿使其被踩踏或碾壓,特別是與插頭或變壓器的連接處。
15.
僅使用製造商指定的配件及零件。
16.
打雷或長時間不使用時請拔除電源。
17.
請勿以任何方式改造或拆解本產品。
18.
如需維修請洽合格維修人員。
19.
請勿當作家庭垃圾任意丟棄請遵從當地環境法規妥善處理。
重要安全说明
1.
仔细阅读这些说明。
2.
妥善保存这些说明。
3.
遵守所有的指示。
4.
注意所有的警告。
5.
请勿将本产品安装于不平稳的表面。
6.
请勿在潮湿或靠近水的地方使用本产品。
7.
清洁前请拔除电源。仅使用干布清洁。
8.
请于通风的环境使用本产品。请勿堵住通风口。
9.
请于规格温度范围
32–104°F (0–40°C)
使用本产品。
10.
请使用额定电压范围内的电源。
11.
请勿放置重物于本产品上。
12.
请勿安装于热源附近如暖器或火炉旁。
13.
请勿破坏极性或接地插头的安全防护设计。
14.
请保护电源线,勿使其被踩踏或碾压,特别是与插头或变压器的连接处。
15.
仅使用制造商指定的配件及零件。
16.
打雷或长时间不使用时请拔除电源。
17.
请勿以任何方式改造或拆解本产品。
18.
如需维修请洽合格维修人员。
19.
请勿当作家庭垃圾任意丢弃。请遵从当地环境法规妥善处理。

05
PREPARATION
PREPARATION
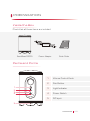
Inside the Box
Check that all these items are included.
SonicBlast GS335 Quick Guide
Parts and Ports
1 Volume Control Knob
2 Pair Button
3 Light Indicator
4 Power Switch
5 DC Input
Power Adapter
3
5
2
1
4

06
INSTALLATION
INSTALLATION
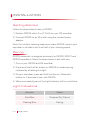
Getting Started
Follow the steps below to set up GS335:
1. Position GS335 within 5 m (13 ft) from your GS soundbar.
2. Connect GS335 to an AC outlet using the included power
adapter.
Note: For a better listening experience, place GS335 close to your
soundbar or at least in the front half of your listening space.
Pairing
GS335 subwoofer is designed exclusively for GS330, GS331 and
GS333 soundbars. Follow the steps below to pair with one.
1. Turn on your GS335 and GS soundbar.
2. Press and hold the Pair button on GS335 to initiate pairing,
indicated by a flashing blue light.
3. On your soundbar, press and hold the Source/Subwoofer
button for 3 seconds to pair with GS335.
4. When successfully paired, the Light Indicator will turn solid blue.
Light Indications
Indicator Status
Solid Blue Powered On/Paired
Flashing Blue Pairing

07
SPECIFICATIONS
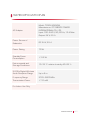
SPECIFICATIONS
AC Adapter
Model: TP06-240250W
Manufacturer: FIT ENERGY POWER
INTERNATIONAL CO., LTD.
Input: 100–240 V, 50/60 Hz, 1.5 A Max.
Output: 24 V, 2.5 A
Power Source of
Subwoofer
DC 24 V, 2.5 A
Power Rating 70 W
Standby Power
Consumption
<
0.5 W
Environmental and
Storage Conditions
10–35 °C relative humidity 40–85 %
5.8 GHz Digital Wireless
Audio Reception Range
Frequency Range
Transmission Power
Up to 8 m
5725–5800 MHz
<
10 mW
For Indoor Use Only

08
Deutsch
VORBEREITUNG
Inhalt der Kiste
Bitte prüfen Sie, dass alle Artikel enthalten sind.
• SonicBlast GS335
• Netzadapter
• Schnellanleitung
Teile und Anschlüsse
1. Lautstärke-Kontrollknopf
2. Koppeln-Taste
3. Lichtanzeige
4. Ein-/Ausschalter
5. DC-Eingang
INSTALLATION
Erste Schritte
Befolgen Sie die nachfolgenden Schritte, um
den GS335 einzurichten:
1. Positionieren Sie den GS335 innerhalb von 5
m (13 Fuß) von Ihrer GS-Soundbar.
2. Verbinden Sie den GS335 mit dem AC-
Ausgang unter Verwendung des zugehörigen
Netzadapters.
Hinweis: Für ein besseres Hörerlebnis
positionieren Sie den GS335 in der Nähe der
Soundbar oder zumindest in der vorderen
Hälfte Ihres Hörbereichs.
Koppeln
Der GS335-Tieftöner wurde exklusiv für
die Soundbars GS330, GS331 und GS333
entworfen. Befolgen Sie die nachfolgenden
Schritte, um die Geräte zu koppeln:
1. Schalten Sie den Strom am GS335 und an
der GS-Soundbar ein.
2. Drücken Sie die Koppeln-Taste am GS335
wiederholt, um den Koppeln-Modus zu
initiieren, der von einem blauen, blinkenden
Licht angezeigt wird.
3. Drücken Sie an Ihrer Soundbar die Quelle-/
Tieftöner-Taste 3 Sekunden lang, um die
Kopplung mit dem GS335 herzustellen.
4. Nach erfolgreicher Kopplung die Anzeige
leuchtet dauerhaft blau.
Lichtanzeigen
Anzeige Status
Dauerhaft Blau Eingeschaltet/Gekoppelt
Blinkend Blau Koppeln
Français
PRÉPARATION
Contenu de la boîte
Vérifiez que tous les composants sont inclus
• SonicBlast GS335
• Bloc d'alimentation
• Guide de démarrage rapide
Composants et Ports
1. Bouton de commande du volume
2. Bouton de synchronisation
3. Diode
4. Interrupteur
5. Entrée DC (CC)
INSTALLATION
Bien débuter
Veuillez suivre les étapes suivantes pour
synchroniser votre barre de son avec un GS335:
1. Positionner le GS335 à moins de 5 mètres de
votre barre de son GS.
2. Connecter le GS335 à une prise secteur en
utilisant le bloc alimentation fourni.
Note : Pour une meilleure expérience d'écoute,
veillez à placer le GS335 à proximité de votre
barre de son ou au moins en face de la moitié de
votre espace d'écoute.
Synchronisation
Le subwoofer GS335 est conçu exclusivement
pour les barres audio GS330, GS331 et GS333.
Veuillez suivre les étapes suivantes pour jumeler
vos appareils.
1. Allumez votre GS335 et votre barre de son
GS.
2. Pressez et maintenez enfoncé le bouton
synchronisation du GS335 pour initialiser
le procédé (indiqué par une diode bleue
clignotante).
3. Sur votre barre de son, pressez et gardez
enfoncé pendant 3 secondes le bouton
Source/Subwoofer pour la synchroniser avec
le GS335.
4. Lorsque la synchronisation est terminée, la
diode bleue cessera de clignoter.
Charte des couleurs
Diode Status
Bleu fixe Allumé/Synchronisé
Bleu Clignotant
En cours de
synchronisation

09
Italiano
PREPARAZIONE
Nella confezione
Controllare che siano inclusi tutti questi articoli.
• SonicBlast GS335
• Adattatore di alimentazione
• Guida rapida
Parti e porte
1. Manopola controllo volume
2. Pulsante abbinamento
3. Spia
4. Interruttore di accensione
5. Ingresso DC
INSTALLAZIONE
Per iniziare
Seguire i punti sotto riportati per configurare
GS335:
1. Posizionare GS335 entro 5 metri (13 piedi)
dalla soundbar GS.
2. Collegare GS335 a una presa AC usando
l'adattatore di alimentazione incluso.
Nota. per una migliore esperienza di ascolto,
mettere il GS335 vicino alla soundbar o almeno
nella metà di fronte dello spazio di ascolto.
Abbinamento
Il subwoofer GS335 è progettato
esclusivamente per le soundbar GS330,
GS331 e GS333. Seguire i punti sotto per
abbinarlo con una di esse.
1. Accendere il GS335 e la soundbar GS.
2. Premere e tenere il pulsante Abbina
su GS335 per iniziare la modalità di
abbinamento, indicata da una spia blu
lampeggiante.
3. Sulla soundbar, premere e tenere il pulsante
Sorgente/Subwoofer per 3 secondi per
abbinare con GS335.
4. Ad abbinamento avvenuto, e l'indicatore
diventerà blu fisso.
Spie
Indicatore Stato
Blu fisso Acceso/Abbinato
Blu lampeggiante Abbinamento
Español
PREPARACIÓN
Dentro de la caja
Compruebe que todos estos componentes
están incluidos
• SonicBlast GS335
• Adaptador de Corriente
• Guía Usuario
Componentes del Producto
1. Control de Volumen
2. Botón Emparejamiento
3. Indicador Luminoso
4. Interruptor de Alimentación
5. Entrada Corriente
INSTALACIÓN
Para Empezar
Siga estos pasos para oconfigurar el GS335:
1. Colocar el GS335 a unos 5 metros de su
Barra de Sonido.
2. Conectar el GS335 a la corriente eléctrica
utilizando su adaptador de corriente.
Nota: Para una mejor experiencia de audición,
colocar el GS335 en la zona media de su
espacio de audición.
Emparejamiento
El Subwoofer GS335 está diseñado
exclusivamente para las Barras de Sonido
GS330, GS331 y GS333. Siga los pasos a
continuación para emparejar con cualquiera de
ellas.
1. Encienda su GS335 y la Barra de Sonido GS.
2. Mantener presionado el botón de
emparejamiento en el GS335 para iniciar el
modo emparejamiento indicado con una luz
azul parpadeando.
3. En su Barra de Sonido, mantener pulsado
el botón Fuente/Subwoofer durante 3 segs
para emparejar con el GS335.
4. Cuando se hayan emparejado correctamente,
el indicador luminoso se quedará en azul fijo.
Indicaciones Luminosas
Indicadores Estado
Azul Fijo Encendido/Emparejado
Azul
Parpadeando
Emparejando

10
Português
PREPARAÇÃO
No interior da embalagem
Confirme que todos estes itens estão incluídos.
• SonicBlast GS335
• Adaptador elétrico
• Guia de início rápido
Partes e Portas
1. Botão de controlo do volume
2. Botão Emparelhar
3. Indicador luminoso
4. Interruptor de energia
5. Entrada CC
INSTALAÇÃO
Iniciar
Siga os passos abaixo para configurar a
GS335:
1. Posicione o GS335 a menos de 5m (13ft)
da sua barra sonora GS.
2. Ligue o GS335 a uma tomada de CA
utilizando o adaptador elétrico incluído.
Nota: Para obter uma melhor experiência de
audição, coloque o GS335 junto da sua barra
sonora ou, pelo menos, na metade frontal do
seu espaço de audição.
Emparelhamento
O subwoofer GS335 foi concebido
exclusivamente para as barras sonoras GS330,
GS331 e GS333. Siga os passos abaixo para
emparelhar com um.
1. Ligue o seu GS335 e a barra sonora GS.
2. Prima e segure o botão Emparelhar
no GS335 para iniciar o modo de
emparelhamento, indicado por uma luz azul
intermitente.
3. Na sua barra sonora, prima e segure o botão
Fonte/Subwoofer durante 3segundos para
emparelhar com o GS335.
4. Quando o emparelhamento tiver sido bem-
sucedido, o indicador ficará azul fixo.
Indicações luminosas
Indicador Estado
Azul fixo Ligado/Emparelhado
Azul
intermitente
Emparelhamento
Pусский
ПОДГОТОВКА
Комплект поставки
Проверьте наличие всех компонентов.
• SonicBlast GS335
• Блок питания
• Краткое руководство пользователя
Элементы и Порты
1. Кнопка контроля громкости
2. Кнопка сопряжения
3. Световой индикатор
4. Переключатель питания
5. Вход адаптера питания
УСТАНОВКА
Начало работы
Для подключения GS335 следуйте
пошаговой инструкции:
1. Разместите GS335 в пределах 5 м (13
футов) от вашей GS звуковой колонки.
2. Подсоедините к GS335 блок питания,
поставляемый в комплекте, и вставьте
его в розетку.
Примечание. Для лучшего звучания
поместите GS335 ближе к вашей
звуковой колонке или, по крайней
мере, в передней половине
пространства прослушивания.
Сопряжение
Сабвуфер GS335 специально
разработан для GS330, GS331 и GS333
звуковых колонок. Для сопряжения
необходимо выполнить следующие
пункты инструкции.
1. Включите питание ваших GS335 и GS
звуковой колонки.
2. Нажмите и удерживайте кнопку
Сопряжение на GS335 до инициации
режима сопряжения, индицируемого
мигающим синим светом.
3. На звуковой колонке нажмите и
удерживайте кнопку Источник/
Сабвуфер около 3-х секунд, для
сопряжения с GS335.
4. После успешного сопряжения,
индикатор перестанет мигать и будет
светиться синим светом.
Световая индикация
Индикатор Состояние
Постоянный
синий
Питание Включено/
Сопряжен
Мигающий
синий
Сопряжение

11
Čeština
PŘÍPRAVA
Obsah balení
Zkontrolujte dodání všech položek.
• SonicBlast GS335
• Napájecí adaptér
• Rychlý návod
Popis prvků
1. Ovladač hlasitosti
2. Tlačítko párování
3. Kontrolka
4. Vypínač
5. Vstup stejnosměrného napětí
INSTALACE
První kroky
Středobasový reproduktor GS335 zprovozněte
vnásledujících krocích:
1. Umístěte GS335 do vzdálenosti 5metrů (13
stop) od horizontálního reproduktoru řady GS.
2. Připojte GS335 ksíťové zásuvce pomocí
přiloženého napájecího adaptéru.
Poznámka: Lepšího poslechového zážitku
dosáhnete umístěním GS335 vblízkosti
horizontálního reproduktoru nebo alespoň
vpřední polovině poslechového prostoru.
Párování
Středobasový reproduktor GS335 je určen
výhradně pro používání shorizontálními
reproduktory GS330, GS331 aGS333.
Proveďte párování stakovým reproduktorem
vníže uvedených krocích.
1. Zapněte napájení GS335 ihorizontálního
reproduktoru řady GS.
2. Na GS335 zahajte režim párování podržením
stisknutého tlačítka Pair (párování), které
bude oznámeno blikajícím modrým světlem
kontrolky.
3. Na horizontálním reproduktoru držte
kpárování sGS335 po 3sekundy stisknuté
tlačítko Source/Subwoofer.
4. Úspěšné spárování je kontrolka svítí trvale
modře.
Význam stavů kontrolky
Stav kontrolky Stav
Trvale modrá Zapnuto/Spárováno
Blikající modrá Párování
Magyar
ELŐKÉSZÍTÉS
A csomag tartalma
Ellenőrizze, hogy minden elem benne van a
csomagban.
• SonicBlast GS335
• Tápadapter
• Gyors használati útmutató
Részegységek és portok
1. Hangerő szabályozógomb
2. Párosítás gomb
3. Jelzőlámpa
4. Bekapcsológomb
5. DC bemenet
ÜZEMBE HELYEZÉS
Első lépések
Kövesse az alábbi lépéseket a GS335
berendezés üzembe helyezéséhez:
1. Helyezze a GS335 berendezést a GS hangsáv
5 m-es körzetébe.
2. A mellékelt tápadapterrel csatlakoztassa a
GS335 berendezést a hálózati aljzatba.
Megjegyzés: A jobb hallgatási élményhez
helyezze a GS335 berendezést a hangsávhoz
közel vagy legalább a hallgatási terület feléig.
Párosítás
A GS335 mélynyomó kizárólag a GS330,
GS331 és GS333 hangsávokhoz készült.
Kövesse az alábbi lépéseket az ezekkel való
párosításhoz.
1. Kapcsolja be a GS335 eszközt és GS
hangsávot.
2. Nyomja meg és tartsa lenyomva a
Párosítás gombot a GS335 berendezésen
a villogó kék jelzőlámpával jelzett párosítás
inicializálásához.
3. A hangsávon nyomja meg és 3 másodpercig
tartsa lenyomva a Forrás/Mélynyomó
gombot a GS335 berendezéssel való
párosításhoz.
4. Sikeres párosításkor, és a jelzőlámpa
folyamatos kékre fog váltani.
Jelzőlámpa jelentések
Jelzés Állapot
Folyamatos kék Bekapcsolva/Párosítva
Villogó kék Párosítás

12
Polski
PRZYGOTOWANIE
W pudełku
Sprawdź, czy wszystkie te elementy są w
pudełku.
• SonicBlast GS335
• Zasilacz
• Instrukcja skrócona
Elementy i porty
1. Pokrętło regulacji głośności
2. Przycisk parowania
3. Lampka kontrolna
4. Wyłącznik zasilania
5. Wejście DC
INSTALACJA
Pierwsze kroki
Wykonaj poniższe czynności, aby skonfigurować
GS335:
1. Umieść GS335 w odległości 5 m (13 stóp) od
soundbaru GS.
2. Podłączyć GS335 do sieci za pomocą
dostarczonego zasilacza.
Uwaga: Aby uzyskać lepsze brzmienie, umieść
GS335 blisko soundbaru lub przynajmniej
w przedniej części pomieszczenia, w którym
słuchasz muzyki.
Parowanie
Subwoofer GS335 został zaprojektowany
wyłącznie do współpracy z soundbarami GS330,
GS331 i GS333. Wykonaj poniższe czynności,
aby sparować z jednym z powyższych urządzeń.
1. Włącz GS335 i soundbar GS.
2. Nacisnąć i przytrzymaj przycisk parowania
na GS335, aby zainicjować tryb parowania
pokazywany przez migające niebieskie światło.
3. Na soundbarze naciśnij i przytrzymaj przycisk
Źródło/Subwoofer przez 3 sekundy, aby
sparować z urządzeniem GS335.
4. Po pomyślnym sparowaniu urządzeń, a
wskaźnik będzie świecić stale na niebiesko.
Wskaźniki świetlne
Wskaźnik Stan
Niebieski, stały Włączony/Sparowany
Niebieski, miga Parowanie
Türkçe
HAZIRLIK
Kutunun içindekiler
Tüm bu öğelerin dâhil edildiğini kontrol edin.
• SonicBlast GS335
• Güç Adaptörü
• Hızlı Rehber
Parçalar ve Bağlantı Noktaları
1. Ses Seviyesi Kontrol Düğmesi
2. Eşleştirme Düğmesi
3. Işıklı Gösterge
4. Güç düğmesi
5. DC Girişi
KURULUM
Başlama
GS335'i kurmak için aşağıdaki adımları izleyin:
1. GS335'i GS ses çubuğunuzdan 5 m (13 ft)
mesafeye getirin.
2. Ürünle birlikte verilen güç adaptörünü
kullanarak GS335'i bir AC prizine bağlayın.
Not: Daha iyi bir dinleme deneyimi için, GS335'i
ses çubuğunuzun yakınına veya en azından
dinleme alanınızın ön yarısına yerleştirin.
Eşleştirme
GS335 subwoofer, yalnızca GS330, GS331 ve
GS333 ses çubukları için tasarlanmıştır. Biriyle
eşleştirmek için aşağıdaki adımları izleyin.
1. GS335 ve GS ses çubuğunuzu açın.
2. Yanıp sönen mavi bir ışıkla gösterilen
eşleştirme modunu başlatmak için
GS335'deki Eşleştirme düğmesini basılı tutun.
3. Ses çubuğunuzda GS335 ile eşleştirmek için
Kaynak/Subwoofer düğmesini 3 saniye basılı
tutun.
4. Başarılı bir şekilde eşleştirildiğinde, gösterge
maviye dönecektir.
Işıklı Göstergeler
Gösterge Durum
Tam Mavi Güç Açık/Eşleşmiş
Yanıp Sönen
Mavi
Eşleştirme

13
Nederlands
VOORBEREIDING
In de doos
Controleer of al deze items zijn opgenomen.
• SonicBlast GS335
• Oplader
• Snelgids
Onderdelen en poorten
1. Volume Control knop
2. Koppelknop
3. Lichtindicator
4. Power schakelaar
5. Gelijkstroominvoer
INSTALLATIE
Ermee beginnen
Volg de onderstaande stappen
1. Plaats GS335 binnen 5m van uw GS
soundbar.
2. Sluit de GS335 aan op een stopcontact met
de meegeleverde voedingsadapter.
Opmerking: Voor een betere luisterervaring,
plaats de GS335 dicht bij je soundbar (althans
in de voorste helft van je luisterruimte).
Koppelen
GS335 subwoofer is uitsluitend ontworpen voor
GS330, GS331 en GS333 soundbars.Volg de
onderstaande stappen om te koppelen.
1. Schakel de GS335 en GS soundbar in.
2. Houd de koppel knop op de GS335 ingedrukt
om de koppelmodus te starten, aangegeven
met een knipperend blauw licht.
3. Druk op de soundbar de knop 'Bron /
Subwoofer' gedurende 3 seconden in om met
GS335 te koppelen.
4. Als een koppeling succesvol is de indicator
wordt helder blauw.
Lichtindicaties
Indicator Status
Volledig blauw Staat aan / gekoppeld
Knipperend blauw Koppelen
繁體中文
配件及按鍵說明
盒內配件
請先檢查所有配件是否齊全。
• SonicBlastGS335
• 電源供應器
• 操作手冊
按鍵與接口
1.音量控制旋鈕
2.配對鍵
3.LED 燈號指示
4.電源開關
5.電源接口
安裝
開始使用
請按照以下步驟使用GS335
1.將 GS335放於距離 GSsoundbar5 公尺
的距離範圍內。
2.接電源供應器連接至 GS335 電源接口。
注意:建議將GS335擺放至距離soundbar
較近的位置或至少是在你聆聽空間的前半部
份,以獲得更好的聲音效果。
配對
GS335重低音喇叭是專為GS330,GS331及
GS333soundbar所設計,請按以下步驟與
其中任何一型號配對。
1.開啟GS335及 GSsoundbar 電源。
2.長按 GS335 上的配對鍵以啟動配對模式,
此時成藍燈閃爍。
3.長按 3 秒GSsoundbar 上的音源 / 重低音
按鍵與 GS335 進行配對。
4.當配對成功後,指示燈呈現藍燈恆亮。
LED 燈號指示對照表
LED 燈號 狀態
藍燈恆亮 電源啟動 / 已配對
藍燈閃爍 配對中

14
한국의
시작하기
상자 내부
다음 구성품이 포함되어 있는지 확인하십시
오 .
• SonicBlast GS335
• 전원 어댑터
• 퀵 가이드
부품 및 포트
1. 음량조절 장치
2. 연결 ( 페어링 ) 버튼
3. 표시등
4. 전원 스위치
5. DC 입력
설치
시작하기
아래 단계에 따라 GS335를 설정하십시오.
1. GS 사운드 바에서 5m (13ft) 이내에 GS335
를 배치하십시오 .
2. 동봉 된 전원 어댑터를 사용하여 GS335 를
AC 콘센트에 연결하십시오 .
참고 :보다 나은 청취 경험을 위해 GS335를
사운드 바 또는 적어도 청취 공간의 앞쪽에
배치하십시오.
연결 ( 페어링 )
GS335 서브 우퍼는 GS330, GS331 및 GS333
사운드 바 전용으로 설계되었습니다. 아래
단계에 따라 연결할 수 있습니다.
1. GS335 및 GS 사운드 바의 전원을 켭니다 .
2. GS335 의 Pair 버튼을 길게 누르면 파란색
으로 깜박이면서 연결 ( 페어링 ) 모드가 시
작됩니다 .
3. 사운드 바에서 Source / Subwoofer 버튼
을 3 초 동안 길게 눌러 GS335 와 연결 ( 페
어링 ) 하십시오 .
4. 연결 ( 페어링 ) 이 성공적으로 완료되면 표
시등이 파란색으로 계속 켜집니다 .
표시등
표시색상 상태
파란색 전원 켜기 / 연결 ( 페어링 )
파란색으로 깜
박임
연결 중
简体中文
准备工作
包装内容
请确认配件齐全
• SonicBlastGS335
• 电源适配器
• 快速指南
零件和端口
1.音量控制旋钮
2.配对按钮
3.指示灯
4.电源选择
5.电源输入
安装
开始
参照以下步骤安装GS335:
1.将 GS335 放置在距离音箱 5 米以内
2.使用自带的电源适配器将 GS335 连接至
AC 插座
提示:为了更好的听觉体验,将GS335放在
靠近音箱的地方,或者靠近你的室内前半部
分。
配对
GS335低音炮专为GS330/GS331/GS333音
箱设计。参考以下步骤进行配对
1.打开 GS335 和 GS 系列音箱
2.长按 GS335 上的配对按钮,进入配对模式,
蓝灯闪烁
3.长按 3 秒 GS 系列音箱上的来源 / 低音炮按
钮,与 GS335 配对
4.成功配对后,蓝灯长亮
指示灯亮
指示灯 状态
蓝灯长亮 电源开 / 配对成功
蓝灯闪烁 配对中

15

16

17

FCC NOTICE Class B
This device complies with Part 15 of the FCC Rules. Operation is subject to the following two conditions: (1) this
device may not cause harmful interference, and (2) this device must accept any interference received, including
interference that may cause undesired operation.
Federal Communications Commission Statement
NOTE - This equipment has been tested and found to comply with the limits for a Class B digital device, pursuant to
Part 15 of the FCC Rules. These limits are designed to provide reasonable protection against harmful interference
in a residential installation. This equipment generates, uses and can radiate radio frequency energy and, if not
installed and used in accordance with the instructions, may cause harmful interference to radio communications.
However, there is no guarantee that interference will not occur in a particular installation. If this equipment does
cause harmful interference to radio or television reception, which can be determined by tuning the equipment off
and on, the user is encouraged to try to correct the interference by one or more of the following measures:
• Reorient or relocate the receiving antenna.
• Increase the separation between the equipment and receiver.
• Connect the equipment into an outlet on a circuit different from that to which the receiver is connected.
• Consult the dealer or an experienced radio/television technician for help.
CAUTION : Any changes or modifications not expressly approved by the party responsible for compliance could void
the user’s authority to operate this equipment.
FCC WARNING: This equipment may generate or use radio frequency energy. changes or modifications to this
equipment may cause harmful interference unless the modifications are expressly approved in the instruction
manual. The user could lose the authority to operate this equipment if an unauthorized change or modification is
made.
Radiation Exposure Statement:
This equipment complies with FCC radiation exposure limits set forth for an uncontrolled environment. This
equipment should be installed and operated with minimum distance 20cm between the radiator & your body.
Responsible manufacturer:
AVerMedia Technologies, Inc.
No. 135, Jian 1st Rd.,Zhonghe Dist., New Taipei City 23585, Taiwan
TEL: +886-2-2226-3630
USA Office contact:
AVerMedia Technologies U.S.A.
47358 Fremont Blvd., Fremont, CA 94538
Technical Support: http://www.avermedia.com/support/
European Community Compliance Statement Class B
This product is herewith confirmed to comply with the requirements set out in the Council Directives on the
approximation of the laws of the Member States relating to Electromagnetic Compatibility Directive (EMC)
2014/30/EU, The Radio Equipment Directive (RED) 2014/53/EU and Energy-related Products Directive (ErP)
2009/125/EC.
This equipment complies with IC RSS-102 radiation exposure limits set forth for an uncontrolled environment. This
equipment should be installed and operated with minimum distance 20cm between the radiator & your body.
Computer speakers, or multimedia speakers, are speakers external to a computer; the speaker is used to play
music, continuous use in long period of the time. The power management features will interrupt the sounds, and it
may not the general use of the consumer behavior. Furthermore, because the speaker products are designed to be
the continuous use of demand, the requirement of a power management function as provided under point 2(d) of
Annex II would be “inappropriate for the intended use” of the equipment.
Note: Please refer to our user guide for more details about the intended use of the Product.
Responsible manufacturer:
AVerMedia Technologies, Inc.
No. 135, Jian 1st Rd.,Zhonghe Dist., New Taipei City 23585, Taiwan
TEL: +886-2-2226-3630
European Community contact:
AVerMedia Technologies Europe B.V.
Distributieweg 13, 2742 RB Waddinxveen, The Netherlands
Technical Support: http://www.avermedia.com/support/
Waste Electrical and Electronic Equipment Directive (WEEE)
The mark of crossed-out wheeled bin indicates that this product must not be disposed of with your other
household waste. Instead, you need to dispose of the waste equipment by handing it over to a designated
collection point for the recycling of waste electrical and electronic equipment. This product must be
handled pursuant to European Directive 2012/19/EU. For more information about where to drop off your
waste equipment for recycling, please contact your household waste disposal service or the shop where
you purchased the product.

BSMI Registration of Product Certification (Taiwan)
【圓剛
BSMI
限用物質及其化學符號】放置於公司企業社會責任專頁
網址
http://www.avermedia.com/tw/about_us/social
台灣 NCC
低功率電波輻射性電機管理辦法
第十二條:經型式認證合格之低功率射頻電機,非經許可,公司、商號或使用者均不得擅自變更頻率、加大功率
或變更原設計之特性及功能。
第十四條:低功率射頻電機之使用不得影響飛航安全及干擾合法通信;經發現有干擾現象時,應立即停用,並改
善至無干擾時方得繼續使用。
前項合法通信,指依電信法規定作業之無線電通信。
低功率射頻電機須忍受合法通信或工業、科學及醫療用電波輻射性電機設備之干擾。
MSIP Class B Statement
MSIP-CMM-AVM-GS333
B 급 기기 ( 가정용 방송통신기기 ): 이 기기는 가정용 (B 급 ) 으로 전자파적합등록을 한 기기로서 주로 가정에서
사용하는 것을 목적으로 하며 , 모든 지역에서 사용할 수 있습니다 . 해당 무선설비는 전파혼신 가능성이 있으므
로 인명안전과 관련된 서비스는 할 수 없음 .
Class B (Home): As this equipment has undergone EMC registration for house hold purpose ("B" Class), this product
can be used in any area and designed to be used mainly in a household. There is a possibility of radio interference in
the radio equipment.
CAN ICES-3 (B)/NMB-3(B)
Canada - Canada Industry Canada (IC) Labelling Requirements
Every manufacturer or importer shall ensure import or before offering for sale, as appropriate, that each unit of the
type that they offer for sale bears, in alocation convenient for inspection, a permanent label or marking containing (in
French and English), the following statement:
ICES-003 (Interference - Causing Equipment Standards)
"This class B digital apparatus complies with Canadian ICES-003.
Cet appareil numérique de la classe B est conforme à la norme NMB-003 du Canada."
This equipment complies with IC RSS-102 radiation exposure limits set forth for an uncontrolled environment. This
equipment should be installed and operated with minimum distance 20cm between the radiator & your body.
Regulatory Compliance Mark
This equipment should be installed and operated with minimum distance 20cm between the radiator & your body.
Technical Regulations of the Customs Union
TR CU 020/2011
TR CU 004/2011
SonicBlast GS335
Speaker/
喇叭
/
音箱
Made in China/
中國製造
/
中国制造
R33183
RoHS

w w w . a v e r m e d i a . c o m
-
 1
1
-
 2
2
-
 3
3
-
 4
4
-
 5
5
-
 6
6
-
 7
7
-
 8
8
-
 9
9
-
 10
10
-
 11
11
-
 12
12
-
 13
13
-
 14
14
-
 15
15
-
 16
16
-
 17
17
-
 18
18
-
 19
19
-
 20
20


他の言語で
- Deutsch: Avermedia GS335 Schnellstartanleitung
- slovenčina: Avermedia GS335 Stručná príručka spustenia
- português: Avermedia GS335 Guia rápido
- English: Avermedia GS335 Quick start guide
関連論文
その他のドキュメント
-
Acard AVS-2904C 取扱説明書
-
 Bowers & Wilkins Pi3 ユーザーマニュアル
-
Soundcore Spirit X2 ユーザーマニュアル
-
Bose SoundLink Revolve II Bluetooth® speaker 取扱説明書
-
-
-
JBL Cinema SB250 クイックスタートガイド
-
-
JBL CINEMA SB 350 ユーザーマニュアル
-
 AVer Media Live Streamer 311 (BO311) ユーザーマニュアル

