Dell PowerEdge 1850 ユーザーガイド

タイプ
ユーザーガイド

Dell PowerEdge 1850は、小規模オフィスやホームオフィスのニーズを満たすように設計された、機能が満載のサーバーです。高性能なプロセッサ、大容量メモリ、高速ストレージを備え、優れたパフォーマンスを発揮します。また、拡張性と信頼性に優れているため、ビジネスの成長に合わせて柔軟に対応できます。

Dell PowerEdge 1850は、ファイルやプリンタを共有する、ウェブサイトをホストする、メールサーバーとして使用するなど、さまざまな用途に使用できます。中小企業にとって理想的なサーバーであり、ビジネスを次のレベルに引き上げるのに役立ちます。

Dell PowerEdge 1850は、小規模オフィスやホームオフィスのニーズを満たすように設計された、機能が満載のサーバーです。高性能なプロセッサ、大容量メモリ、高速ストレージを備え、優れたパフォーマンスを発揮します。また、拡張性と信頼性に優れているため、ビジネスの成長に合わせて柔軟に対応できます。

Dell PowerEdge 1850は、ファイルやプリンタを共有する、ウェブサイトをホストする、メールサーバーとして使用するなど、さまざまな用途に使用できます。中小企業にとって理想的なサーバーであり、ビジネスを次のレベルに引き上げるのに役立ちます。

www.dell.com | support.dell.com
About Cautions
CAUTION: A CAUTION indicates a potential for property damage, personal injury, or death.
Installing A Remote Access Card
CAUTION: Only trained service technicians are authorized to remove the system cover and access any
of the components inside the system. See your Product Information Guide for complete information
about safety precautions, working inside the computer, and protecting against electrostatic discharge.
This document provides instructions for installing the remote access card on your system.
NOTE: See your Installation and Troubleshooting Guide for detailed instructions on removing or
replacing components.
1
Turn off the system, including any attached peripherals, and disconnect the system from the
electrical outlet.
2
Open the system.
3
Remove the filler plug from the system back panel. See Figure 1.
4
Remove the memory cooling shroud (if present).
5
Remove the memory module fans at the back of the system (if present).
6
Remove the fan bracket at the back of the system (if present).
July 2004
www.dell.com | support.dell.com
Figure 1. Removing the Filler Plug
7
Angle the RAC card so that the NIC connector inserts through the back-panel RAC card
opening, and then straighten the card. See
Figure 2.
8
Install the RAC card:
a
Hold the card by its edges with the holes in the corners of the card aligned with the four
plastic standoffs on the system board. See Figure 2.
b
Carefully press the back edge of the card onto the RAC card connector on the system
board, until the clips on the plastic standoffs snap over that end of the card. See Figure 2.
9
Press down on the front edge of the card until the remaining two plastic standoffs fit over the
card edge.
10
Reinstall the back fan bracket (if removed in step 6).
11
Reinstall the two memory module fans (if removed in step 5).
12
Reinstall the memory cooling shroud (if removed in step 4).
13
Close the system.
14
Reconnect the system and peripherals to their power sources, and turn them on.
filler plug
www.dell.com | support.dell.com
Figure 2. Installing a RAC Card
15
Enter the System Setup program and verify that the setting for the
Boot Sequence
has
changed to reflect the presence of the card. You should see options for virtual disk for
CDROM and LS-120. See "Using the System Setup Program" in your
User's Guide
.
When the system boots, the
Remote Access Control Detected
message displays and
the option ROM and firmware information for the RAC displays. Press <
Ctrl><d
> to enter
the configuration screen for the RAC.
See the RAC card documentation for information on configuring and using the RAC card.
___________
Information in this document is subject to change without notice.
© 2004 Dell Inc. All rights reserved. Printed in the U.S.A.
Reproduction in any manner whatsoever without the written permission of Dell Inc. is strictly forbidden.
Trademarks used in this text: Dell and the DELL logo are trademarks of Dell Inc. Other trademarks and trade names may be
used in this document to refer to either the entities claiming the marks and names or their products. Dell Inc. disclaims any
proprietary interest in trademarks and trade names other than its own.
RAC card
standoffs (4)
RAC card connector
NIC connector
www.dell.com | support.dell.com
关于警告
警告
警告表示存在可能导致财产损失、人身伤害或死亡的潜在危险。
安装远程访问卡
警告
只有经过培训的维修技术人员才有权卸下主机盖并拆装系统内部的任何组件。
有关安全预防措施、拆装计算机内部组件以及防止静电损害的完整信息,请参阅
《产品信息指南》
本说明文件提供了在系统上安装远程访问卡的说明。
注:
有关卸下或装回组件的详情,请参阅 《安装与故障排除指南》
1
关闭系统电源(包括连接的任何外围设备)然后断开系统与电源插座的连接。
2
打开系统外壳。
3
从系统背面板上卸下填充塞。请参阅图
1
4
卸下内存冷却护罩(如果有)
5
从系统背面卸下内存模块风扇(如果有)
6
从系统背面卸下风扇支架(如果有)
2004 7
www.dell.com | support.dell.com
1.
卸下填充塞
7
转动
RAC
卡的角度,使
NIC
连接器穿过背面板
RAC
卡开口插入,
然后将卡放正。请参阅图
2
8
安装
RAC
卡:
a
抓住卡的边缘,并使卡边角上的插孔对准系统板上的四个塑料定位器。
请参阅图
2
b
小心地将卡的后缘按到系统板的
RAC
卡连接器上,直到塑料定位器上的夹子卡住卡
的后缘那一端。请参阅图
2
9
按下卡的前缘,直到其余两个塑料定位器固定在卡边缘上。
10
重新安装背面的风扇支架(如果在步骤
6
中卸下)
11
重新安装两个内存模块风扇(如果在步骤
5
中卸下)
12
重新安装内存冷却护罩(如果在步骤
4
中卸下)
13
合上系统外壳。
14
将系统和外围设备重新连接至电源插座,然后开机。
填充塞
www.dell.com | support.dell.com
2.
安装
RAC
15
进入系统设置程序,然后验证
Boot Sequence
(引导顺序)的设置是否已更改为显示存在
卡。您应该会看到
CDROM
LS-120
虚拟磁盘的选项。请参阅《用户指南》中的
“使用系统设置程序”
系统引导时,屏幕上会显示以下信息:
Remote Access Control Detected
(检测到远程访问控制),并且会显示关于
RAC
ROM
和固件信息的选项。
<
Ctrl><d
>
组合键进入
RAC
配置屏幕。
有关配置和使用
RAC
卡的信息,请参阅
RAC
卡的说明文件。
___________
本文中的信息如有更改,恕不另行通知。
© 2004 Dell Inc.
版权所有。美国印制。
未经
Dell Inc.
书面许可,不准以任何形式进行复制。
本文件中使用的商标:
Dell
DELL
徽标是
Dell Inc.
的商标。本文件中述及的其它商标和产品名称是指拥有相应
商标和产品名称的公司或其制造的产品。
Dell Inc.
对本公司的商标和产品名称之外的其它商标和产品名称不拥有
任何专有权。
RAC
定位器4 个)
RAC 卡连接器
NIC 连接器
www.dell.com | support.dell.com
À propos des avertissements
AVERTISSEMENT : un AVERTISSEMENT vous avertit d'une situation qui, si elle n'est pas évitée,
peut provoquer la mort ou des blessures sérieuses.
Installation d'une carte d'accès distant
AVERTISSEMENT : seuls les techniciens de maintenance qualifiés sont habilités à retirer le capot du
système et à accéder aux composants du système. Consultez le Guide d'information sur le produit pour
obtenir des informations détaillées sur les consignes de sécurité, les interventions dans l'ordinateur et
la protection contre les décharges électrostatiques.
Ce document contient les instructions d'installation de la carte d'accès distant.
REMARQUE : consultez le Guide d'installation et de dépannage pour obtenir des instructions détaillées
sur le retrait ou le remplacement de composants.
1
Éteignez le système et les périphériques connectés, puis débranchez-le de la prise de courant.
2
Ouvrez le système.
3
Retirez l'obturateur de prise du panneau arrière du système. Voir la figure 1.
4
Retirez le carénage de ventilation des modules de mémoire, s'il est installé.
5
Retirez les ventilateurs de modules de mémoire situés à l'arrière du système,
s'ils sont installés.
6
Retirez le support de ventilateur situé à l'arrière du système, s'il est installé.
Juillet 2004
www.dell.com | support.dell.com
Figure 1. Retrait de l'obturateur de prise
7
Placez la carte d'accès distant de sorte que son connecteur réseau s'insère dans l'ouverture
appropriée du panneau arrière, puis redressez la carte. Voir la
figure 2.
8
Installez la carte :
a
Tenez la carte par les bords et alignez les orifices situés dans les coins de la carte avec
les quatre picots en plastique de la carte système. Voir la figure 2.
b
Enfoncez doucement le bord arrière de la carte sur le connecteur, jusqu'à ce que les clips
de fixation des picots se referment sur le bord de la carte. Voir la figure 2.
9
Procédez de même avec la partie avant de la carte.
10
Remettez en place le support de ventilateur arrière, si vous l'avez retiré à l'étape 6.
11
Remettez en place les deux ventilateurs de modules de mémoire, si vous les avez retirés
à l'étape 5.
12
Remettez en place le carénage de ventilation des modules de mémoire, si vous l'avez retiré
à l'étape 4.
13
Refermez le système.
14
Rebranchez le système à la prise de courant et allumez-le, ainsi que les périphériques
connectés.
Obturateur de prise
www.dell.com | support.dell.com
Figure 2. Installation d'une carte d'accès distant
15
Accédez au programme de configuration du système ; vérifiez que le paramètre
Boot
Sequence
(Séquence d'amorçage) a été modifié pour prendre en compte la présence de
la nouvelle carte. De nouvelles options de disque virtuel (CD-ROM et LS-120) doivent
apparaître. Consultez la section “Utilisation du programme de configuration du système”
dans le
Manuel de l'utilisateur
.
Lorsque le système démarre, le message
Remote Access Control Detected
(Dispositif d'accès distant détecté) s'affiche, ainsi que des informations concernant la ROM
et le microcode de la carte. Appuyez sur <
Ctrl><d
> pour accéder à l'écran de configuration
de la carte.
Consultez la documentation de la carte d'accès distant pour plus d'informations sur
sa configuration et son utilisation.
____________
Les informations contenues dans ce document peuvent être modifiées sans préavis.
© 2004 Dell Inc. Tous droits réservés. Imprimé aux États-Unis.
La reproduction de ce document de quelque manière que ce soit sans l'autorisation écrite de Dell Inc. est strictement interdite.
Marques utilisées dans ce document : Dell et le logo DELL sont des marques de Dell Inc. Toutes les autres marques déposées
et noms de marques utilisés dans ce document se rapportent aux sociétés propriétaires des marques et des noms de ces produits.
Dell Inc. décline tout intérêt dans l'utilisation des marques déposées et des noms de marques ne lui appartenant pas.
Carte d'accès distant
Picots (4)
Connecteur de la carte
d'accès distant
Connecteur de
contrôleur réseau (NIC)
www.dell.com | support.dell.com
Warnhinweise
VORSICHT: VORSICHT zeigt eine mögliche gefährliche Situation an, die bei Nichtbeachtung
zu Sachschäden, Körperverletzungen oder zum Tod führen könnte.
Remote-Access-Karte (Remote-Zugriffskarte) installieren
VORSICHT: Nur ausgebildete Servicetechniker sind befugt, die Systemabdeckung zu entfernen
und Komponenten im Innern des Systems zu handhaben. Ausführliche Informationen zu den
Sicherheitsvorkehrungen beim Arbeiten im Innern des Computers und zum Schutz vor elektrischer
Entladung finden Sie im Produktinformationshandbuch.
Dieses Dokument enthält eine Anleitung für den Einbau der Remote-Access-Karte
(RAC-Karte, Remote-Zugriffskarte) in Ihr System.
ANMERKUNG: Ausführliche Erläuterungen zum Einbau oder Austausch von Komponenten
finden Sie im Installations- und Fehlerbehebungshandbuch.
1
Schalten Sie das System und die Peripheriegeräte aus, und trennen Sie das System vom
Stromnetz.
2
Öffnen Sie das System.
3
Entfernen Sie das Abdeckblech von der Rückseite des Systems. Siehe Abbildung 1.
4
Entfernen Sie den Speicherkühlkörper (falls vorhanden).
5
Entfernen Sie die Speichermodullüfter im hinteren Bereich des Systems (falls vorhanden).
6
Entfernen Sie die Lüfterhaltung, im hinteren Bereich des Systems (falls vorhanden).
Juli 2004
www.dell.com | support.dell.com
Abbildung 1. Entfernen des Abdecksteckers
7
Richten Sie die RAC-Karte so aus, dass der NIC-Anschluss durch die RAC-Kartenöffnung
der Systemrückseite geführt werden kann. Richten Sie sie dann wieder gerade aus.
Siehe Abbildung 2.
8
Installieren Sie die RAC-Karte.
a
Halten Sie die Karte an den Kanten, und richten Sie die Löcher an den Ecken der Karte
mit den vier Kunststoffabstandshaltern auf der Systemplatine aus. Siehe Abbildung 2.
b
Drücken Sie die Rückseite der Karte vorsichtig auf den RAC-Kartensteckplatz auf der
Systemplatine, bis die Clips auf den Kunststoffabstandshaltern über dieser Seite
einrasten. Siehe Abbildung 2.
9
Drücken Sie die Vorderseite der Karte nach unten, bis die beiden anderen Abstandshalter
über der Kartenkante einrasten.
10
Setzen Sie die hintere Lüfterhalterung wieder ein, sofern sie in Schritt 6 ausgebaut wurde.
11
Setzen Sie die beiden Speichermodullüfter wieder ein, sofern sie in Schritt 5 ausgebaut
wurden.
12
Setzen Sie den Speicherkühlkörper wieder ein, sofern er in Schritt 4 ausgebaut wurde.
13
Schließen Sie das System.
14
Stellen Sie die Stromzufuhr zum System und den Peripheriegeräten wieder her, und schalten
Sie sowohl das System als auch die Geräte ein.
Abdeckstecker
www.dell.com | support.dell.com
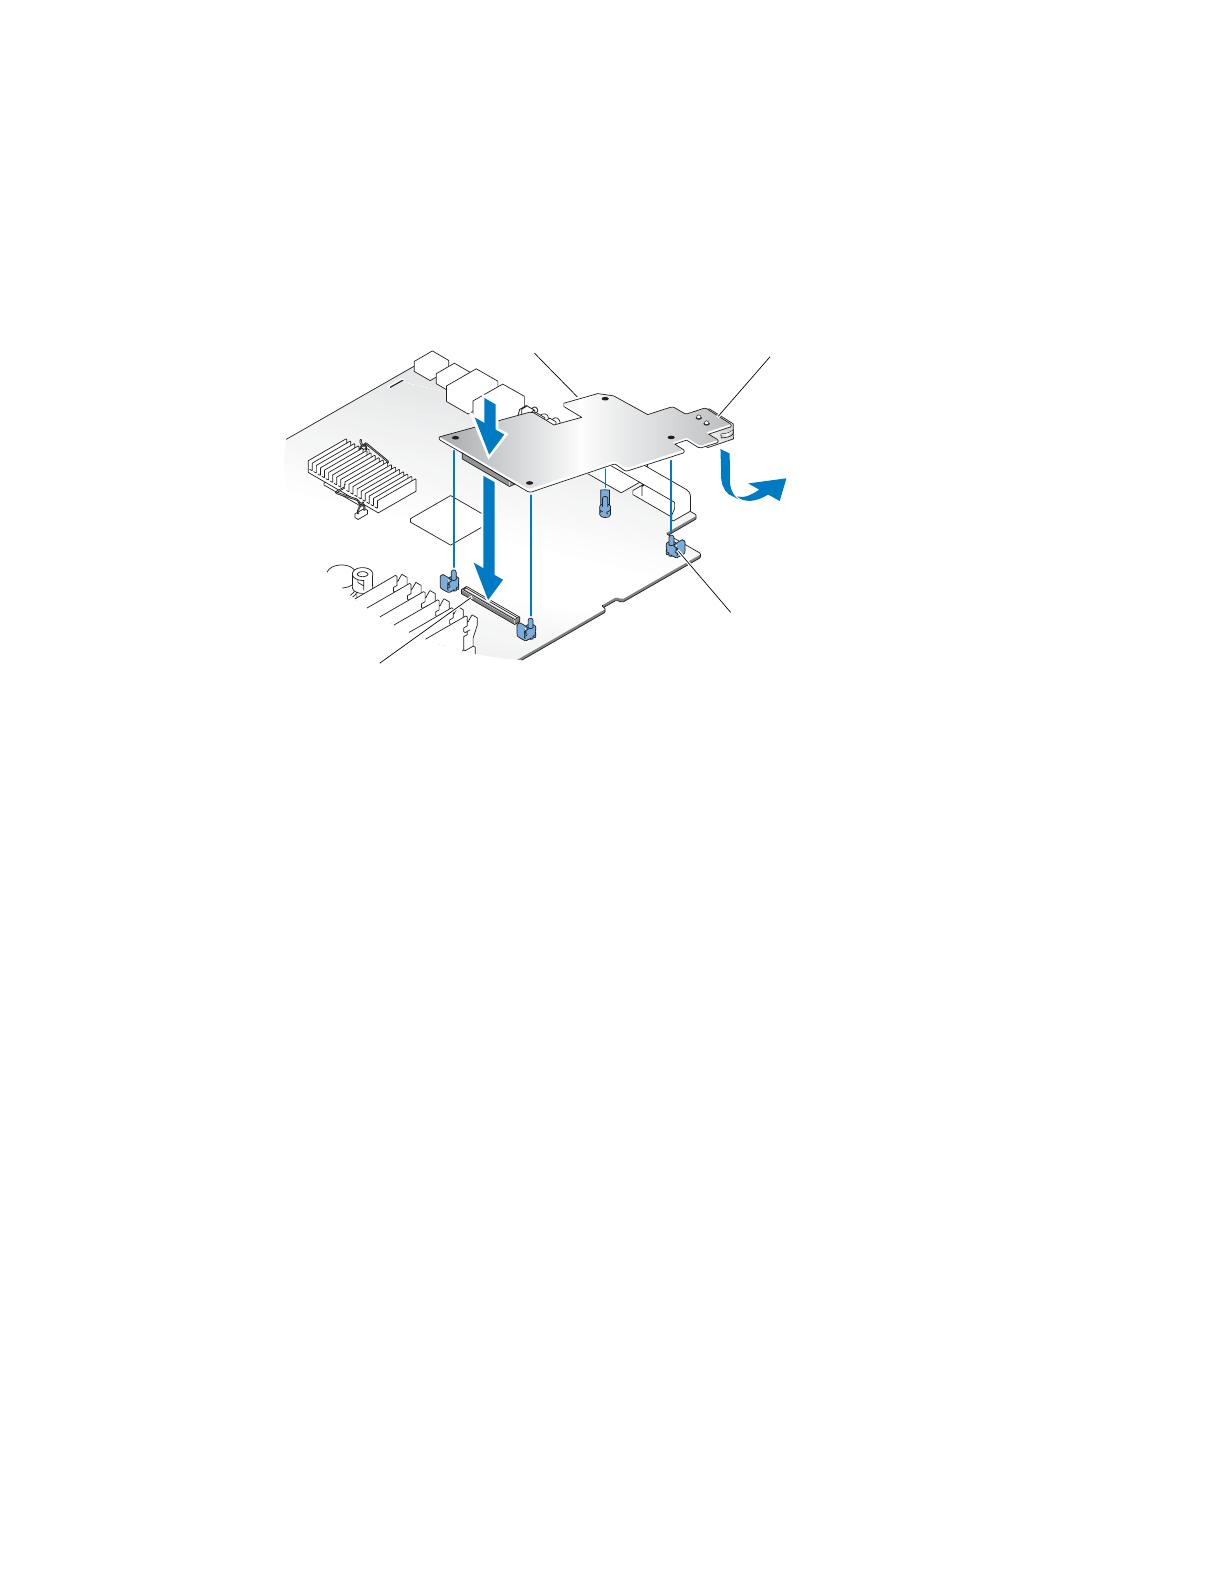
Abbildung 2. RAC-Karte installieren
15
Rufen Sie das System-Setup-Programm auf, und vergewissern Sie Sie sich, dass die
Geräteauswahl für die Startreihenfolge (
Boot Sequence
) um die Optionen der RAC-Karte
erweitert wurde. Es sollten Optionen für virtuelle CDROM- und LS-120-Datenträger
aufgeführt sein. Weitere Hinweise finden Sie in Ihrem
Benutzerhandbuch
unter
„System-Setup-Programm verwenden“.
Beim Hochfahren des Systems werden die Meldung
Remote Access Control
Detected
(Remote-Zugriffssteuerung erkannt) sowie Informationen zum optionalen
ROM-Speicher und der Firmware der RAC-Karte angezeigt. Drücken Sie die Tasten-
kombination <
Strg><d
>, um den Konfigurationsbildschirm für die RAC-Karte aufzurufen.
Informationen zur Konfiguration und Verwendung der RAC-Karte finden Sie in der mit der Karte
gelieferten Dokumentation.
___________
Irrtümer und technische Änderungen vorbehalten.
© 2004 Dell Inc. Alle Rechte vorbehalten. Gedruckt in den USA.
Eine Reproduktion dieses Dokuments in jeglicher Form ohne schriftliche Genehmigung von Dell Inc. ist streng verboten.
Marken in diesem Text: Dell und das DELL -Logo sind Warenzeichen von Dell Inc. Andere in diesem Dokument
möglicherweise verwendete Warenzeichen und Handelsbezeichnungen sind unter Umständen Marken und Namen der
entsprechenden Firmen oder ihrer Produkte. Dell Inc. erhebt keinen Anspruch auf Marken und Handelsbezeichnungen
mit Ausnahme der eigenen.
RAC-Karte
Anschlusspole (4)
RAC-Kartenanschluss
NIC-Anschluss
www.dell.com | support.dell.com
警告について
警告: 警告は、物的損害、けが、または死亡の原因となる可能性があることを示します。
リモートアクセスカードの取り付け
警告: システムのカバーを取り外して、システム内部に手を触れる作業は、トレーニングを
受けたサービス技術者の方だけが行ってください。安全上の注意、コンピュータ内部の作業、
および静電気障害への対処の詳細については、『製品情報ガイド』を参照してください。
本書では、お使いのシステムにリモートアクセスコントロール
RAC
カードを取り付ける手
順を説明します。
メモ: コンポーネントの取り外しや交換の詳しい手順については、『インストール & トラブ
ルシューティングガイド』を参照してください。
1
システムの電源を切り、システムに接続されているすべての周辺機器の電源を切って、
システムを電源コンセントから取り外します。
2
システムカバーを開きます。
3
システムの背面パネルからフィラープラグを取り外します。
1
を参照してください。
4
メモリ冷却カバーが取り付けてある場合は、これを取り外します。
5
システムの背面にメモリモジュール冷却ファンが取り付けてある場合は、
これを取り外します。
6
システムの背面にファンブラケットが取り付けてある場合は、
これを取り外します。
2004 7
www.dell.com | support.dell.com
1. フィラープラグの取り外し
7
RAC
カードは、背面パネルの
RAC
カードの開口部に
NIC
コネクタがくるように、角
度を調整しながら挿入してから、向きを真っ直ぐにします。
2
を参照してください。
8
RAC
カードの取り付け手順:
a
カードの端部を持ち、カードの四隅に設けられた穴を
4
つのプラスチック製の突起
に合わせます。
2
を参照してください。
b
正面側のカードの端を慎重に下に押して、システム基板に設けられた
RAC
カード
コネクタに接続します。所定の位置まで押し下げると、カチッと音がして前端部の
2
つの突起がはまります。
2
を参照してください。
9
背面側のカードの端を、残りの
2
つのプラスチック製の突起がカチッとはまるまで下
に押しつけます。
10
背面ファンブラケットを元のように取り付けます(手順
6
で取り外した場合)
11
2
つのメモリモジュール冷却ファンを元のように取り付けます
(手順
5
で取り外した場合)
12
メモリ冷却カバーを元のように取り付けます(手順
5
で取り外した場合)
13
システムカバーを閉じます。
14
システムと周辺機器の電源ケーブルをコンセントに接続し、電源を入れます。
フィラープラグ
www.dell.com | support.dell.com
2. RAC カードの取り付け
15
セットアップユーティリティを起動し、システムが取り付けた
RAC
カードを認識し
て、
Boot Sequence
(起動順序)の設定が変更されていることを確認します。『ユー
ザーズガイド』の「セットアップユーティリティの使い方」を参照してください。
システムが起動すると、
Remote Access Control Detected
(リモートアクセス
コントロールを検出しました)というメッセージと、
RAC
表示用の
オプション
ROM
とファームウェアの情報が表示されます。
<
Ctrl><d
>
を押して、
RAC
の設定画面を
表示します。
RAC
カードの設定と使い方については、
RAC
カードのマニュアルを参照し
てください。
___________
ここに記載されている内容は予告なく変更されることがあります。
© 2004 すべての著作権は Dell Inc. にあります。Printed in the U.S.A.
Dell Inc. の書面による許可のない複製は、いかなる形態においても厳重に禁じられています。
本書で使用されている商標について:Dell および DELL ロゴは Dell Inc. の商標です。本書では、必要に応じて
上記以外の商標および会社名が使用されている場合がありますが、これらの商標や会社名は、一切 Dell Inc.
所属するものではありません。
RAC カード
突起(4
RAC カードコネクタ
NIC コネクタ
www.dell.com | support.dell.com
주의에 대하여
주의 : 주의는 위험한 상황 , 심각한 부상 또는 사망할 우려가 있음을 알려줍니다 .
원격 액세스 카드 설치
주의 : 숙련된 서비스 기술자만 시스템 덮개를 분리하고 시스템 내부의 구성요소에 액세스해야
합니다 . 안전 지침 , 컴퓨터 내부 작업 정전기 방전 보호에 대한 자세한 내용은 시스템 정보
명서를 참조하십시오 .
설명서에서는
시스템에
원격
액세스
카드를
설치하는
지침을
제공합니다
.
참고: 구성 요소 제거 교체에 대한 세부 지침은 설치 문제 해결 설명서 참조하십시오.
1
시스템과
시스템에
연결된
모든
주변장치의
전원을
끄고
전원
콘센트에서
시스템을
분리
하십시오
.
2
시스템을
여십시오
.
3
시스템
후면
패널에서
필러
플러그를
분리하십시오
.
그림
1
참조하십시오
.
4
메모리
냉각기
덮개를
분리하십시오
.
5
시스템
후면에서
메모리
모듈
팬을
분리하십시오
.
6
시스템
후면에서
브래킷을
분리하십시오
.
2004 7
www.dell.com | support.dell.com
그림 1. 필러 플러그 분리
7
NIC
커넥터가
후면
패널
RAC
카드
입구에
들어가도록
RAC
카드를
기울여
넣은
다음
드를
펴십시오
.
그림
2
참조하십시오
.
8
RAC
카드를
설치하십시오
.
a
카드
가장자리를
잡고
카드
모서리의
구멍을
시스템
보드의
개의
플라스틱
격리
자와
맞추십시오
.
그림
2
참조하십시오
.
b
플라스틱
격리
애자의
클립이
카드
끝에
맞물릴
때까지
카드
뒤쪽
모서리를
시스템
드의
RAC
카드
커넥터에
조심스럽게
밀어
넣으십시오
.
그림
2
참조하십시오
.
9
남은
두개의
플라스틱
격리
애자가
카드
모서리에
맞을
때까지
카드의
전면
모서리를
르십시오
.
10
6
단계에서
분리한
후면
브래킷을
재설치하십시오
.
11
5
단계에서
분리한
메모리
모듈
팬을
재설치하십시오
.
12
4
단계에서
분리한
메모리
냉각기
덮개를
재설치하십시오
.
13
시스템을
닫으십시오
.
14
컴퓨터와
주변장치를
전원에
다시
연결한
다음
,
전원을
켜십시오
.
필러 플러그
www.dell.com | support.dell.com
그림 2. RAC 카드 설치
15
시스템
설치
프로그램을
시작하여
부팅
순서
설정이
현재
카드에
반영되도록
변경되었는
확인하십시오
. CDROM
LS-120
대한
가상
디스크
옵션을
확인하십시오
.
사용
설명서
"
시스템
설치
프로그램
사용
"
참조하십시오
.
시스템이
부팅되면
원격
액세스
제어가
검색됨
메시지가
표시되고
RAC
옵션
ROM
펌웨어
정보가
표시됩니다
. <
Ctrl><d
>
눌러
RAC
구성
화면을
시작하십시오
.
RAC
카드
구성
사용에
대한
정보는
RAC
카드
설명서를
참조하십시오
.
___________
설명서에 수록된 정보는 사전 통보 없이 변경될 있습니다 .
© 2004 Dell Inc. All rights reserved. 미국에서 인쇄됨 .
Dell Inc. 사전 승인 없이 어떠한 경우에도 무단 복제하는 것을 엄격히 금합니다 .
설명서에 사용된 상표 : Dell, DELL 로고는 Dell Inc. 등록 상표입니다 . 특정 회사의 표시나 회사명 또는 제품
지칭하기 위해 다른 상표나 상호를 설명서에서 사용할 수도 있습니다 . Dell Inc. 자사가 소유하고 있는
이외에 기타 모든 등록 상표 상표 이름에 대한 어떠한 소유권도 없습니다 .
RAC 카드
격리 애자 (4)
RAC 카드 커넥터
NIC 커넥터
www.dell.com | support.dell.com
Información sobre los avisos de precaución
PRECAUCIÓN: un mensaje de PRECAUCIÓN indica el riesgo de daños materiales, lesiones corporales
o incluso la muerte.
Instalación de una tarjeta de acceso remoto
PRECAUCIÓN: los técnicos de servicio especializados son las únicas personas autorizadas para
retirar las cubiertas y acceder a los componentes internos del sistema. Consulte la Guía de
información del producto para obtener información completa sobre las precauciones de seguridad, la
manipulación de las piezas internas del ordenador y la protección contra descargas electrostáticas.
En este documento se proporcionan las instrucciones necesarias para instalar la tarjeta de acceso
remoto en el sistema.
NOTA: consulte la Guía de instalación y solución de problemas para obtener instrucciones detalladas
sobre la extracción y la colocación de componentes.
1
Apague el sistema, incluidos todos los periféricos, y desconéctelo de la toma eléctrica.
2
Abra el sistema.
3
Extraiga la pieza de relleno del panel posterior del sistema. Consulte la figura 1.
4
Retire la cubierta de refrigeración de la memoria (si la hay).
5
Extraiga los ventiladores de módulo de memoria situados en la parte posterior del sistema
(si los hay).
6
Extraiga el soporte del ventilador situado en la parte posterior del sistema (si lo hay).
Julio de 2004
www.dell.com | support.dell.com
Figura 1. Extracción de la pieza de relleno
7
Incline la tarjeta RAC de modo que el conector NIC se inserte en la abertura de la tarjeta
RAC del panel posterior y, a continuación, enderece la tarjeta. Consulte la
figura 2.
8
Instale la tarjeta RAC:
a
Sujete la tarjeta por los bordes alineando los orificios de las esquinas con los cuatro
separadores de plástico de la placa base. Consulte la figura 2.
b
Presione con cuidado el extremo posterior de la tarjeta en el conector de tarjeta RAC de la
placa base hasta que los ganchos de los separadores de plástico encajen en ese extremo de
la tarjeta. Consulte la figura 2.
9
Presione el extremo frontal de la tarjeta hasta que los dos separadores de plástico restantes
encajen sobre el borde de la tarjeta.
10
Vuelva a colocar el soporte del ventilador posterior (si lo ha extraído en el paso 6).
11
Vuelva a colocar los dos ventiladores de módulo de memoria (si los ha extraído en el paso 5).
12
Vuelva a colocar la cubierta de refrigeración de la memoria (si la ha extraído en el paso 4).
13
Cierre el sistema.
14
Vuelva a conectar el sistema y los dispositivos periféricos a las fuentes de alimentación
correspondientes y enciéndalos.
Pieza de relleno
  • Page 1 1
  • Page 2 2
  • Page 3 3
  • Page 4 4
  • Page 5 5
  • Page 6 6
  • Page 7 7
  • Page 8 8
  • Page 9 9
  • Page 10 10
  • Page 11 11
  • Page 12 12
  • Page 13 13
  • Page 14 14
  • Page 15 15
  • Page 16 16
  • Page 17 17
  • Page 18 18
  • Page 19 19
  • Page 20 20
  • Page 21 21
  • Page 22 22

Dell PowerEdge 1850 ユーザーガイド

タイプ
ユーザーガイド

Dell PowerEdge 1850は、小規模オフィスやホームオフィスのニーズを満たすように設計された、機能が満載のサーバーです。高性能なプロセッサ、大容量メモリ、高速ストレージを備え、優れたパフォーマンスを発揮します。また、拡張性と信頼性に優れているため、ビジネスの成長に合わせて柔軟に対応できます。

Dell PowerEdge 1850は、ファイルやプリンタを共有する、ウェブサイトをホストする、メールサーバーとして使用するなど、さまざまな用途に使用できます。中小企業にとって理想的なサーバーであり、ビジネスを次のレベルに引き上げるのに役立ちます。