German pool EV-55D Operating Instructions Manual
- カテゴリー
- バーベキュー
- タイプ
- Operating Instructions Manual
このマニュアルも適しています

www.germanpool.com
EV15D_55D-M-14(1)
德國寶(香港)有限公司
German Pool (Hong Kong) Limited
香港
Hong Kong
Room 113. Newport Centre Phase II. 116 Ma Tau
Kok Road. Tokwawan. Kowloon. Hong Kong.
電話 Tel: +852 2773 2888
傳真 Fax:+852 2765 8215
香港九龍土瓜灣馬頭角道116號
新寶工商中心2期113號室
中國
China
電話 Tel:+86 757 2980 8308
傳真 Fax:+86 757 2980 8318
3/F, Takshun Plaza, Nanguo East Road,
Shunde, Foshan, Guangdong
廣東省佛山市順德區
大良南國東路德順廣場三層
澳門
澳門宋玉生廣場263號
中土大廈15樓I座
Alameda Dr. Carlos D'Assumpcao No. 263,
Edif. China Civil Plaza, 15 Andar, I. Macau
電話 Tel:+853 2875 2699
傳真 Fax:+853 2875 2661
Macau
© 版權所有。未獲德國寶授權,不得翻印、複製或使用本說明書作任何商業用途,違者必究。
© All rights reserved. Copying, reproducing or using the contents of this manual is not allowed without prior authorization from German Pool, violators will be prosecuted.
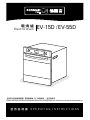
使用說明書
OPERATING INSTRUCTIONS
電焗爐
EV-15D / EV-55D
Electric Oven
Please read these instructions and warranty information carefully before use and keep them handy for future reference.
在使用之前請詳細閱讀「使用說明書」及「保用條例」,並妥為保存。
Oven
EV-55D

05
03
10
07
06
11
12
13
16
目錄
注意事項
清潔須知
產品結構
產品主要功能
安裝說明
操作說明
保養與維護
技術規格
常見問題
主機
操作顯示屏幕
基本控制方法
操作前注意
操作程序
P. 0 3
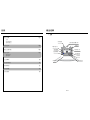
Ⅰ. 主機
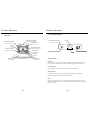
產品結構
控制面板及顯示屏
電熱管 (外)
照明壁燈
燒烤架
烤焗烘盤
層架導軌
焗爐門
隔熱板
電熱管 (內)
烤箱風扇
控制旋鈕

P. 0 4
Ⅲ. 基本控制方法
調校運作時間
按任何一個 [ 定時器 ] 按鍵以顯示定時時間 (預設值為60分鐘),每按右鍵一次增加5分鐘,
連續按則可連續增加 (最大值為150分鐘)。每按左鍵一次則可減少設定時間5分鐘。
調校烤焗溫度
利用左邊的 [ 溫度 ] 控制旋鈕,調校適當的溫度設定。
(有關資料可參照〈操作程序〉的溫度時間參考表 P. 07)。
選擇功能
將右邊的 [ 功能 ] 控制旋鈕調到適當位置。
(個別功能資料可參照〈產品主要功能〉P. 06)。
啟動
按 [ 定時器 ] 按鍵中間的 [ MODE ] 鍵啟動焗爐,焗爐會按設定時間倒時工作,直到設定時間
便關機。於工作狀態下如要查閱設定時間,可按左鍵 [ - ] 顯示,5秒後則恢復工作狀態顯示。
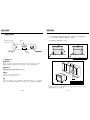
產品結構
100
Ke ep w arm
150
200
250
OFF
OFF
-
MODE
+
OVEN/GRILL
PROGRAM TIMER
FUNCTIO N
溫度控制旋鈕
定時器
功能控制旋鈕
加熱指示燈 (加熱中)
顯示屏
Ⅱ. 控制面板及顯示屏
P. 0 5
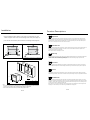
安裝說明
為了使焗爐安裝後與整體的廚房融成一體,可將烤箱安裝在一個標準闊度為
600 mm 的廚櫃裏,焗爐門可與廚櫃面平排,如圖A。
1.
21 mm
16 mm
600 mm
1
2
3
16 mm
30m m
mi n
圖A廚櫃俯視圖 圖B廚櫃俯視圖
① 廚櫃面 ② 焗爐頂面 ③ 墊板
亦可讓焗爐門外露於廚櫃面,如圖B。
2.
通風口
200 x 200 mm
580 mm
550 mm
595 mm
595 mm
545 mm
圖C
說明:
- 安裝焗爐的地面必須平整,盡量讓焗爐周圍空氣流通,建議夾板和墊板採用不易燃絕熱材料覆蓋
- 電源插頭要接插方便,且必須接妥地線
30mm
mi n
1
2
16 m m
16 m m
60 0 mm
21 m m
Ⅲ
Ⅱ
Ⅰ
Ⅰ
600 mm
565 mm
Ⅱ
600 mm
588 mm
Ⅲ
605 mm
585 mm
A
B

P. 0 6
產品主要功能
此功能之熱力單一來自食物下方(即層板下)的加熱器,並由恆溫器維持設定溫度。
適宜︰加深意式薄餅、餡餅和糕餅底部的金黃色。
底部加熱
由風扇驅動低溫空氣在烤箱中流動來達致解凍效果。
適宜︰在燒烤以前可幫助食物進行融霜﹔製作麵包糕餅時亦可利用此功能協助麵團發酵。
解凍
將上方兩個加熱器的熱力同時輻射引導到食物上,烤燒速度比一般快。
適宜︰利用大烤架盤面積烤燒嫩肉、香腸、點心和其他快燒食品。
提示︰先將烤箱連烤架預熱3分鐘,效果更佳。
強力燒烤
把上方加熱器的熱力輻射引導到食物上。
適宜︰燒烤嫩肉、肉排、芝士餅和其他快燒食物。
提示︰先將烤箱連烤架預熱3分鐘,效果更好。
燒烤
熱力來自內膽上方的兩個加熱器,具有烘焙和標準烤焗兩種功能。焗爐門關閉時,風扇驅動熱空氣循環
流動,加熱器以時開時關來維持設定溫度。
適宜︰燒烤較大肉類時具有相似於旋轉烤肉的效果。
提示︰將食物放在烤箱倒數第二層烤架上,然後在最下層可放置烤盤以盛載散落碎屑肉汁,烤燒期間無
需反轉食物。
風扇+燒烤
此功能結合了風扇周圍和上方2個加熱器的熱力,比以標準加熱功能預熱快達30%。只須將食物直接放進
烤箱進行加熱即可。
適宜︰烤焗已熟的急凍食品,如意式薄餅、廣東點心、肉餡餅和西式糕餅等。
提示︰在烤箱的上半部分烤焗食品效果最為理想。
此功能熱力來自風扇周圍的加熱器,風扇驅動熱氣在烤箱內循環,可把食品放在烤箱內不同位置同時烤
焗。使用 [ 風扇+加熱 ] 功能比單獨使用無風扇 [ 加熱 ] 功能快及均勻。
提示︰烤焗後食物可能會有不同色調,乃屬正常現象。
風扇 + 加熱
特快加熱
此功能之熱力同時來自食物上方和下方(即層板下),兩部分都設有一個恆溫器來維持設定溫度不變。
適宜︰燒烤單盤的曲奇餅、烤餅、蛋糕、肉片、意大利粉、布甸和薄脆蛋餅等。
加熱
P. 0 7
- 首次使用之前,請先用中性清潔劑清洗烤箱爐壁,擦乾後關閉焗爐門,調至180℃空燒烤
箱2-4小時以去除烤箱內之物料氣味
- 使用時,房間必須保持通風良好
操作前注意
Ⅰ.
操作程序
Ⅱ.
操作說明
1. 預熱烤箱
2. 預熱烤架
預熱能使烤箱更快地的達到設定溫度。
說明:指示燈熄滅,表示溫度已達到,可將食品放入烤箱。
預熱烤架3分鐘以上效果最佳,有助於保持肉排、香腸和其它肉食的原汁美味。
3. 設定溫度
參考下表,設定烤箱內溫度。
烤箱狀態
冷
微熱
低熱
小熱
中熱
熱
高熱
特高熱
極熱
參考溫度
80°C / 175°F
100~110°C / 210~230°F
130~140°C / 265~285°F
150~160°C / 300~320°F
170~180°C / 340~355°F
190~200°C / 375~390°F
200~210°C / 390~416°F
220~230°C / 430~450°F
240~250°C / 465~480°F

P. 0 8
操作說明
4. 烤焗設定
糕點種類
鬆餅類
餅乾類
蛋糕類
酥餅/餡餅類
發酵類
布甸類
糕點名稱
乾果鬆餅
餅乾卷
牛油曲奇
鬆脆麵包餅乾
小餡餅
海棉蛋糕-4蛋
果仁條形餅
熱果批
濃味水果蛋糕
吉士撻
忌簾奶油泡芙
丹麥棒形餅
饅頭
面包
巧克力
芝士梳乎厘
參考溫度
210 °C
170-180 °C
170-180 °C
150 °C
180 °C
170-180 °C
170 °C
160-170 °C
140 °C
180-160 °C
220-180 °C
210-180 °C
200 °C
220 °C
190 °C
180 °C
烤箱層數*
3
3或4
3或4
3或4
3或4
3
3
3
3
3
3或4
3或4
3或4
3
3或4
3
參考時間
10-12 min
10-15 min
10-15 min
15-20 min
15-20 min
18-20 min
45-50 min
60-90 min
180-210 min
10/30 min
20/30 min
15/30-40 min
20/30 min
25-30 min
40 min
35 min
A. 糕餅點心
B. 烤肉
*從烤箱底往上數
1. 把肉放進烤箱,設定溫度在180-200℃。建議用錫紙把肉食包起來,防止油
和脂肪溢出,事後清潔烤箱也較方便。
2. 使用烤架/烤盤和無煙烤架配件,把肉放在插件上。
3. 不要刺戳肉食,以免肉汁流失。
4. 肉燒熟後,立即從烤箱取出。
5. 用鋁箔紙包起來,放置約10分鐘,這有助於肉食在切開時保持原汁原味。
肉類
牛排
羊架
小牛肉
豬扒
參考溫度
200 °C
200 °C
200 °C
200 °C
200 °C
180 °C
200 °C
燒烤程度
淺烤
中烤
烤熟
淺烤
中烤
一般
一般
參考時間
35-40 min
45-50 min
55-60 min
40 min
60 min
60 min
60 min
註︰上表提供不同肉類的參考烤焗溫度和時間,但實際設定須根據肉的厚度、骨頭大小和肉中混和的材料而
略作調整。
P. 0 9
操作說明
C. 魚類 / 禽類
1. 把禽肉或魚放進烤箱,設定180℃的中度溫度。
2. 在魚上面放一層錫紙,烤燒約45分鐘。
註︰上表提供各種禽、魚的參考燒烤溫度和時間,但實際設定須根據禽魚的厚度和餡子的內容而略作調整。
魚 / 禽類
雞肉
鴨肉
火雞
魚
參考溫度
180 °C
180-200 °C
180 °C
180 °C
180 °C
參考時間
45-50 min
60-70 min
40-45 min(<10kg)
35-40 min(>10kg)
20 min
5. 操作小提示
- 烤焗肉類時無須調味,若要增添風味,可將魚放在一盤香草上或在雞肉上撒上
迷迭香或龍蒿等香料
- 食物切割成小塊,有助烤煮得更快、更均勻
- 要令雞、小牛肉或豬扒等肉類看起來更美味,可在烤盤上塗上少許油,然後各
面烤一次,可使肉表面帶有金黃色澤

P. 1 0
注意事項
- 不得讓十二歲以下兒童單獨操作使用,亦不可在無人看管下進行烤焗
- 使用時,請勿接觸發熱部分及焗爐表面 (如焗爐門),以免燙傷和灼傷
- 切勿將焗爐用作室內取暖器
- 為防止火警,焗爐必須保持清潔,風道必須暢通無阻
- 焗爐運作時,切勿在附近使用噴霧劑
- 不可將易燃物質 (如噴霧劑) 放置在焗爐內或附近
- 使用後應立即關閉電源,否則食物殘餘的脂肪或油漬會容易引致火警
- 不要將厚度大的食品放到烤架下面,以免引起食品捲曲、發熱甚至燃燒
- 隨機之電源線如有損壞,必須由本公司認可或持牌的專業維修人員進行更換
- 如長期不使用焗爐,應將電源插頭拔下
P. 1 1
保養與維護
烤箱Ⅴ.
- 必須長期保持烤箱的清潔,確保發熱元件、風扇周圍沒有積聚脂肪和油膩
- 烤盤和燒烤架插件必須保持清潔,脂肪積斑會容易引致火警
- 肉食必須用箔紙包起來或裝進燒烤錫袋中,可減少清潔麻煩
烤架Ⅵ.
- 經常保持烤架盆和無煙烤架插件的清潔,防止脂肪積層引致發生火警
重要提示﹕
- 清洗烤箱前,先應保證切斷烤箱的電源
- 切勿使用蒸氣清洗
- 切勿用錫紙覆蓋或用器皿遮擋烤箱的底部及燒烤架,以免阻擋烤箱內之熱空氣運行
說明:使用家庭搪瓷器皿去污劑進行清洗,請必須按照產品說明進行清洗。
搪瓷面Ⅰ.
- 難去除的銹斑可用尼龍刷或專用去污液大力抹擦
- 切勿使用強烈或有刺激性清潔劑、去污粉、鋼絲刷、石蠟或粗糙摩擦性的抹布等清潔,以免傷害
物質表面
說明:必須根據鋼材的紋理走向來擦洗焗爐之不銹鋼部分。
不銹鋼面板Ⅱ.
任何等級之不銹鋼材料均會產生銹斑、褐色或會沾油漬。請按下列程序清洗,以確保焗爐的外觀、
性能和壽命。
- 請用溫熱的肥皂水清洗,再用清水沖洗乾淨
- 如要使焗爐外觀光潔,可用不銹鋼專用清潔劑擦洗,然後用一塊不留棉屑的布抹擦乾淨
- 不銹鋼特別髒或呈褐色的部分必須使用不銹鋼專用清潔劑擦洗
噴漆 (控制面板)Ⅲ.
- 用溫熱肥皂水擦洗,再以清水沖洗乾淨,然後用不留棉屑的布抹擦乾淨
- 切勿使用強烈或有刺激性清潔劑、去污粉、鋼絲刷、石蠟或粗糙摩擦性的抹布等清潔,以免傷害
面板表面物質
玻璃 (門及面板)Ⅳ.
- 門和控制面板上的玻璃面當沾有污漬就應立即清潔
- 沉積在玻璃上的食物烤跡可用濕布擦淨
- 頑固的斑跡可用焗爐專用清潔劑清潔

P. 1 2
清潔須知
拆去側旁架(燒烤架承托)
Ⅳ.
1. 握住焗爐下面的燒烤架承托。
2. 把它們堅定地往裏托。
3. 要安裝承托架,應先將後方的鉤插進後方孔。
4. 把前壯攀插進前椿孔,並把它插牢。
說明:燒烤架應置在上面的位置。
拆裝風扇擋板(如有擋板)
Ⅴ.
1. 兩邊握住風扇蓋,朝自身方向抽出。
2. 把風扇底部的兩個拉手稍插進相應的孔洞裏。
3. 輕輕壓向頂面。
說明:風扇擋板清洗以後務必重新裝回。
拆下烤盤和烤架
Ⅲ.
1. 拉出烤盤和燒烤架到盡頭位置。
2. 提起烤盤和燒烤架,把他們取出。
3. 在烤箱下面斜提烤盤和燒烤架,拆除承托架,注意不要倒出烤盤內的食物殘餘。
4. 用溫暖肥皂水洗滌烤盤和接插件。
5. 把它們放置兩側支撐線架之間。
拆裝烤箱燈的側旁燈(如有燈)
Ⅵ.
1. 逆時針向旋轉照明燈玻璃,然後拆下,更換燈泡。
2. 如要更換側旁照明燈燈泡,可利用鐵匙插進玻璃照明燈的底下,然後把它扳起來。
說明:風扇擋板清洗以後務必重新裝回。
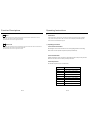
按以下指示,可較方便地將手伸進烤箱內進行清潔工作﹕
注意︰拆裝任何零件或配件前必先關閉焗爐電源,以免觸電
完全打開烤箱門
Ⅰ.
1. 打開焗爐門,朝前方旋轉2個挑動器,使它們二者扣上鉸鍵臂上的鉤子。
2. 就地按住二個挑動器,把它們稍為關攏一點,挑動器宣告掛扣完畢。
3. 把門關攏一半,向上提升,就可以卸下箱門了。
4. 不要用手把抬起箱門,用一只手執門的任何一側起出,手指保持與鉸鍵臂的距離。
重新裝上烤箱門
Ⅱ.
1. 把二個鉸鍵臂同時返回到焗爐的下面。
2. 把門局部開啟,確保定位凹口落在位置上。
3. 鉸鍵定位後,把門打開,確保挑動器膠鉤。
注意:
- 不可強行用力,裝門前必須先套上定位凹口
- 切勿握著門把手拆門
- 禁止將門浸入水裏
P. 1 3
常見問題
一般問題
故障
焗爐不工作
焗爐指示燈不亮
烤箱升溫不夠,不能燒烤
首次使用時,烤箱冒煙
爐門拆下後,不能重新裝上
實心電熱管已褪色
原因分析
- 電源未連接妥當
- 控制器設定不正確
- 安全保險絲燒斷致令電源未打開
- 指示燈壞了
- 家中的安全保險絲燒掉
- 烤箱底有鋁紙和烤盤
- 安全保險絲燒掉
- 防護油正在揮發
- 鉸動杆沒有妥然掛扣
- 發熱元件和飾邊圈在烤燒中受熱而
褪色是正常的
說明:如安全保險絲更換後仍燒掉,請立即找
技術人員維修
說明:如家中的安全保險絲更換後仍燒掉,請
立即找技術人員維修
說明:如安全保險絲更換後仍燒掉,請立即找
技術人員維修

P. 1 4
常見問題
燒烤問題
處理方法
- 選擇能把食品放在烤箱中心的
燒烤架層格
- 用其它托盤或烤盤試驗
- 烤燒期間旋轉食物
- 拿掉焙模式的烤架盤
- 預熱烤箱
- 採用適用尺寸的烤鍋皿
- 調正焙烤鍋皿和間距,皿與皿
間,皿與壁間一律3cm距離
- 每塊大小切得一樣,烤盤上放
得均勻
- 調低溫度
- 改用正確尺寸的鍋皿
- 改用光亮輕質鍋皿,並調低溫
度10℃
- 改放到高一層的位置
- 至少烤到一半時間才可以打開
爐門
- 調低溫度
- 焙烤模式時,把烤架盆拿掉
- 調低溫度
- 將食物放低一格
- 攪抖時間要適當以食品成份互
相結合就可
- 檢查鍋的尺寸,採用參考尺寸鍋
- 改用明亮焙烤鍋
- 調高溫度
- 放高一格
- 延長焙烤時間
- 改用尺寸正確的鍋皿
原因分析
- 燒烤架位置不正確
- 烤箱托盤太大
- 烤箱內空氣流通不均勻
- 烤盤影響了溫控器
- 烤箱未有預熱
- 烘烤皿太大
- 焙烤鍋皿空間不均勻
- 食品塊大小不一或烤盤上放得不
均勻
- 焙烤溫度太高
- 相對於合成配置,焙烤鍋皿太大
- 鍋皿是暗色金屬或玻璃
- 食品在烤箱中位置太低
- 烤燒期間爐門開的次數太多
- 焙烤溫度太高
- 烤盤影響了溫控器
- 焙烤溫度太高
- 食物在烤箱裏放得太高
- 糕糊攪抖時間過份
- 鍋形狀太深
- 焙烤鍋顏色太暗
- 焙烤溫度太低
- 食品在烤箱裏放得太低
- 焙烤時間太短
- 鍋皿尺寸不對
故障
烤燒不均勻
烤好的食物表面褐色太深
烤出的食品底面褐色太深
烤出的糕餅有裂縫和深厚
的鍋巴層
烤出的食品顏色蒼白,不
豐滿,以及未烘透
P. 1 5
常見問題
燒烤問題
處理方法
- 調高溫度
- 延長焙烤時間
- 檢查食物配方
- 要等烤焙時間後一刻鐘才能開
爐門
- 把食物放到高一點的架子上,
使熱氣流通好
- 焙烤模式時,拿掉烤架盆
- 不可用叉子戳肉塊
- 要用鉗子翻肉塊
- 放到低一點的烤架位置
- 每隔2cm用刀切一下
原因分析
- 焙烤溫度太低
- 焙烤時間太短
- 味配方比例不對
- 烤焙時間爐門開得太早
- 熱空氣流通不足
- 烤架盤影響了溫控器
- 肉食太接近發熱管
故障
糕餅中央塌下了
在風扇烤箱中烤肉和烤薯
仔顏色不和
原汁從肉中流出
烤出來的肉外層烤過頭,
中間欠烤
烤架烤成的剁肉和牛排
變形

P. 1 6
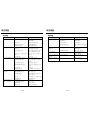
技術規格
EV-55D
220 - 240 V / 50 - 60 Hz
2900 - 3200 W
13.5 A
100 - 250 °C
不銹鋼
84 L
(H) 595 x (W) 595 x (D) 575 mm
(H) 470 x (W) 380 x (D) 430 mm
(H) 588 x (W) 565 x (D) 585 mm
41.0 kg
EV-15D
220 - 240 V / 50 - 60 Hz
2900 - 3200 W
13.5 A
100 - 250 °C
黑色
84 L
(H) 595 x (W) 595 x (D) 575 mm
(H) 470 x (W) 380 x (D) 430 mm
(H) 588 x (W) 565 x (D) 585 mm
41.0 kg
型號
電壓
功率
電流
溫度範圍
顏色
烤箱容量
機身尺寸
烤箱容積尺寸
安裝尺寸
淨重
本產品之外型、機件或規格如有任何變更,恕不另行通知。
本說明書內容之中英文版本如有出入,一概以中文版為準。
本產品使用說明書以 www.germanpool.com 網上版為最新版本。
02
02
05
03
11
08
06
12
13
14
15
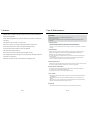
Table of Contents
Cautions
Notes About Cleaning
Product Structure
Function Descriptions
Installation
Operating Instructions
Care & Maintenance
Technical Specifications
Troubleshooting
Main Body
Control Panel & Display
Basic Control
Precautions
Operating Procedures

P. 0 3
Ⅰ. Main Body
Product Structure
Control Panel & Display
Lighting
Grill Rack
Baking Tray
Grill Rack Tracking
Oven Door
Grill Deflector
Inner Heating Element
Circulating Fan
Outer Heating Element
P. 0 4
Ⅲ. Basic Control
Set Timer
Press any button to show the timer setting on the display (default value is 60 min). Press right
button to add 5 min and left button to reduce 5 min (Maximum timer setting is 150 min) .
Set Temperature
Using [ Temperature ] control knob (left), set temperature from 100-250°C.
Select Function
Turn [ Function ] control knob (right) to desired position (Please refer to p.06 “Function
Descriptions” in this manual for details about each function).
Start
Press [ Set ] (middle button) to start. Timer will begin counting down from the set time and
operation will stop when it reaches “0”. During operation, press the left button [ - ] to display the
timer for 5 seconds.
Product Structure
100
Ke ep w arm
150
200
250
OFF
OFF
-
MODE
+
OVEN/GRILL
PROGRAM TIMER
FUNCTIO N
Heat Indicator (Heating)
Ⅱ. Control Panel & Display
Temperature Control Knob
Timer
Function Control Knob
Display

P. 0 6
Function Descriptions
Base Heat
Heat comes from element below food. The element is controlled by thermostat and will turn on and off to
maintain desired temperature. Ideal for: Adding extra browning to the bottoms of pizzas, pies and pastries.
Defrost
The “Defrost” function uses low temperature air that is circulated by the fan. Ideal for: defrost/thaw food
before cooking. “Defrost” function can also be used to raise yeast dough and dry fruit, vegetables and herbs.
Heat With Fan
Heat comes from the element around the fan, with fan circulating hot air within the oven chamber. Food can
be placed in several different positions in the oven at the same time. And this function is quicker than
standard non-fan [ Heat Only ] function.
Note: Some variation in browning is normal.
Rapid Heat
Heat comes from the element around the circulating fan as well as the smaller element above food. This
helps to preheat oven 30% quicker than on standard heating. Simply place food in oven straight from the
freezer. Ideal for: cooking frozen (pre-cooked) food, e.g. savoury pastries, pizzas, meat pies and fruit pies.
Note: Cook in the upper half of the oven for best results.
Heat Only
Heat comes from two elements, one above and one below food. Both elements are controlled by thermostat
and will turn on and off to maintain the desired temperature. Ideal for: Baking single trays of biscuits,
scones, muffins, cakes, casseroles, egg pudding, etc.
Grill With Fan
Heat comes from two heating elements above food. It combines the benefits of both “Heating” and “Grill”
functions. The grill element switches on and off to maintain the desired temperature while the fan circulates
heated air. The oven door remains closed for this function. Ideal for: Grill large cuts of meat, which gives you
a result that is similar to “rotisserie” cooked meat.
Note: Place on a rack in the second lowest level. Put baking pan on the lowest level to catch any spills and
droppings. It is not necessary to turn over during “Grill With Fan” cooking cycle.
P. 0 5
Installation
For best integration within a kitchen, mount oven in a standard 600 mm wide
cabinet that gives a flush fit with the surrounding cabinet front panels (Figure A).
1.
Figure A: Cabinet Top View Figure B: Cabinet Top View
① Cabinet Front ② Oven Top ③ Filling Plate
It can also be mounted with a proud fit with the surrounding cabinet (Figure B).
2.
Figure C
21 mm
16 mm
600 mm
1
2
3
16 mm
30m m
mi n
Air Inlet
200 x 200 mm
580 mm
550 mm
595 mm
595 mm
545 mm
30mm
mi n
1
2
16 m m
16 m m
60 0 mm
21 m m
Ⅲ
Ⅱ
Ⅰ
Ⅰ
600 mm
565 mm
Ⅱ
600 mm
588 mm
Ⅲ
605 mm
585 mm
A
B
Note:
- Oven must be installed on a flat and level surface; venting space must be present. Non-flammable
material is recommended for the surrounding cabinet panels and filling plates
- Power socket should be conveniently accessible and properly earthed

P. 0 8
- When using oven for the first time, clean the oven interior with warm water (with or without
soap). Then heat empty oven at 180°C for 2 to 4 hours to dispel any manufacturing odor
- Room must be well ventilated during use
Precautions
Ⅰ.
Operating Procedures
Ⅱ.
Operating Instructions
1. Pre-heat Oven Chamber
2. Pre-heat Grill Rack
Pre-heating of oven is recommended for some of the grilling functions. Pre-heating
allows oven to reach required temperature quickly and efficiently.
Preheat grill rack for at least 3 minutes to obtain best results. It helps to seal juice and
flavour in meat items such as steak, pork chops and lamb.
3. Set Temperature
Set desired temperature (refer to table below).
Oven Status
Cool
Warm
Very Warm
Moderate Hot
Medium Hot
Hot
Very Hot
Extra Hot
Extremely Hot
Reference Temperature
80°C / 175°F
100~110°C / 210~230°F
130~140°C / 265~285°F
150~160°C / 300~320°F
170~180°C / 340~355°F
190~200°C / 375~390°F
200~210°C / 390~416°F
220~230°C / 430~450°F
240~250°C / 465~480°F
P. 0 7
Function Descriptions
Turbo Grill
“Turbo Grill” directs radiant heat from two powerful upper elements onto the food. Ideal for: Grill tender cuts
of meat, sausages, open toasts and other quick cooking foods.
Note: Preheat oven for 3 minutes to get the best results.
Grill
Radiant heat is directed from the powerful upper element onto food. Ideal for: Grill tender cuts of meat,
steak, chops, open toasts and other quick cooking foods.
Note: Preheat oven for 3 minutes to get the best results.

P. 1 0
C. Fish / Poultry
1. Place poultry or fish in oven. Set temperature at 180°C.
2. Lay a sheet of foil on top of fish and grill for 20-45 min.
Note: Above table is for reference only. Actual grill time must be adjusted depending on the thickness of
fish/poultry and other ingredients in the dish.
Fish / Poultry
Chicken
Duck
Turkey
Fish
Temperature
180 °C
180-200 °C
180 °C
180 °C
180 °C
Time
45-50 min
60-70 min
40-45 min ( <10kg )
35-40 min ( >10kg )
20 min
5. Operating Tips
- Seasoning is not necessary when grilling. However, to enrich meat flavour, you
can grill fish on top of a bed of herbs, or add a bunch of rosemary or tarragon
to your poultry dish
- Food cooks faster and more evenly when cut into pieces
- To make poultry, veal and pork look more appetizing, apply a small amount of
fat in baking pan and heat meat on all sides
Operating Instructions
P. 0 9
Operating Instructions
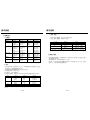
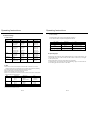
4. Adjust Settings
Pastry Type
Scones
Biscuits / Cookies
Cakes
Pastries
Yeast Breads
Puddings
Pastry Name
Dried Fruit Scones
Rolls
Butter Cookies
Shortbreads
Patty Cakes
Sponge Cakes
Nut Loaves
Boiled Fruit Pies
Rich Fruit Cakes
Custard Tarts
Cream Puffs
Danish Stick
Buns
Breads
Chocolate
Cheese Soufle
Temperature
210 °C
170-180 °C
170-180 °C
150 °C
180 °C
170-180 °C
170 °C
160-170 °C
140 °C
180-160 °C
220-180 °C
210-180 °C
200 °C
220 °C
190 °C
180 °C
Rack Level*
3
3 or 4
3 or 4
3 or 4
3 or 4
3
3
3
3
3
3 or 4
3 or 4
3 or 4
3
3 or 4
3
Time
10-12 min
10-15 min
10-15 min
15-20 min
15-20 min
18-20 min
45-50 min
60-90 min
180-210 min
10/30 min
20/30 min
15/30-40 min
20/30 min
25-30 min
40 min
35 min
A. Cake & Pastry
B. Meat
*Counting from bottom to top
1. Place meat in oven and set temperature between 180°C and 200°C. It is recom
mended to wrap meat in a roasting bag or foil to prevent fats and oil from splattering.
2. Use baking pan and/or grill rack insert; place meat on the insert.
3. Do not pierce meat, as it will allow meat juice to escape.
4. When meat is cooked, remove meat from oven.
5. Wrap meat in aluminium foil and leave to stand for about 10 minutes. It will help retain
meat juice when the meat is carved.
Meat
Steak
Lamb Rack
Veal
Pork Chop
Temperature
200 °C
200 °C
200 °C
200 °C
200 °C
180 °C
200 °C
Grilling Level
Medium Rare
Medium
Medium Cooked
Medium Rare
Medium
Normal
Normal
Time
35-40 min
45-50 min
55-60 min
40 min
60 min
60 min
60 min
Note: Above table is for reference only. Actual grill time must be adjusted depending on the thickness of meat,
size of bones and other ingredients in the dish.

P. 1 2
Care & Maintenance
- Always keep your appliance clean. Ensure that grease do not accumulate around heating elements
or circulating fan
- Always keep the oven dish, bake trays and smokeless grill insert clean, as any fat deposits may
catch fire
- Always wrap meats in foil or an roasting bag to minimize cleaning effort. Any poly-unsaturated fats
can leave a varnish-like residue which is very hard to remove
Oven Interior
Ⅴ.
- Always keep the baking pan and grill rack inserts clean. Any fat deposits may catch fire
Grill Rack
Ⅵ.
- Rub persistent stains vigorously with a nylon scourer or creamed powder cleansers
- Do not use harsh abrasive cleaners, powder cleaners, steel wool or wax polishes
Note: User may use household oven enamel cleaners - follow the manufacturer’s instructions
carefully
Enamel Surface
Ⅰ.
Stainless steel of any grade can be stained, discolored or greasy. In order to maintain oven’s best
performance and appearance, clean those areas regularly by following the procedures below.
- Wash with warm soap water and then rinse with clean water
- For a better, shinny look, wipe stainless steel areas with a stainless steel cleaner, then wipe with a
soft lint-free cloth
- Use a stainless steel cleaner when the stainless steel part is extremely dirty and/or discolored
Note: Please follow the polish or brush lines of the stainless steel.
Stainless Steel
Ⅱ.
- Wash with warm soap water and then rinse with clean water. Then wipe it dry with a soft, lint-free cloth
- Do not use harsh abrasive cleaners, powder cleaners, steel wool or wax polishes
Paint (Control Panel)
Ⅲ.
Glass (Door & Control Panel)
Ⅳ.
- Glass surfaces on oven door and control panel are best cleaned immediately after being soiled
- Use a damped cloth to remove baked-on food deposits
- Oven cleaners may be used to remove stubborn marks and stains
Important:
- Always make sure that the power is disconnected before cleaning
- Do not use steam cleaners
- Do not block heat circulation within the oven chamber by lining the bottom or grill racks with foil
or cookware
P. 1 1
Cautions
- Children under 12 should not operate oven alone. Oven must not be unattended at
any time during operation
- Do not touch heating element and other hot surfaces (e.g. oven door) to avoid burns
and injuries
- This appliance cannot be used as a space heater
- In order to avoid a fire, oven should be kept clean and vents unobstructed
- Do not spray aerosols in the vicinity of the appliance during operation
- Do not store flammable materials in or under the appliance
- Shut off power immediately after use
- Do not place thick portions of food under the grill. Foods may curl
- If the supplied power cord is damaged, contact a German Pool-authorized or licensed
technician for a replacement
- When oven will not be used for an extended period, unplug power cord

P. 1 4
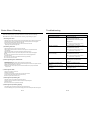
Troubleshooting
Possible Cause
- Power not turned on
- Controls are incorrectly set
- Household fuse has blown or power
supply is off
- Light bulb blows out or loose in socket
- Household fuse has blown
- Foil or trays lining on bottom of oven
- Household fuse has blown
- Reduce amount of water used in
cooking (Some condensation is
normal )
- Stirrup not engaged properly
- Discoloration of heating elements and
trimming is normal
Problem
Oven or grill not working
Lighting not working
Oven not heating up enough
Oven not working
Condensation building up
Door cannot be replaced after
removal
Solid heating element has been
discolored
Note: If the fuse continues to blow, contact
technician for a replacement
Note: If the fuse continues to blow, contact
technician for a replacement
Note: If the fuse continues to blow, contact
technician for a replacement
P. 13
Notes About Cleaning
1. Slide out baking pan and grill racks towards you until they reach the end.
2. Pull and lift them out.
3. Tilt up baking pan and grill racks at the front to the side supports. Be careful not to spill the contents.
4. Wash pan and racks with warm soap water.
5. Reverse the above steps to put the pan and racks back. Make sure they are placed between
2 support wires.
Removing Baking Pans & Grill Racks
Ⅲ.
1. Grasp the rack supports at the front.
2. Pull them firmly inwards.
3. To install the rack supports, first insert the rear hook to the rear hole.
4. Locate the front peg into the front hole and push in firmly.
Note: Rack support wires should be on top
Removing Side Rack
Ⅳ.
1. Hold fan cover by the two sides and pull towards yourself.
2. Insert the two tabs at the bottom of the fan into their corresponding holes.
3. Push the top back.
Note: The fan baffle must be replaced after cleaning.
Removing & Re-positioning Fan
Ⅴ.
Removing & Re-positioning Lighting
Ⅵ.
1. Turn lighting glass anti-clockwise and remove it for bulb replacement.
2. To remove side light, place a spoon under the light glass and lever off. Replace bulb and snap glass.
Follow the following steps to get better access to the oven interior for cleaning:
Note: Make sure power is connected when removing or positioning any parts.
1. Rotate the two stirrups forward so that they are engaged together onto the hooks on the hinge arms.
2. Hold both stirrups in place and slightly close the door. The stirrups will now remain engaged.
3. Close the door half way and lift it away from the oven.
4. Do not lift the door by the handle. Keep one hand on either side of the door
(Keep fingers away from the hinge arms).
Removing Oven Door
Ⅰ.
Positioning Oven Door
Ⅱ.
1. Position both hinge arms at the same time into the front.
2. Ensure that the location notches on the bottom of the hinge arms are positioned onto the
lower cutout lip.
3. Close the door partially to ensure that the location notch drops into place.
4. When the hinges are located, open the door fully and ensure the stirrups are disengaged.
Caustion:
- Do not use force and always ensure that the location notch is correctly engaged before
you operate the door
- Do not lift or carry oven door by the handle when removing or positioning
- Do not immerse oven door in water

機身號碼 Serial No. :
購買商號 Purchased From :
發票號碼 Invoice No. :
購買日期 Purchase Date :
型號 Model No. :
保用條例
此保用提供德國寶產品之機件在正常使用下壹
年保用
(自購買日起計算),但不包括安裝、維修
、保養及更換零件之人工或其他費用。
* 此保用不包括﹕非家庭性質用途﹔燈泡及塑
膠配件﹔因意外而造成的損壞(包括運輸及其
它)﹔任何附件及輔助裝置﹔以及一切因人為、
電源接合不當、不依說明書而錯誤或疏忽使用
本機、經非本公司認可之安裝及不適當維修等
等所引致之損壞。
** 保用只在香港、九龍、新界區有效,東涌、
愉景灣及離島,需額外收取交通費用。
貴戶須在購機十天內¸以下列其中一種方
式向本公司登記資料¸保用手續方正式生效﹕
1)填妥本公司網頁內之保用登記表格
www.germanpool.com/warranty
2)填妥保用登記卡¸並連同購機發票之副本
一併郵寄到維修及客戶服務部
(本公司將不發還發票副本或登記卡)
Warranty Terms & Conditions
Our Repairs & Customer Service Centre will provide
rectification of any defect of manufacturing materials
free of charge given that such defect is reported within
12 months from purchase date.
* Product must be used solely for domestic purposes.
Customer should always follow the operating
instructions. This warranty does not apply to:
replacement of accessories and parts; damages
caused by incorrect voltage, improper operations,
unauthorized installation or repairs as well as
accidents.
** Service area includes Hong Kong Island, Kowloon
and New Territories. Repairs in Tung Chung, Discovery
Bay or other areas are subject to extra service charge.
This warranty is not valid until Customer’s registration
information is returned to and received by our Service
Centre within 10 days of purchase via one of the
following methods:
1) Visit our website and register online:
www.germanpool.com/warranty
2) Complete all fields on the attached Warranty
Card and mail it back to our Repairs & Customer
Service Centre along with a photocopy of the
purchase invoice (Warranty Card and invoice
copy will not be returned to Customer)
請填妥以下空格並與發票一併保存¸以便維修時核對資料。用戶提供本公司之所有資料必須正確無誤¸否則免費保用將會無效。
Please fill out the form below. This information and the purchase invoice will be required for any repairs. Warranty will be invalid
if information provided is found to be inaccurate.
EV-15D EV-55D
Customer Service & Repair Centre
German Pool (Hong Kong) Limited
8/F, China Travel (Cargo) Logistics Centre
1 Cheong Tung Road
Hung Hom, Kowloon, Hong Kong
Tel : +852 2333 6249
Fax : +852 2356 9798
Email : [email protected]
客戶服務及維修中心
德國寶(香港)有限公司
香港九龍紅磡暢通道1號
中旅貨運物流中心8樓
電話:+852 2333 6249
傳真:+852 2356 9798
此保用證只適用於香港 This warranty card is valid only in Hong Kong
P. 1 5
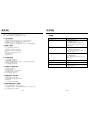
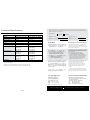
Technical Specifications
EV-55D
220 - 240 V / 50 - 60 Hz
2900 - 3200 W
13.5 A
100 - 250 °C
Stainless Steel
84 L
(H) 595 mm
(W) 595 mm
(D) 575 mm
(H) 470 mm
(W) 380 mm
(D) 430 mm
(H) 588 mm
(W) 565 mm
(D) 585 mm
41.0 kg
EV-15D
220 - 240 V / 50 - 60 Hz
2900 - 3200 W
13.5 A
100 - 250 °C
Black
84 L
(H) 595 mm
(W) 595 mm
(D) 575 mm
(H) 470 mm
(W) 380 mm
(D) 430 mm
(H) 588 mm
(W) 565 mm
(D) 585 mm
41.0 kg
Model
Voltage
Rated Power
Electric Current
Temperature Range
Colour
Interior Capacity
Dimensions
Interior Dimensions
Cut-out Dimensions
Net Weight
Product appearance, structure and specifications are subject to change without prior notice.
If there is any inconsistency or ambiguity between the English version and the Chinese version of these operating instructions,
the Chinese version shall prevail.
Refer to www.germanpool.com for the most up-to-date version of the operating instructions.

www.germanpool.com
EV15D_55D-M-14(1)
德國寶(香港)有限公司
German Pool (Hong Kong) Limited
香港
Hong Kong
Room 113. Newport Centre Phase II. 116 Ma Tau
Kok Road. Tokwawan. Kowloon. Hong Kong.
電話 Tel: +852 2773 2888
傳真 Fax:+852 2765 8215
香港九龍土瓜灣馬頭角道116號
新寶工商中心2期113號室
中國
China
電話 Tel:+86 757 2980 8308
傳真 Fax:+86 757 2980 8318
3/F, Takshun Plaza, Nanguo East Road,
Shunde, Foshan, Guangdong
廣東省佛山市順德區
大良南國東路德順廣場三層
澳門
澳門宋玉生廣場263號
中土大廈15樓I座
Alameda Dr. Carlos D'Assumpcao No. 263,
Edif. China Civil Plaza, 15 Andar, I. Macau
電話 Tel:+853 2875 2699
傳真 Fax:+853 2875 2661
Macau
© 版權所有。未獲德國寶授權,不得翻印、複製或使用本說明書作任何商業用途,違者必究。
© All rights reserved. Copying, reproducing or using the contents of this manual is not allowed without prior authorization from German Pool, violators will be prosecuted.
使用說明書
OPERATING INSTRUCTIONS
電焗爐
EV-15D / EV-55D
Electric Oven
Please read these instructions and warranty information carefully before use and keep them handy for future reference.
在使用之前請詳細閱讀「使用說明書」及「保用條例」,並妥為保存。
Oven
EV-55D
-
 1
1
-
 2
2
-
 3
3
-
 4
4
-
 5
5
-
 6
6
-
 7
7
-
 8
8
-
 9
9
-
 10
10
-
 11
11
-
 12
12
-
 13
13
-
 14
14
-
 15
15
-
 16
16
-
 17
17


German pool EV-55D Operating Instructions Manual
- カテゴリー
- バーベキュー
- タイプ
- Operating Instructions Manual
- このマニュアルも適しています
他の言語で
- English: German pool EV-55D