
1
E361
CONTINUOUSLY VARIABLE PATTERN
CONDENSER GOOSENECK MICROPHONE
E309D PRO
HIGH QUALITY CONDENSER
GOOSENECK MICROPHONE
Contact
Marketing and sales
Superlux Taiwan
+886-2-26931323
Manufacturing & logistics
Superlux Enterprise
Development ( Shanghai ) Co., Ltd.
English

2
GENERAL DESCRIPTION
E309D PRO Miniature Gooseneck Microphone delivers
the professional features needed to achieve optimum
speech pickup in board meetings, conferences, pre-
sentations, houses-of-worship and more. The E309D
PRO features a highly sensitive condenser capsule and
is available in a cardioid, super-cardioid or omni-direc-
tional pickup pattern for maximum flexibility and control.
The three model numbers for E309D PRO with different
capsule are as bellow:
E309DU PRO with incorporated cardioid capsule
E309DH PRO with incorporated supercardioid capsule
E309DO PRO with incorporated omni-directional capsule
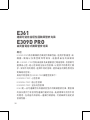
The E361 is a condenser gooseneck microphone with a
continuously-variable pickup pattern achieved by its dual
capsule design. The variable pattern control is selected
by the button on its base, making the E361 flexible for a
variety of applications.
E361
E309D PRO
CONTINUOUSLY VARIABLE PATTERN
CONDENSER GOOSENECK MICROPHONE
HIGH QUALITY CONDENSER
GOOSENECK MICROPHONE

3
FEATURES
• High quality condenser capsule
• Durable, high quality gooseneck structure
• Integrated programmable stand
• Selectable capsules from cardioid, super-cardioid and
omni- directional for E309D PRO only
• E361 features dual capsule design and continuously
variable pattern RF immunity
APPLICATIONS
• Conference room
• Board meetings
• Presentations
• Houses-of-worship
Both the E309D PRO and E361 feature a brand-new
design in a high-quality gooseneck. They are immune
to radio-frequency (RF) interference from cell phones,
PDAs, wireless internet devices, two-way radios, etc. An
On/Off switch doubles as a power LED, providing status
indication. The integrated desk stand features a pro-
grammable membrane switch. The base features both a
3-pin XLR male output connection and a 4-pin connector
to allow a hard-wired cable to be led out from either the
bottom or the rear of the base.

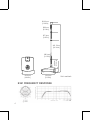
4
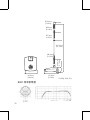
E361 FREQUENCY RESPONSE
143.0mm
[5.630in]
Ø16 .0mm
[0.630in]
465.17mm
[18.314in]
Ø6.0mm
[0.236in]
Ø7.3
mm
[0.287in]
Ø8.0mm
[0.315in]
44.6mm
[1.756in]
123.0mm
[4.843in]
Unit: mm/inch

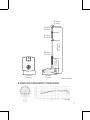
5
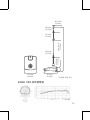
E309D PRO FREQUENCY RESPONSE
Unit: mm/inch
143.0mm
[5.630in]
Ø11.5mm
[0.453in]
Ø6.0mm
[0.236in]
Ø7.3mm
[0.287in]
Ø8.0mm
[0.315in]
44.6.0mm
[1.756in]
445.21 mm
[17.528in]
123.0mm
[4.843in]

6
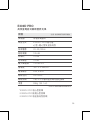
Specications
Transducer
Back Electret
Polar Pattern Dual capsule design with continuously
variable polar pattern
Frequency Response 80~18,000 Hz
Dynamic Range 107 dB
Signal-to-Noise Ratio 81 dB
Equivalent Noise Level 15 dB
Max. SPL 120 dB SPL
Sensitivity - 31 ± 2 dBV/Pa
Finish Matte-black
Power Requirement P48, 8.6 mA
Output Impedance 200 ohms
Connector 3-pin XLR male jack
Net Weight 943 g (33.3 oz)
*1Pa=10 microbars=94dB SPL
*Note:Specications are subject to change.
E361
CONTINUOUSLY VARIABLE PATTERN
CONDENSER GOOSENECK MICROPHONE

7
Specications
Transducer
Back Electret
Polar Pattern E309D PRO: Select from 3 capsules: car-
dioid, supercardioid and omni-directional.
Frequency Response 20~20,000 Hz
Dynamic Range 105 dB
Signal-to-Noise Ratio 75 dB
Equivalent Noise Level 19 dB
Max. SPL 124 dB
Sensitivity - 38 ± 2 dBV/Pa
Finish Matte-black
Power Requirement P48, 5.5mA
Output Impedance 200 ohms
Connector 3-pin XLR male jack
Net Weight 938 g (33.1 oz)
*1Pa=10 microbars=94dB SPL
*Note:Specications are subject to change.
*The three model numbers are as bellow:
E309DU PRO with incorporated cardioid capsule
E309DH PRO with incorporated supercardioid capsule
E309DO PRO with incorporated omni-directional capsule
E309D PRO
HIGH QUALITY CONDENSER
GOOSENECK MICROPHONE

8
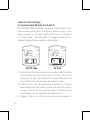
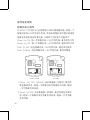
Operational Settings
Programmable Membrane Switch
Both E309D PRO and E361 integrate a low-profile micro-
phone base and require a phantom power supply. Their
base provides a soft touch button that can be congured
for “push-to-talk”, “push-to-mute” or “toggle on-and-off” op-
eration through the dip switch on the bottom.
1. Push-to-talk: The microphone is normally muted. Pushing
and holding the soft touch button will turn the micro-
phone on. As soon as the operator stops holding the soft
touch button, the microphone will return to mute.
2. Push-to-mute: The microphone is normally on. Pushing
and holding the soft touch button will mute the micro-
phone. As soon as the operator stops holding the soft
touch button, the microphone will again turn on.
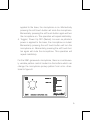
3. Toggle / Power Up ON: As soon as phantom power is

9
applied to the base, the microphone is on. Momentarily
pressing the soft touch button will mute the microphone.
Momentarily pressing the soft touch button again will turn
the microphone on. This operation will repeat indenitely
4. Toggle / Power Up OFF (Muted): As soon as phantom
power is applied to the base, the microphone is muted.
Momentarily pressing the soft touch button will turn the
microphone on. Momentarily pressing the soft touch but-
ton again will mute the microphone. This operation will
repeat indenitely.
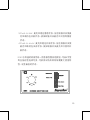
For the E361 gooseneck microphone, there is a continuous-
ly variable pattern control located on the bottom which can
change the microphone pickup pattern from omni- direc-
tional to gure-8.

10
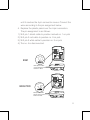
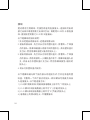
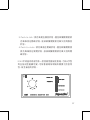
Connection
Users may use an audio cable terminated with a profes-
sional 3-pin XLR type connector to send a balanced audio
signal to a microphone preamp, or a three-conductor
cable with one open end and the other terminated with a
professional 3-pin male XLR type connector. If an audio
cable terminating in XLR connectors on both ends is used,
it can simply be plugged in to the built-in XLR jack at the
back of the base. If a hard-wired installation is preferred,
a three-conductor cable with an open end can be directly
attached to the base following the instructions below; this
cable can be led out from the bottom, or from the back if
preferred.
1. Determine whether the cable is to be led out from the
bottom or the rear of the base.
2. If from the bottom, then rst of all, open the rectangular
plastic panel on the bottom. The 4-pin connector will be
visible. Insert the open end of the cable into the hole
located at the center of the bottom and feed the cable
end into the 4-pin connector recess. Connect the wires
according to the pin assignment below.
3. If the wire is to be led out through the rear of the base,
then first of all, open the rectangular plastic panel on
the bottom to expose the 4-pin connectors. Remove the
small rubber cover from the hole at the back of the base
and feed the open end of the cable through this hole

11
E361
E309 PRO
until it reaches the 4-pin connector recess. Connect the
wires according to the pin assignment below.
4. Replace the plastic panel over the 4-pin connectors.
The pin assignment is as follows:
1) XLR pin 1 shield cable to position marked no. 1 on pcb
2) XLR pin 2 red cable to position no. 2 on pcb
3) XLR pin 3 white cable to position no. 3 on pcb
4) The no. 4 is disconnected.
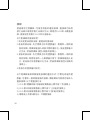
E309D PRO
White wire
Red wire
Shield
Microphone cable
can be led out from
bottom or back
GOOSENECK
MICROPHONE
BASE
Microphone cable
can be led out from
bottom or back
White wire
Red wire
Shield

12
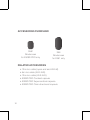
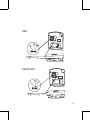
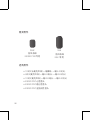
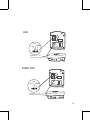
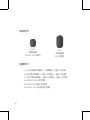
S55F
Windscreen
for E309D PRO only
• 10m mic cable (open end and XLR-M)
• 5m mic cable (XLR-XLR)
• 10m mic cable (XLR-XLR)
• E309D PRO Cardioid capsule
• E309D PRO Supercardioid capsule
• E309D PRO Omni-directional capsule
S56
Windscreen
for E361 only
ACCESSORIES FURNISHED
RELATED ACCESSORIES

13
!
!
!
SAFETY PRECAUTIONS
Safety symbols-“WARNING” AND “CAUTION”- and mes-
sages described below are used in this manual to prevent
bodily injury and property damage which could result from
mishandling. Before operating your product, read this man-
ual rst and understand the safety symbols and messages
so you are thoroughly aware of the potential safety hazards.
!
WARNING: Indicates a potentially hazardous situ-
ation which, if mishandled, could result in death or
serious personal injury.
CAUTION: Indicates a potentially hazardous situa-
tion which, if mishandled, could result in moderate
or minor personal injury, and/or property damage.
WARNING
‧Do not expose the unit to rain or an environment
where it may be splashed by water or other liquids,
as doing so may result in re or electric shock.
‧Do not attempt to modify this product. Doing so
could result in personal injury and/or product failure.
CAUTION
‧Do not subject to extreme force and do not pull on
the cable or failures may result.
‧Keep the device dry and avoid exposure to extreme
temperatures and humidity.

14
P/N:LB100E36101EN OCT, 2018
LIMITED WARRANTY
Superlux Enterprise warrants all materials and workmanship under use as instructed
by the user’s manual of this product for a period of one year from the original date of
purchase. Warranty period might be different by each area. Please contact your local
dealer for more information. If any defects are found in the materials or workmanship
or if the product fails to function properly during the applicable warranty period,
Superlux Enterprise, at its option, will repair or replace the product. This warranty
applies only to equipment sold and delivered by Superlux Enterprise’s authorized
distributors or dealers. However, the following are not covered: Damage caused by
accident, misuse, abuse, product modication or neglect; damage occurring during
shipment; damage resulting from failure to follow instructions contained in your
Instruction manual; damage resulting from the performance of repairs by someone
not authorized by Superlux; claims based upon any misrepresentations by the seller;
any Superlux product on which the serial number has been defaced, modied or
removed. Service and repairs of Superlux products are to be performed only at a
factory-authorized facility or authorized distributors or dealers. Unauthorized service,
repairs, or modication will void this warranty. To obtain repairs under warranty,
you must have a copy of your sales receipt from the authorized Superlux dealer
where you purchased the product. It is necessary to establish purchase date and
determine whether your Superlux product is within the warranty period. To obtain
factory authorized service, please contact authorized distributors, dealers or mail to
THIS DEVICE COMPLIES WITH PART 15 OF THE FCC RULES CLASS B. OPER-
ATION IS SUBJECT TO THE FOLLOWING TWO CONDITIONS:
(1) THIS DEVICE MUST NOT CAUSE HARMFUL INTERFERENCE, AND
(2) THIS DEVICE MUST ACCEPT ANY INTERFERENCE RECEIVED INCLUDING
INTERFERENCE THAT MAY CAUSE UNDESIRED OPERATION. SUITABLE FOR
HOME OR OFFICE USE.
www.superlux.com.tw

15
E361
连续可变拾音极性图鹅颈管麦克风
E309D PRO
高质量电容式鹅颈管麦克风
Contact
021-69223756
support_cn@superlux.com.tw
Superlux
+886-2-26931323
sales@superlux.com.tw

16
E309D PRO
E309D PRO
E309D PRO
E309DU PRO
E309DH PRO
E309DO PROE361
E361
连续可变拾音极性图鹅颈管麦克风
E309D PRO
高质量电容式鹅颈管麦克风

17
•
•
•
• E309D PRO
• E361
•
•
•
•
•
E309D PROE361
LED 3

18
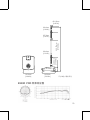
/
E361
143.0mm
[5.630in]
Ø16 .0mm
[0.630in]
465.17mm
[18.314in]
Ø6.0mm
[0.236in]
Ø7.3
mm
[0.287in]
Ø8.0mm
[0.315in]
44.6mm
[1.756in]
123.0mm
[4.843in]

19
/
E309D PRO
143.0mm
[5.630in]
Ø11.5mm
[0.453in]
Ø6.0mm
[0.236in]
Ø7.3mm
[0.287in]
Ø8.0mm
[0.315in]
44.6.0mm
[1.756in]
445.21 mm
[17.528in]
123.0mm
[4.843in]

20
80~18,000Hz
107 dB
81 dB
15 dB
120 dB SPL
-31 2dBV/Pa
P48, 8.6mA
200ohms
3 XLR
943g33.3 oz
*1Pa=10 microbars=94dB SPL
*
E361
ページが読み込まれています...
ページが読み込まれています...
ページが読み込まれています...
ページが読み込まれています...
ページが読み込まれています...
ページが読み込まれています...
ページが読み込まれています...
ページが読み込まれています...
ページが読み込まれています...
ページが読み込まれています...
ページが読み込まれています...
ページが読み込まれています...
ページが読み込まれています...
ページが読み込まれています...
ページが読み込まれています...
ページが読み込まれています...
ページが読み込まれています...
ページが読み込まれています...
ページが読み込まれています...
ページが読み込まれています...
ページが読み込まれています...
ページが読み込まれています...
-
 1
1
-
 2
2
-
 3
3
-
 4
4
-
 5
5
-
 6
6
-
 7
7
-
 8
8
-
 9
9
-
 10
10
-
 11
11
-
 12
12
-
 13
13
-
 14
14
-
 15
15
-
 16
16
-
 17
17
-
 18
18
-
 19
19
-
 20
20
-
 21
21
-
 22
22
-
 23
23
-
 24
24
-
 25
25
-
 26
26
-
 27
27
-
 28
28
-
 29
29
-
 30
30
-
 31
31
-
 32
32
-
 33
33
-
 34
34
-
 35
35
-
 36
36
-
 37
37
-
 38
38
-
 39
39
-
 40
40
-
 41
41
-
 42
42


