LaCie 12big Thunderbolt™ 3 インストールガイド

カテゴリー
外付けハードドライブ
タイプ
インストールガイド

LaCie 12big Thunderbolt™ 3は、高速で信頼性の高いデータストレージソリューションです。12ベイのデザインで、最大120TBのデータを保存でき、Thunderbolt 3インターフェイスにより、最大40Gb/sの転送速度を実現します。また、RAID 0、1、5、10をサポートしており、データの冗長性を確保することができます。

LaCie 12big Thunderbolt™ 3は、ビデオ編集、グラフィックデザイン、オーディオ制作など、大容量のデータを使用するクリエイターに最適です。また、バックアップやアーカイブにも最適です。

主な機能:

  • 12ベイのデザインで、最大120TBのデータを保存可能
  • Thunderbolt 3インターフェイスで、最大40Gb/sの転送速度を実現
  • RAID 0、1、5、10をサポートし、データの冗長性を確保
  • ビデオ編集
12big Thunderbolt
3
12-Bay Desktop RAID Storage
|
Dual Thunderbolt 3
|
USB 3.1
design by neil poulton
Quick Install Guide
2
1
USB connection
USB-C/USB-C
USB-C/USB-A
Connect your LaCie storage device’s USB 3.1 port to your computers USB-C port or
USB Type A port. You can also connect the cable to a Thunderbolt 3 port on your computer.
However, do not use the Thunderbolt 3 ports on the LaCie storage until you have completed
all the steps.
3
2
Power connection
Connect the power cable.
4
3
Power switch
Power on the LaCie storage device.
5
4
Install LaCie RAID Manager
LaCie RAID Manager helps you to configure your LaCie storage device’s RAID arrays
and maintain its health. It also includes an important driver that allows you to use the
Thunderbolt ports.
Your LaCie device is delivered formatted as HFS+ for Mac with a single RAID 5 array. Review
the instructions below for your operating system.
1. Use the Finder to open your storage
device and launch Start Here Mac.
Start Here Mac
LaCie
HD
2. Follow the onscreen instructions to
register your device and download
LaCie RAID Manager.
Configure and format storage:
The disks must be formatted since Windows
does not support HFS+.
1. On the computer that will connect to
the LaCie storage device, go to
www.lacie.com/support/lrm.
2. Download LaCie RAID Manager for
Windows.
3. Launch the installer and follow the
onscreen instructions to complete
the installation.
4. Use LaCie RAID Manager to delete the
current RAID array and create a new one.
For instructions, see www.lacie.com/
lrm-guide. After creating a new RAID
array, the drives must be formatted
for Windows. For instructions, see the
formatting chapter in the manual,
www.lacie.com/tbt3-guide.
6
5
Remove label
After installing LaCie RAID Manager, remove the label on the back of the LaCie storage
device. You can now use the Thunderbolt ports.
a
7
The available storage is smaller than the total capacity since RAID 5 offers data
redundancy in case one drive fails. To learn more about RAID levels and how to use
LaCie RAID Manager, see www.lacie.com/lrm-guide.
For information on device operation and maintenance, see www.lacie.com/tbt3-guide.
b
Review details of your 12big Thunderbolt 3s warranty by opening the LaCie Limited Warranty Statement
on your drive or go to www.lacie.com/warranty. To request warranty service, contact an authorized
LaCie service center or refer to www.lacie.com/support/12big-tbolt3 for more information regarding
customer support within your jurisdiction.
8
FR
1
Connexion USB
Raccordez le port USB 3.1 de votre périphérique de stockage LaCie au port USB-C
ou au port USB de type A de votre ordinateur. Vous pouvez également connecter le
câble à un port Thunderbolt 3 de votre ordinateur. En revanche, procédez comme
indiqué avant d’utiliser les ports Thunderbolt 3 du périphérique de stockage LaCie.
2
Branchement électrique
Branchez le câble dalimentation.
3
Interrupteur d’alimentation
Allumez le périphérique de stockage LaCie.
4
Installation de LaCie RAID Manager
Le logiciel LaCie RAID Manager vous aide à configurer les matrices RAID de votre
riphérique de stockage LaCie et à assurer son intégrité. Par ailleurs, il contient un
pilote qui permet d’utiliser les ports Thunderbolt.
Le périphérique LaCie est formaté par défaut en HFS+ pour Mac avec une seule
matrice RAID 5. Pour tout complément d’informations sur votre système d’exploitation,
référez-vous aux instructions ci-dessous.
9
Mac Windows
1. Ouvrez votre périphérique de
stockage à l’aide du Finder, puis
lancez Start here Mac.
Start Here Mac
LaCie
HD
2. Suivez les instructions qui
s’affichent à l’écran pour
enregistrer votre périphérique et
télécharger LaCie RAID Manager.
Configurer et formater lespace de
stockage :
Les disques doivent être formatés car
Windows ne prend pas en charge le
format HFS+.
1. Sur l’ordinateur auquel le périphérique
de stockage LaCie sera connecté,
consultez la page www.lacie.com/
support/lrm.
2. Téléchargez LaCie RAID Manager pour
Windows.
3. Lancez le programme d’installation,
puis suivez les instructions qui
s’affichent à l’écran pour mener à bien
la produre d’installation.
4. Utilisez le logiciel LaCie RAID Manager
pour effacer la matrice RAID existante
et en créer une nouvelle. Pour plus
d’informations, consultez la page
www.lacie.com/lrm-guide. Après
avoir créé une nouvelle matrice RAID,
les disques doivent être formas pour
Windows. Pour plus d’informations,
reportez-vous au chapitre sur le
formatage dans le manuel
(www.lacie.com/tb3-guide).
10
5
Retirer létiquette
Après avoir installé l’application LaCie RAID Manager, retirez l’étiquette au dos
du périphérique de stockage LaCie. Vous pouvez maintenant utiliser les ports
Thunderbolt.
Lespace de stockage disponible est inrieur à la capacité totale car la
configuration RAID 5 assure la redondance des dones en cas de défaillance
d’un disque. Pour en savoir plus sur les niveaux RAID et l’utilisation de LaCie RAID
Manager, consultez le site www.lacie.com/lrm-guide.
Pour plus d’informations sur le fonctionnement et la maintenance du périphérique,
consultez la page www.lacie.com/tbt3-guide.
Pour conntre les conditions de garantie de votre 12big Thunderbolt 3 , ouvrez la déclaration de
garantie limitée LaCie sur votre disque ou consultez la page www.lacie.com/warranty. Pour toute
demande d’intervention sous garantie, contactez un centre de réparation agréé LaCie clientèle ou
consultez le site www.lacie.com/support/12big-tbolt3 pour obtenir de plus amples informations sur
le support clientèle dont vous dépendez.
IT
1
Connessione USB
Collegare la porta USB 3: 1 del dispositivo di archiviazione LaCie alla porta USB-C
o porta USB di tipo A del computer. È altresì possibile collegare il cavo a una porta
Thunderbolt 3 del computer. Tuttavia, non utilizzare le porte Thunderbolt 3 sul
dispositivo di archiviazione LaCie fino a che tutti i passaggi non sono stati completati.
2
Collegamento allalimentazione
Collegare il cavo di alimentazione.
11
3
Interruttore di alimentazione
Accendere il dispositivo di archiviazione LaCie.
4
Installazione di LaCie RAID Manager
LaCie RAID Manager aiuta a configurare gli array RAID del dispositivo di
archiviazione LaCie e a mantenerne lo stato di salute. Include anche un driver
importante che consente di utilizzare le porte Thunderbolt.
Il dispositivo LaCie viene consegnato formattato nel formato HFS+ per Mac con un
array RAID 5 singolo. Consultare le istruzioni sotto riportate per il sistema operativo.
Mac Windows
1. Utilizzare Finder per aprire il
dispositivo di archiviazione e
avviare Start Here Mac.
Start Here Mac
LaCie
HD
Configurazione e formattazione del
dispositivo di archiviazione:
I dischi devono essere formattati poiché
Windows non supporta HFS+.
1. Sul computer che si collegherà al
dispositivo di archiviazione LaCie,
visitare il sito www.lacie.com/
support/lrm.
2. Scaricare LaCie RAID Manager per
Windows.
3. Avviare il programma di installazione
e seguire le istruzioni visualizzate sullo
schermo per completare l’installazione.
12
2. Seguire le istruzioni visualizzate
sullo schermo per registrare il
dispositivo e scaricare LaCie RAID
Manager.
4. Utilizzare LaCie RAID Manager per
eliminare l’array RAID attuale e crearne
uno nuovo. Per le istruzioni, vedere
www.lacie.com/lrm-guide. Dopo
la creazione di un nuovo array RAID,
le unità devono essere formattate per
Windows. Per le istruzioni, vedere
il capitolo sulla formattazione nel
manuale, www.lacie.com/tb3-guide.
5
Rimuovere l’etichetta
Dopo aver installato LaCie RAID Manager rimuovere l’etichetta sul retro del dispositivo
di archiviazione LaCie. È ora possibile utilizzare le porte Thunderbolt.
Lo spazio di archiviazione disponibile è inferiore alla capacità totale poiché RAID
5 garantisce la ridondanza dei dati se un’unità disco si guasta. Per saperne di più
sui livelli RAID e le istruzioni su come utilizzare LaCie RAID Manager, accedere a
www.lacie.com/lrm-guide.
Per informazioni sul funzionamento e la manutenzione del dispositivo, vedere
www.lacie.com/tbt3-guide.
Controllare i dettagli della garanzia del vostro 12big Thunderbolt 3 aprendo la Garanzia Limitata di
LaCie Informativa presente sulla vostra unità o su www.lacie.com/warranty. Per richiedere un
servizio coperto da garanzia contattare un centro di assistenza autorizzato LaCie o fare riferimento
a www.lacie.com/support/12big-tbolt3 per maggiori informazioni in merito all’assistenza clienti
presente nel vostro territorio.
13
DE
1
Anschluss über USB
Verbinden Sie den USB 3.1-Anschluss des LaCie-Speichergeräts mit dem USB-C-
oder USB Type A-Anschluss an Ihrem Computer. Sie können das Kabel auch mit
einem Thunderbolt 3-Anschluss an Ihrem Computer verbinden. Bevor Sie das LaCie-
Speichergerät an einem Thunderbolt 3-Anschluss verwenden, müssen Sie erst alle
vorbereitenden Schritte durchführen.
2
Stromanschluss
Schließen Sie das Netzkabel an.
3
Netzschalter
Schalten Sie das LaCie-Speichergerät ein.
4
Den LaCie RAID Manager installieren
LaCie RAID Manager unterstützt Sie bei der Konfiguration und Wartung der RAID-
Arrays des LaCie-Speichergeräts. Aerdem umfasst es wichtige Treiber, die Sie zur
Verwendung der Thunderbolt-Anschlüsse benötigen.
Das LaCie-Gerät wird für den Mac mit HFS+ vorformatiert und als einzelnes RAID
5-Array ausgeliefert. Beachten Sie die folgenden Hinweise zu Ihrem Betriebssystem.
14
Mac Windows
1. Suchen Sie das Gerät im Finder
und starten Sie „Start Here Mac“.
Start Here Mac
LaCie
HD
2. Registrieren Sie Ihr Gerät gemäß
den Anweisungen und laden Sie
LaCie RAID Manager herunter.
Speicher konfigurieren und formatieren:
Die Festplatten müssen formatiert werden,
weil HFS+ von Windows nicht unterstzt wird.
1. Öffnen Sie auf dem Computer, mit dem
Sie das LaCie-Speichergerät verbinden
werden, www.lacie.com/support/lrm.
2. Laden Sie LaCie RAID Manager für
Windows herunter.
3. Starten Sie das Installationsprogramm
und folgen Sie den Anweisungen bis zum
Abschluss der Installation.
4. Verwenden Sie LaCie RAID Manager,
um das aktuelle RAID-Array zu löschen
und ein neues zu erstellen. Anweisungen
hierzu finden Sie unter www.lacie.com/
lrm-guide. Nachdem das neue
RAID-Array erstellt wurde, müssen die
Festplatten für Windows formatiert
werden. Anweisungen zur Formatierung
entnehmen Sie dem Handbuch unter
www.lacie.com/tb3-guide.
5
Etikett entfernen
Nachdem Sie LaCie RAID Manager installiert haben, entfernen Sie das Etikett auf
der Rückseite des LaCie-Speichergeräts. Sie können jetzt die Thunderbolt-Anschlüsse
verwenden.
15
Der verfügbare Speicherplatz ist kleiner als die Gesamtkapazität, da RAID 5
Datenredundanz für den Fall bietet, dass eine Festplatte ausfällt. Informationen zu
den einzelnen RAID-Levels und eine Anleitung zu LaCie RAID Manager finden Sie
auf www.lacie.com/lrm-guide.
Weitere Informationen zu den Funktionen und zur Wartung des Geräts finden Sie
auf www.lacie.com/tbt3-guide.
Einzelheiten zur Garantie für Ihre 12big Thunderbolt 3 finden Sie in der LaCie Garantieerklärung zu
Ihrer Festplatte oder auf www.lacie.com/warranty. Im Garantiefall wenden Sie sich bitte an ein
autorisiertes LaCie Servicecenter oder besuchen Sie www.lacie.com/support/12big-tbolt3, wo Sie
weitere Informationen über den Kundensupport in Ihrer Region erhalten.
ES
1
Conexión USB
Conecte el puerto USB 3.1 de su dispositivo de almacenamiento de LaCie al puerto
USB-C o al puerto USB tipo A del ordenador. También puede conectar el cable a un
puerto Thunderbolt 3 del ordenador. No obstante, no utilice los puertos Thunderbolt 3 del
dispositivo de almacenamiento de LaCie hasta que no haya completado todos los pasos.
2
Conexión de alimentación
Conecte el cable de alimentación.
3
Interruptor de alimentación
Encienda el dispositivo de almacenamiento de LaCie.
16
4
Instalación de LaCie RAID Manager
LaCie RAID Manager le ayuda a configurar las matrices RAID de su dispositivo
de almacenamiento de LaCie y a mantenerlo en buen estado. También incluye un
controlador importante que le permite utilizar los puertos Thunderbolt.
Su dispositivo de LaCie se entrega formateado como HFS+ para Mac con una única
matriz RAID 5. Revise las instrucciones incluidas a continuación correspondientes a su
sistema operativo.
Mac Windows
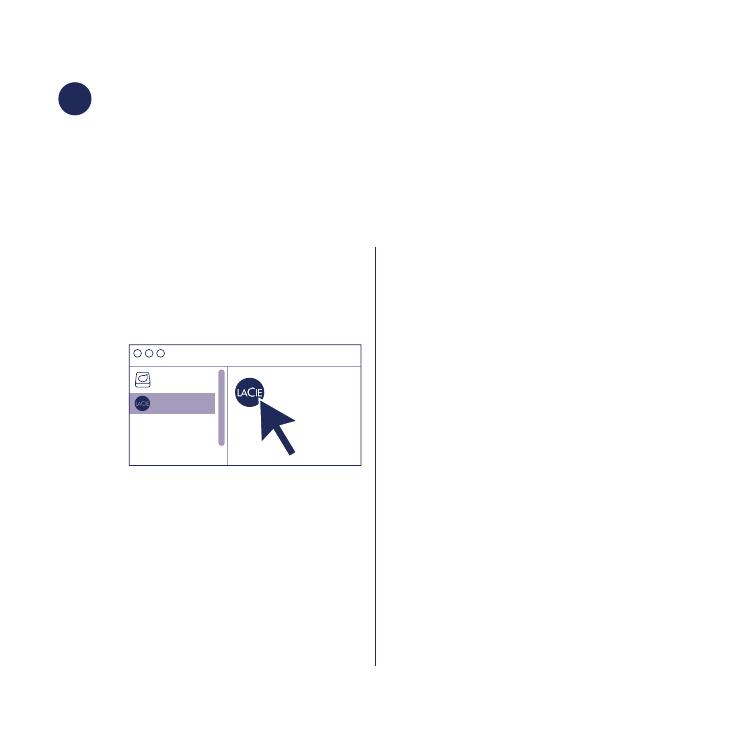
1. Utilice el Finder para abrir el
dispositivo de almacenamiento y
ejecute Start Here Mac.
Start Here Mac
LaCie
HD
2. Siga las instrucciones en pantalla
para registrar su dispositivo y
descargar LaCie RAID Manager.
Configure y formatee el almacenamiento:
Es necesario formatear los discos, ya que
Windows no admite el formato HFS+.
1. En el ordenador que vaya a conectar al
dispositivo de almacenamiento de LaCie,
acceda al sitio web www.lacie.com/
support/lrm.
2. Descargue LaCie RAID Manager para
Windows.
3. Inicie el instalador y siga las instrucciones
en pantalla para completar la instalación.
4. Utilice LaCie RAID Manager para
eliminar la matriz RAID actual y crear
una nueva. Para obtener instrucciones,
consulte www.lacie.com/lrm-guide.
Tras crear una nueva matriz RAID, las
unidades deben formatearse para
Windows. Para obtener instrucciones,
consulte el capítulo sobre el formateo en
el manual www.lacie.com/tb3-guide.
17
5
Retirada de la etiqueta
Tras instalar LaCie RAID Manager, retire la etiqueta situada en la parte posterior del
dispositivo de almacenamiento de LaCie. Ahora puede utilizar los puertos Thunderbolt.
El espacio de almacenamiento disponible es inferior a la capacidad total, ya
que RAID 5 ofrece redundancia de datos en caso de que falle una unidad. Para
obtener más información sobre los niveles de RAID y sobre cómo utilizar LaCie
RAID Manager, visite el sitio web www.lacie.com/lrm-guide.
Para obtener información sobre el funcionamiento y el mantenimiento del
dispositivo, consulte www.lacie.com/tbt3-guide.
Revise los detalles de la garantía de su 12big Thunderbolt 3 abriendo la declaración de garantía
limitada de LaCie que se encuentra en su unidad o visite www.lacie.com/warranty. Para solicitar
servicio técnico bajo la garantía, póngase en contacto con un centro de servicio autorizado de LaCie
o visite www.lacie.com/support/12big-tbolt3 si desea obtener más información sobre el servicio
técnico en su territorio.
NL
1
USB-aansluiting
Sluit de USB 3.1-poort van uw LaCie-opslagapparaat aan op de USB-C- of USB-A-
poort van uw computer. U kunt de kabel ook aansluiten op een Thunderbolt 3-poort
van uw computer. Maak echter geen gebruik van de Thunderbolt 3-poorten op het
LaCie-apparaat totdat u alle stappen heeft doorlopen.
2
Stroomaansluiting
Sluit het netsnoer aan.
18
3
Aan/uit-knop
Schakel het LaCie-opslagapparaat in.
4
LaCie RAID Manager installeren
LaCie RAID Manager helpt u om de RAID-array van uw LaCie-opslagapparaat te
configureren en te onderhouden. Het bevat ook een belangrijk stuurprogramma dat
nodig is om gebruik te maken van de Thunderbolt-poorten.
Uw LaCie-apparaat is geformatteerd als HFS+ voor Mac met één RAID 5-array.
Bekijk onderstaande instructies voor uw besturingssysteem.
Mac Windows
1. Gebruik de Finder om uw
opslagapparaat te openen en
start ‘Start Here Mac’.
Start Here Mac
LaCie
HD
Opslag configureren en formatteren:
De schijven moeten geformatteerd
worden, omdat HFS+ niet door Windows
ondersteund wordt.
1. Ga naar www.lacie.com/support/lrm
op de computer die op het LaCie-
opslagapparaat zal worden aangesloten.
2. Download LaCie RAID Manager voor
Windows.
3. Start het installatieprogramma en volg
de instructies op het scherm om de
installatie te voltooien.
19
2. Volg de instructies op het
scherm om uw opslagapparaat
te registreren en de LaCie Raid
Manager te downloaden.
4. Gebruik LaCie RAID Manager om de
huidige RAID-array te wissen en een
nieuwe aan te maken. Raadpleeg voor
instructies www.lacie.com/lrm-guide.
Nadat u een nieuwe RAID-array heeft
aangemaakt, moeten de schijven
geformatteerd worden voor Windows.
Raadpleeg voor instructies het hoofdstuk
over formatteren in de handleiding:
www.lacie.com/tb3-guide.
5
Label verwijderen
Nadat u LaCie Raid Manager heeft geïnstalleerd, verwijdert u het label op de
achterkant van uw LaCie-opslagapparaat. U kunt nu gebruik maken van de
Thunderbolt-poorten.
De beschikbare opslagruimte is kleiner dan de totale capaciteit, aangezien RAID
5 u gegevensredudantie biedt in geval zich een probleem voordoet met een schijf.
Raadpleeg voor meer uitleg over de verschillende RAID-niveaus en het gebruik
van LaCie RAID Manager www.lacie.com/lrm-guide.
Zie www.lacie.com/tbt3-guide voor meer informatie over de werking en het
onderhoud van het apparaat.
Meer informatie over de garantie op uw 12big Thunderbolt 3 vindt u door de LaCie Limited
Garantieverklaring te openen op uw schijf of door naar www.lacie.com/warranty te gaan. Om de
garantieservice aan te vragen, kunt u contact opnemen met een erkend LaCie-servicecentrum of ga
naar www.lacie.com/support/12big-tbolt3 voor meer informatie over klantenservice in uw regio.
20
PT
1
Conexão USB
Conecte a porta USB 3.1 do seu dispositivo de armazenamento LaCie à porta
USB-C ou porta USB tipo A. Você também pode conectar o cabo a uma porta
Thunderbolt 3 no seu computador. No entanto, não use as portas Thunderbolt 3 no
dispositivo de armazenamento LaCie até ter concluído todas as etapas.
2
Conexão de energia
Conecte o cabo de alimentação.
3
Botão de ligar/desligar
Ligue o dispositivo de armazenamento LaCie.
4
Instalar o LaCie RAID Manager
O LaCie RAID Manager ajuda você a configurar os conjuntos RAID do seu dispositivo
de armazenamento LaCie e manter a sua integridade. Também inclui um driver
importante que permite que você use as portas do Thunderbolt.
O seu dispositivo LaCie é fornecido formatado como HFS+ para Mac com um único
conjunto RAID 5. Consulte as instruções abaixo para o seu sistema operacional.
  • Page 1 1
  • Page 2 2
  • Page 3 3
  • Page 4 4
  • Page 5 5
  • Page 6 6
  • Page 7 7
  • Page 8 8
  • Page 9 9
  • Page 10 10
  • Page 11 11
  • Page 12 12
  • Page 13 13
  • Page 14 14
  • Page 15 15
  • Page 16 16
  • Page 17 17
  • Page 18 18
  • Page 19 19
  • Page 20 20
  • Page 21 21
  • Page 22 22
  • Page 23 23
  • Page 24 24
  • Page 25 25
  • Page 26 26
  • Page 27 27
  • Page 28 28
  • Page 29 29
  • Page 30 30
  • Page 31 31
  • Page 32 32
  • Page 33 33
  • Page 34 34
  • Page 35 35
  • Page 36 36
  • Page 37 37
  • Page 38 38
  • Page 39 39
  • Page 40 40

LaCie 12big Thunderbolt™ 3 インストールガイド

カテゴリー
外付けハードドライブ
タイプ
インストールガイド

LaCie 12big Thunderbolt™ 3は、高速で信頼性の高いデータストレージソリューションです。12ベイのデザインで、最大120TBのデータを保存でき、Thunderbolt 3インターフェイスにより、最大40Gb/sの転送速度を実現します。また、RAID 0、1、5、10をサポートしており、データの冗長性を確保することができます。

LaCie 12big Thunderbolt™ 3は、ビデオ編集、グラフィックデザイン、オーディオ制作など、大容量のデータを使用するクリエイターに最適です。また、バックアップやアーカイブにも最適です。

主な機能:

  • 12ベイのデザインで、最大120TBのデータを保存可能
  • Thunderbolt 3インターフェイスで、最大40Gb/sの転送速度を実現
  • RAID 0、1、5、10をサポートし、データの冗長性を確保
  • ビデオ編集