
使用产品前请仔细阅读本使用说明书
保留备用
出版日期
:
2016-06-15
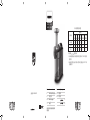
HR1931, HR1932
HR1933, HR1934
3000 000 80221 B
EN User manual
ID Buku Petunjuk Pengguna
KO 사용
설명서
MS-MY Manual pengguna
TH คู่มือผู้ใช้
VI
ZH-TW 使用手冊
ZH-CN 用户手册
FA
AR
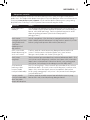
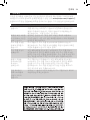
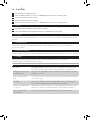
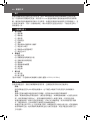
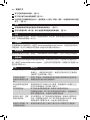
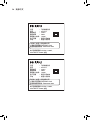
产品中有害物质的名称及含量
部件名称
有害物质
铅
(Pb)
汞
(Hg)
镉
(Cd)
六价铬
(Cr VI)
多溴联苯
(PBB)
多溴二苯醚
(PBDE)
榨汁装置 O O O O O O
马达组件 X O O O O O
果汁杯 O O O O O O
本表格依据
SJ/T 11364
的规格编制。
O:
表示该有害物质在该部件所有均质材料中的含量均在
GB/T 26572
规定的限
量要求以下。
X:
表示该有害物质至少在该部件的某一均质材料中的含量超出
GB/T 26572
规
定的限量要求。

17
1
3
4
A
CB
11
16
12
1314
15
17
10
8
6 7
9
5
2
18
1
1
2
2 3 4 5
1
2
6 7 8 9
1
2
10 11 12 13
14
15 16 18
1
2
19
20
21 22
2
1
23 24 25
1
2
26
27 28

HR1934, HR1933, HR1932, HR1931
ENGLISH 6
INDONESIA 12
한국어 18
BAHASA MELAYU 24
ภาษาไทย 31
35
繁體中文
40
简体中文 45
55
60

6
ENGLISH
Introduction
Congratulations on your purchase and welcome to Philips! To fully benet from the
support that Philips oers, register your product at www.philips.com/welcome. This
Philips Avance slow juicer helps you to get all the goodness of fruits and vegetables
into your glass, so that you can enjoy tasty and healthy juices every day. Its
innovative technology allows you to extract up to the maximum of fruits and
vegetables and to quickly clean the appliance in less than 1 minute. The fully
integrated design was developed to take up little space and to give you great
results.
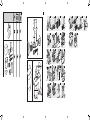
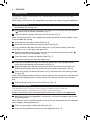
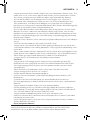
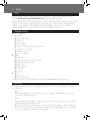
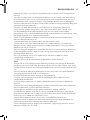
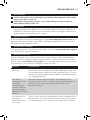
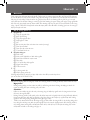
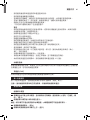
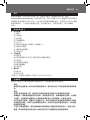
General description (Fig. 1)
A Juicing unit
a Pusher
b Berry tray
c Feeding tube
d Drip stop
e Spout
f Black two-part lter for clear juice*
g Black juicing screw
h Coral sorbet screw
i Pulp outlet
B Motor unit
j Locking clamp
k On/o button with power-on light
l Reverse/Pre-clean button
m Mains cord
n Cord storage facility
o Pulp container
p Safety pins
C Jug
q Juice jug
r Lid of juice jug
*Not shown: grey two-part lter for bre juice (HR1932/HR1934 only)
Important
Read this user manual carefully before you use the appliance and save it for future
reference.
Danger
- Do not immerse the motor unit in water or any other liquid. Do not rinse it under
the tap and do not clean it in the dishwasher.
Warning
- Check if the voltage indicated on the base of the appliance corresponds to the
local mains voltage before you connect the appliance.
- Do not use the appliance if the plug, the mains cord or other parts are damaged.
If the mains cord is damaged, you must have it replaced by Philips, a service

7
ENGLISH
centre authorised by Philips or similarly qualied persons in order to avoid a
hazard.
- This appliance is intended for household use only. If the appliance is used
improperly or for professional or semi-professional purposes or if it is not used
according to the instructions in the user manual, the guarantee becomes invalid
and Philips refuses any liability for damage caused.
- This appliance is not intended for use by persons (including children) with
reduced physical, sensory or mental capabilities, or lack of experience and
knowledge, unless they have been given supervision or instruction concerning
use of the appliance by a person responsible for their safety.
- Children should be supervised to ensure that they do not play with the
appliance.
- Keep the appliance and its cord out of the reach of children.
- Never reach into the feeding tube with your ngers or an object while the
appliance is operating. Only use the pusher for this purpose.
- Always disconnect the appliance from the mains if you leave it unattended or
before you assemble, disassemble or clean it.
- Always unwind the mains cord completely before you switch on the appliance.
- Never let the appliance operate unattended.
Caution
- Never use any accessories or parts from other manufacturers or that Philips does
not specically recommend. If you use such accessories or parts, your guarantee
becomes invalid.
- Always place the appliance on a stable, level and horizontal surface.
- Do not use the appliance outdoors.
- Avoid contact with moving parts.
- Make sure all parts are assembled properly before you switch on the appliance.
- Only use the appliance when the locking clamp is in locked position.
- Only unlock the locking clamp after you have switched o the appliance and the
juicing screw has stopped rotating.
- Do not remove the pulp container when the appliance is operating.
- Cut large ingredients into pieces that t into the feeding tube. Remove stones,
cores, seeds and thick peels from fruits or vegetables before juicing.
- Do not exert too much pressure on the pusher to avoid damage.
- Food colouring can discolour parts. This is normal and has no impact on the
performance of the appliance.
- To optimise the lifetime of the appliance, do not use it continuously for more
than 30 minutes.
Built-in safety lock
The appliance is equipped with a built-in safety lock. The safety pins on the motor
unit ensure that you can only switch on the appliance if you have placed the juicing
unit and the pulp container on the motor unit correctly.
Electromagnetic elds (EMF)
This Philips appliance complies with all applicable standards and regulations
regarding exposure to electromagnetic elds.

8
ENGLISH
Before rst use
Thoroughly clean all parts before you use the appliance for the rst time (see
chapter ‘Cleaning’).
Note: Make sure all parts are completely dry before you start using the appliance.
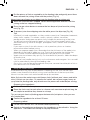
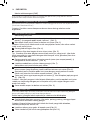
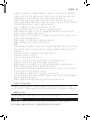
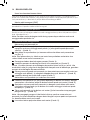
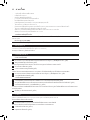
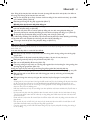
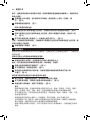
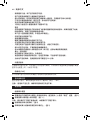
Preparing for use
Assembling the juicing unit
1 Attach the pulp outlet to the juicing unit and turn it clockwise until the arrow
( ) points to the ‘locked’ indication. (Fig. 2)
2 Insert the black juicing screw into the juicing unit (Fig. 3).
Note: The juicing screw is not suitable for preparing sorbet, and the sorbet screw
is not suitable for juicing.
3 Assemble the two parts of the lter (Fig. 4).
4 Place the two-part lter over the juicing screw (Fig. 5).
Tip: Use the black two-part filter for clear juice. If you prefer cloudy juice with
more fibres in it, use the grey two-part filter.
5 Attach the spout to the juicing unit and turn it clockwise until the arrow ( )
points to the ‘locked’ indication. (Fig. 6)
6 Place the berry tray on the feeding tube (Fig. 7).
Placing the juicing unit onto the motor unit
1 Place the assembled juicing unit onto the motor unit, with the pulp outlet
tting into the opening on the motor unit (Fig. 8).
2 Align the projections on the juicing unit with the recesses in the motor unit.
Slide the juicing unit onto the motor unit until it locks into place. (Fig. 9)
3 Press the juicing unit onto the motor unit (1) and then close the locking clamp
(2). (Fig. 10)
Note: If the locking clamp cannot be closed, check if the juicing unit is positioned
properly with the projections on the juicing unit into the recesses of the motor
unit.
4 Slide the pulp container into the motor unit (Fig. 11).
Using the appliance
The appliance only functions if the juicing unit and the pulp outlet are
assembled correctly and the locking clamp is locked properly.
Always unwind the mains cord completely before you switch on the appliance.
1 Wash the fruit and/or vegetables. If necessary, cut them into pieces that t into
the feeding tube.
Note: Remove stones and thick peels of the fruits you would not eat, for example
from oranges, pomegranates etc.
2 Place a jug or a glass under the spout (Fig. 12).
3 Press the on/o button to switch on the appliance (Fig. 13).

9
ENGLISH
4 Put the pieces of fruit or vegetables in the feeding tube and gently press them
down towards the juicing screw with the pusher (Fig. 14).
Never insert your ngers or an object into the feeding tube or juicing unit.
5 When the juice ow has stopped, switch o the appliance and wait until the
juicing screw has stopped rotating.
6 Press the pre-clean button to remove the last drops of juice from the juicing
unit (Fig. 15).
7 To prevent juice from dripping onto the table, press the drip stop (Fig. 16).
Tips
- Use fresh fruit and vegetables, as they contain more juice. Pineapples, beetroots,
celery stalks, apples, cucumbers, carrots, spinach, melons, tomatoes,
pomegranates and grapes are particularly suitable for processing in the juicer.
- You do not have to remove thin peels or skins. Only remove peels which you
would not eat, e.g. those of oranges, pineapples, kiwis, melons and uncooked
beetroots.
- If you want to juice fruits with stones, such as peaches, plums or cherries,
remove the stones before juicing.
- When you prepare apple juice, remember that the thickness of the apple juice
depends on the kind of apple you use. The juicier the apple, the thinner the
juice. Choose a kind of apple that produces the type of juice you prefer.
- Apple juice turns brown very quickly. To slow down this process, add a few drops
of lemon juice.
- This juicer can handle starchy fruits such as bananas and mangoes. You can add
milk or water directly through the feeding tube.
- Citrus fruits can also be processed with the juicer, remove the white pith of citrus
fruits because it has a bitter taste.
Using the sorbet function
Assemble the juicing unit as described in “Preparing for use”, but use the coral
sorbet screw instead of the black juicing screw and leave out the two-part lter.
Mount it on the motor unit and assemble the pulp container.
Note: Only use the sorbet screw with frozen fruits (without peel, stones and white
skins). Do not use ice cubes. To sweeten the sorbet, do not pour sugar, honey or
syrup into the feeding tube, only drizzle over the processed sorbet before serving.
Preparing the ingredients:
1 Cut fresh fruits in 3x3 cm pieces.
2 Place the fruits next to each other in a freezer safe container or plastic bag, do
not staple to avoid that they freeze in a clump.
Tip: you can put sheets of baking paper between the fruit pieces, then you can
also staple them.
3 Freeze the ingredients for at least 12 hours.
Preparing sorbet
1 Let the fruits defrost for 5-10 minutes before processing.
2 Switch on the appliance and process the ingredients as described in “Using the
appliance”. The sorbet will end up in the pulp container.

10
ENGLISH
Note: Only slowly process smaller amounts at once.
Important: You can process 500 grams of sorbet before you need to empty the
pulp container.
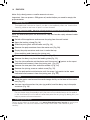
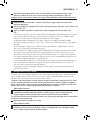
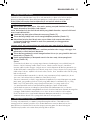
Cleaning (Fig. 17)
- The appliance is easier to clean if you do so immediately after use. Look at the
cleaning table to see how all parts can be cleaned.
Never use scouring pads, abrasive cleaning agents or aggressive liquids such as
alcohol, petrol or acetone to clean the appliance.
Note: All detachable parts are dishwasher-safe and can be safely cleaned under
the tap.
1 Switch o the appliance and remove the plug from the wall socket.
2 Open the locking clamp (Fig. 18).
3 Slide the juicing unit o the motor unit (Fig. 19).
4 Remove the pulp container from the motor unit (Fig. 20).
5 Empty the pulp container and rinse it under the tap.
Disassembling and cleaning the juicing unit
1 Remove the pusher from the feeding tube (Fig. 21).
2 Remove the berry tray from the feeding tube (Fig. 22).
3 Turn the juice collector anticlockwise until the arrow ( ) points to the ‘open’
indication and remove it from the juicing unit. (Fig. 23)
4 Remove the two-part lter and disassemble it (Fig. 24).
5 Remove the juicing screw or sorbet screw (Fig. 25).
6 Turn the pulp outlet anticlockwise until the arrow ( ) points to the ‘open’
indication and remove it from the juicing unit. (Fig. 26)
Storage
1 Wind the mains cord around the cord storage facility in the base of the motor
unit (Fig. 27).
2 You can store the pusher, the juice jug and lid, and the berry tray in the pulp
container (Fig. 28).
Recycling
- Do not throw away the product with the normal household waste at the end of
its life, but hand it in at an ocial collection point for recycling. By doing this, you
help to preserve the environment.
Ordering accessories
To buy accessories or spare parts, visit www.shop.philips.com/service or go to your
Philips dealer. You can also contact the Philips Consumer Care Centre in your
country.

11
ENGLISH
Guarantee and support
If you need information or support, please visit www.philips.com/support or read
the separate worldwide guarantee leaet.
Troubleshooting
This chapter summarises the most common problems you could encounter with the
appliance. If you are unable to solve the problem with the information below, visit
www.philips.com/support for a list of frequently asked questions or contact the
Consumer Care Centre in your country.
Problem Solution
The appliance does not
work.
The appliance is equipped with two safety pins. If either
the juicing unit or the pulp container has not been
placed on the motor unit properly, the appliance does
not work. Check whether these parts have been
assembled in the right way (see chapter ‘Preparing for
use’).
The motor unit gives o
an unpleasant smell
the rst few times the
appliance is used.
This is not unusual. If the appliance continues to give o
this smell after a few times, check the quantities you are
processing and the processing time.
The juicing unit cannot
be placed onto the
motor unit.
Check if the spout is properly attached to the juicing
unit. Make sure that the projections on the juicing unit
are aligned with the recesses in the motor unit (see
g. 9).
The juicing unit is
blocked.
Press the pre-clean button for a few seconds. If the
juicing unit is still blocked, then switch o the appliance,
remove the juicing unit and disassemble all parts.
Remove the fruit that is blocking the juicing unit. Then
process a smaller quantity.
The appliances stops
working and the
power-on light ashes.
The juicing unit is blocked. Press the pre-clean button
for a few seconds. If the juicing unit is still blocked, then
switch o the appliance, remove the juicing unit and
disassemble all parts. Remove the fruit that is blocking
the juicing unit. Then process a smaller quantity.
The power-on light
ashes and the
appliance cannot be
switched on.
Check whether the pulp container is in the correct
position and the juicing unit is assembled properly.

12
INDONESIA
Pendahuluan
Selamat atas pembelian Anda dan selamat datang di Philips! Untuk memanfaatkan
sepenuhnya dukungan yang ditawarkan Philips, daftarkan produk Anda di
www.philips.com/welcome.
Slow juicer Philips Avance ini membantu agar semua manfaat buah-buahan dan
sayuran masuk ke dalam gelas Anda, sehingga Anda bisa menikmati jus lezat
dan sehat setiap hari. Teknologinya yang inovatif memungkinkan Anda untuk
mengekstrak buah-buahan dan sayuran secara maksimal dan membersihkan alat
dengan cepat dalam waktu kurang dari 1 menit. Desainnya yang terintegrasi penuh
dikembangkan agar tidak memakan tempat dan memberikan hasil yang luar biasa.
Gambaran umum (Gbr. 1)
A Unit juicer
a Pendorong
b Wadah berry
c Tabung pengisi
d Penghenti tetesan
e Cerat
f Filter dua-bagian warna hitam untuk jus yang jernih*
g Uliran juicer hitam
h Uliran sorbet coral
i Saluran keluar ampas
B Unit motor
j Jepit pengunci
k Tombol on/o dengan nyala lampu
l Tombol Balik/Pra-pembersihan
m Kabel listrik
n Tempat penyimpanan kabel
o Wadah ampas
p Pin pengaman
C Tabung
q Tabung jus
r Tutup tabung jus
*Tidak ditunjukkan: lter dua-bagian warna abu-abu untuk jus berserat (Hanya
HR1932/HR1934)
Penting
Bacalah petunjuk pengguna ini secara saksama sebelum Anda menggunakan alat
dan simpan untuk referensi di kemudian hari.
Bahaya
- Jangan memasukkan unit motor ke dalam air atau cairan lain. Jangan
membilasnya di bawah keran dan jangan membersihkannya di dalam mesin
pencuci piring.
Peringatan
- Periksalah apakah voltase yang tertera di bagian bawah alat sudah sesuai
dengan voltase listrik lokal sebelum Anda menghubungkan alatnya.

13
INDONESIA
- Jangan gunakan alat jika steker, kabel listrik, atau komponen lainnya rusak. Jika
kabel listrik rusak, maka harus diganti oleh Philips, pusat layanan resmi Philips,
atau orang yang mempunyai keahlian sejenis agar terhindar dari bahaya.
- Alat ini dimaksudkan untuk penggunaan rumah tangga saja. Jika alat ini
digunakan tidak sebagaimana layaknya atau untuk tujuan profesional atau
semi-profesional, atau digunakan dengan cara yang tidak sesuai dengan
petunjuknya, maka garansi menjadi tidak berlaku dan Philips tidak bertanggung
jawab atas setiap kerusakan yang disebabkannya.
- Alat ini tidak dimaksudkan untuk digunakan oleh orang (termasuk anak-anak)
dengan cacat sik, indera atau kecakapan mental yang kurang, atau kurang
pengalaman dan pengetahuan, kecuali jika mereka diberikan pengawasan atau
petunjuk mengenai penggunaan alat oleh orang yang bertanggung jawab bagi
keselamatan mereka.
- Anak kecil harus diawasi untuk memastikan mereka tidak bermain-main dengan
alat ini.
- Jauhkan alat dan kabelnya dari jangkauan anak-anak.
- Jangan sekali-kali meraih ke dalam tabung pengisi dengan jari-jari Anda atau
suatu benda sewaktu alat sedang beroperasi. Hanya gunakan pendorong untuk
maksud ini.
- Selalu cabut steker alat dari stopkontak listrik jika Anda akan meninggalkan alat
tanpa diawasi atau sebelum memasang, membongkar, atau membersihkannya.
- Selalu lepas gulungan kabel sepenuhnya sebelum alat dihidupkan.
- Jangan sekali-kali membiarkan alat bekerja tanpa diawasi.
Perhatian
- Jangan sekali-kali menggunakan aksesori atau komponen apa pun dari
produsen lain atau yang tidak secara khusus direkomendasikan oleh Philips.
Jika Anda menggunakan aksesori atau komponen tersebut, garansi Anda
menjadi batal.
- Selalu letakkan alat pada permukaan yang stabil, rata dan horisontal.
- Jangan menggunakan alat di luar ruangan.
- Hindari kontak dengan komponen bergerak.
- Pastikan semua komponen sudah dipasang dengan benar sebelum alat
dihidupkan.
- Gunakan alat hanya jika jepit pengunci telah berada di posisi terkunci.
- Bukalah jepit pengunci setelah alat dimatikan dan uliran juicer sudah berhenti
berputar.
- Jangan lepaskan wadah ampas saat alat sedang bekerja.
- Potong-potong buah/sayuran besar sehingga dapat dimasukkan ke dalam
tabung pengisi. Buang biji besar, bagian tengah, biji kecil, dan kulit tebal buah
atau sayuran sebelum dimasukkan ke dalam juicer.
- Jangan menekan pendorong terlalu kuat agar alat tidak rusak.
- Pewarna makanan bisa merubah warna komponen alat. Ini normal, dan tidak
memengaruhi kinerja alat.
- Untuk mengoptimalkan masa pakai alat, jangan gunakan alat terus-menerus
selama lebih dari 30 menit.
Kunci pengaman bawaan.
Alat dilengkapi dengan kunci pengaman bawaan. Pin pengaman pada unit motor
memastikan bahwa Anda hanya dapat menghidupkan alat jika Anda telah
meletakkan unit juicer dan wadah ampas di unit motor dengan benar.

14
INDONESIA
Medan elektromagnet (EMF)
Alat Philips ini mematuhi semua standar dan peraturan yang berlaku terkait
paparan terhadap medan elektromagnet.
Sebelum menggunakan alat pertama kali.
Bersihkan semua komponen sebelum Anda menggunakan alat untuk pertama kali
(lihat bab ‘Membersihkan’).
Catatan: Pastikan semua komponen benar-benar kering sebelum mulai
digunakan.
Menyiapkan penggunaan
Memasang unit juicer
1 Pasang saluran keluar ampas ke unit juicer, lalu putar searah jarum jam sampai
panah ( Á) mengarah pada tanda ‘terkunci’. (Gbr. 2)
2 Masukkan uliran juicer hitam ke dalam unit juicer (Gbr. 3).
Catatan: Uliran juicer tidak cocok untuk menyiapkan sorbet, dan uliran sorbet
tidak cocok untuk juicer.
3 Pasang kedua bagian filter (Gbr. 4).
4 Letakkan filter dua-bagian di atas uliran juicer (Gbr. 5).
Tip: Gunakan filter dua-bagian warna hitam untuk jus yang jernih. Jika Anda
lebih menyukai jus yang keruh dengan lebih banyak serat, gunakan filter dua-
bagian warna abu-abu.
5 Pasang cerat ke unit juicer, lalu putar searah jarum jam sampai panah ( Á)
mengarah ke tanda ‘terkunci’. (Gbr. 6)
6 Letakkan wadah berry di atas tabung pengisi (Gbr. 7).
Meletakkan unit juicer di atas unit motor
1 Letakkan unit juicer yang sudah dipasang ke atas unit motor, dengan saluran
keluar ampas yang terpasang tepat ke dalam bukaan unit motor (Gbr. 8).
2 Sejajarkan posisi tonjolan pada unit juicer dengan ceruk pada unit motor.
Geser unit juicer ke unit motor sampai terkunci. (Gbr. 9)
3 Tekan unit juicer agar terpasang ke unit motor (1), lalu katupkan jepit pengunci
(2). (Gbr. 10)
Catatan: Jika jepit pengunci tidak dapat dikatupkan, periksa apakah unit juicer
sudah pas terpasang dengan posisi tonjolan unit juicer sejajar dengan ceruk
pada unit motor.
4 Geser wadah ampas ke dalam unit motor (Gbr. 11).
Menggunakan alat
Alat hanya berfungsi jika unit juicer dan saluran keluar ampas dipasang dengan
benar dan jepit pengunci terkatup dengan benar.
Selalu lepas gulungan kabel sepenuhnya sebelum alat dihidupkan.
1 Cucilah buah dan/atau sayuran. Jika perlu, potong-potong sehingga dapat
dimasukkan ke dalam tabung pengisi.
Catatan: Buang biji besar dan kulit tebal dari buah yang tidak dimakan,
contohnya dari jeruk, delima, dll.
2 Letakkan tabung atau gelas di bawah cerat (Gbr. 12).
3 Tekan tombol on/o untuk menghidupkan alat (Gbr. 13).

15
INDONESIA
4 Masukkan potongan buah atau sayuran dalam tabung pengisi dan tekan
dengan lembut ke arah uliran juicer menggunakan pendorong (Gbr. 14).
Jangan sekali-kali memasukkan jari tangan atau benda ke dalam tabung pengisi
atau unit juicer.
5 Setelah aliran jus berhenti, matikan alat dan tunggu sampai uliran juicer
berhenti berputar.
6 Tekan tombol pra-pembersihan untuk menghilangkan tetesan sisa jus dari unit
juicer (Gbr. 15).
7 Agar jus tidak menetes ke atas meja, tekan penghenti tetesan (Gbr. 16).
Tip
- Gunakan buah dan sayuran segar, karena mengandung lebih banyak air. Bahan
yang cocok diproses dengan juicer terutama adalah nanas, bit, seledri, apel,
ketimun, wortel, bayam, melon, tomat, delima dan anggur.
- Anda tidak perlu mengupas kulit tipis. Hanya kulit tebal yang tidak dapat
dimakan seperti kulit jeruk, nanas, kiwi, melon dan umbi bit mentah yang perlu
dikupas.
- Jika Anda ingin membuat jus dari buah-buahan berbiji, seperti persik, plum,
atau ceri, buang bijinya terlebih dahulu.
- Bila membuat jus apel, ingat bahwa kekentalannya tergantung pada jenis apel
yang digunakan. Semakin banyak mengandung air, semakin encer jus yang
dihasilkan. Pilihlah jenis apel yang sesuai dengan jenis jus yang Anda inginkan.
- Jus apel cepat berubah warna menjadi coklat. Untuk memperlambat proses ini,
tambahkan beberapa tetes air jeruk lemon.
- Juicer dapat digunakan untuk mengolah buah-buahan yang mengandung zat
tepung seperti pisang dan mangga. Anda bisa menambahkan susu atau air
secara langsung melalui tabung pengisi.
- Buah jeruk juga bisa diproses dengan juicer. Kupas serabut putihnya karena
memiliki rasa pahit.
Menggunakan fungsi sorbet
Pasang unit juicer seperti dijelaskan di “Menyiapkan penggunaan”, tetapi gunakan
uliran sorbet koral, bukan uliran juicer hitam, dan tinggalkan kedua bagian filter.
Letakkan di unit motor dan pasang wadah ampas.
Catatan: Hanya gunakan sekrup sorbet dengan buah beku (tanpa kulit, biji, atau
serat). Jangan gunakan es batu. Untuk mempermanis sorbet, jangan tuangkan
gula, madu, atau sirup langsung ke tabung pengisi, tetapi tuangkan sedikit demi
sedikit saja di atas sorbet yang telah jadi sebelum disajikan.
Menyiapkan bahan:
1 Potong buah segar dalam potongan 3x3 cm.
2 Letakkan buah bersebelahan dalam wadah freezer atau kantong plastik,
jangan steples untuk menghindari buah membeku dalam gumpalan.
Tip: Anda bisa menaruh lembaran kertas roti di antara potongan buah, kemudian
Anda bisa menstaplesnya.
3 Bekukan bahan setidaknya 12 jam.
Menyiapkan sorbet
1 Biarkan buah mencair selama 5-10 menit sebelum diproses.
2 Hidupkan alat dan proses bahan seperti yang dijelaskan di “Menggunakan
alat”. Sorbet akan keluar di wadah ampas.

16
INDONESIA
Catatan: Hanya proses dalam jumlah kecil secara perlahan.
Penting: Anda dapat memproses 500 gram sorbet sebelum mengosongkan
wadah ampas.
Membersihkan (Gbr. 17)
- Alat ini mudah dibersihkan jika Anda melakukannya segera setelah digunakan.
Lihat tabel pembersihan untuk melihat cara membersihkan semua komponen.
Jangan sekali-kali menggunakan sabut gosok, bahan pembersih abrasif atau
cairan agresif seperti alkohol, bensin atau aseton untuk membersihkan alat.
Catatan: Semua komponen lepas-pasang aman dicuci di dalam mesin pencuci
piring dan dapat dibersihkan di bawah keran dengan aman.
1 Matikan alat dan lepaskan steker listrik dari stopkontak dinding.
2 Buka jepitan pengunci (Gbr. 18).
3 Geser unit juicer keluar dari unit motor (Gbr. 19).
4 Lepas wadah ampas dari unit motor (Gbr. 20).
5 Kosongkan wadah ampas dan bilas di bawah keran.
Melepas dan membersihkan unit juicer
1 Lepas pendorong dari tabung pengisi (Gbr. 21).
2 Lepas wadah berry dari tabung pengisi (Gbr. 22).
3 Putar cerat berlawanan arah jarum jam sampai panah ( Á) mengarah ke tanda
‘buka’, lalu lepaskan dari unit juicer. (Gbr. 23)
4 Lepas lter dua-bagian, lalu bongkar lter tersebut (Gbr. 24).
5 Lepaskan uliran juicer atau uliran sorbet (Gbr. 25).
6 Putar saluran keluar ampas berlawanan arah jarum jam sampai panah ( Á)
mengarah ke tanda ‘buka’, lalu lepas dari unit juicer. (Gbr. 26)
Penyimpanan
1 Gulung kabel listrik di tempat penyimpanan kabel di bagian bawah unit
motor (Gbr. 27).
2 Anda dapat menyimpan pendorong, tabung jus dan tutup, serta wadah berry
di dalam wadah ampas (Gbr. 28).
Mendaur ulang
- Jangan membuang alat bersama limbah rumah tangga biasa jika alat sudah
tidak bisa dipakai lagi, tetapi serahkan ke titik pengumpulan atau daur ulang
resmi. Dengan melakukan hal ini, Anda ikut membantu melestarikan lingkungan.
Memesan aksesori
Untuk membeli aksesori atau suku cadang, kunjungi www.shop.philips.com/
service atau kunjungi dealer Philips. Anda juga dapat menghubungi Pusat Layanan
Konsumen Philips di negara Anda.
Garansi dan dukungan
Jika Anda membutuhkan informasi atau dukungan, harap kunjungi
www.philips.com/support atau bacalah pamflet garansi internasional.

17
INDONESIA
Mengatasi masalah
Bab ini merangkum masalah-masalah paling umum yang mungkin Anda temui
pada alat. Jika Anda tidak dapat mengatasi masalah dengan informasi di bawah ini,
kunjungi www.philips.com/support untuk melihat daftar pertanyaan yang sering
diajukan atau hubungi Pusat Layanan Konsumen di negara Anda.
Masalah Solusi
Alat tidak mau
bekerja.
Alat dilengkapi dengan dua pin pengaman. Jika unit juicer
atau wadah ampas tidak diletakkan pada unit motor dengan
benar, alat tidak berfungsi. Periksa apakah bagian ini telah
dipasang dengan benar (lihat bab ‘Menyiapkan
penggunaan’).
Unit motor
mengeluarkan bau
yang tidak enak
saat baru
beberapa kali
digunakan.
Ini hal yang biasa. Jika alat terus mengeluarkan bau yang
tidak sedap setelah beberapa kali digunakan, periksa jumlah
bahan yang Anda proses dan waktu prosesnya.
Unit juicer tidak
dapat dipasang ke
atas unit motor.
Periksa apakah cerat terpasang dengan benar pada unit
juicer. Pastikan posisi tonjolan pada unit juicer selaras
dengan ceruk pada unit motor (lihat gbr. 9).
Unit juicer
terganjal.
Tekan tombol pra-pembersihan selama beberapa detik. Jika
unit juicer masih terganjal, matikan alat, lepas unit juicer dan
lepas semua komponen. Keluarkan buah yang mengganjal
unit juicer. Lalu proses buah dengan jumlah lebih kecil.
Alat berhenti
berfungsi dan
lampu tanda
menyala berkedip.
Unit juicer terganjal. Tekan tombol pra-pembersihan selama
beberapa detik. Jika unit juicer masih terganjal, matikan alat,
lepas unit juicer dan lepas semua komponen. Keluarkan
buah yang mengganjal unit juicer. Lalu proses buah dengan
jumlah lebih kecil.
Lampu tanda
menyala berkedip
dan alat tidak
dapat dihidupkan.
Periksa apakah wadah ampas berada dalam posisi yang
benar dan unit juicer terpasang dengan benar.

18
한국어
소개
필립스 제품을 구입해 주셔서 감사합니다! 필립스가 드리는 다양한 혜택을 받으실 수
있도록 www.philips.co.kr/membership에서 제품을 등록하십시오.
필립스 Avance 주서기를 사용하면 과일과 야채의 모든 영양소를 한 컵에 담아 매일 맛있고
건강한 주스를 마실 수 있습니다. 필립스만의 혁신적인 기술로 과일과 채소를 최대로
추출할 수 있으며 1분 이내에 제품을 신속하게 세척할 수 있습니다. 공간 효율적인
디자인을 통해 적은 공간을 차지하고도 최고의 만족감을 선사합니다.
제품정보 (그림 1)
A 주스 추출 유닛
a 누름봉
b 깔대기형 받침대
c 투입구
d 누수 방지
e 주스 추출구
f 맑은 주스용 필터(검정색 부품 2개)*
g 검정색 주스 추출 망
h 코랄색 셔벗 망
i 찌꺼기 배출구
B 본체
j 잠금 걸쇠
k 전원 표시등이 있는 전원 스위치
l 역방향/사전 세척 버튼
m 전원 코드
n 코드 보관함
o 과육 용기
p 안전핀
C 용기
q 주스 용기
r 주스 용기 뚜껑
*그림 없음: 섬유질 주스용 필터(회색 부품 2개)(HR1932/HR1934 모델만 해당)
중요 사항
본 제품을 사용하기 전에 이 사용 설명서를 주의 깊게 읽고 나중에 참조할 수 있도록 잘
보관하십시오.
주의
- 절대로 본체를 물 또는 다른 액체에 담그거나 수돗물로 세척하지 마십시오. 또한
식기세척기에 넣지 마십시오.
경고
- 제품을 벽 콘센트에 연결하기 전에 제품 하단에 표시되어 있는 전압이 사용 지역의
전압과 일치하는지 확인하십시오.
- 플러그, 전원 코드 또는 다른 부품이 손상된 경우에는 본 제품을 사용하지 마십시오.
전원 코드가 손상된 경우 안전을 위하여 필립스 서비스 센터, 필립스 서비스 지정점
또는 전문 기술자에게 의뢰하여 교체하십시오.

19
한국어
- 본 제품은 가정용입니다. 제품을 부적절하게 사용하거나 사업장이나 준사업장에서
사용하는 경우, 또는 사용 설명서에 따라 이용하지 않는 경우, 보증 서비스를 받을 수
없으며 필립스는 이로 인해 발생한 피해에 대해 책임을 지지 않습니다.
- 신체적인 감각 및 인지능력이 떨어지거나 경험과 지식이 풍부하지 않은 성인 및
어린이는 혼자 제품을 사용하지 말고 제품 사용과 관련하여 안전에 책임질 수 있도록
지시사항을 충분히 숙지한 사람의 도움을 받으십시오.
- 어린이가 제품을 가지고 놀지 못하도록 지도해 주십시오.
- 제품과 전원 코드는 어린이의 손이 닿지 않는 곳에 보관하십시오.
- 제품이 작동하는 도중에는 손가락이나 다른 물체를 재료 투입구에 넣지 마십시오.
필요한 경우에는 누름봉만 사용하십시오.
- 제품을 사용하지 않고 자리를 비우거나 제품을 조립, 분리 및 청소하기 전에는 반드시
제품에서 전원 코드를 뽑으십시오.
- 제품의 전원을 켜기 전에 전원 코드를 완전히 푸십시오.
- 제품이 작동 중일 때는 자리를 비우지 마십시오.
주의
- 다른 제조업체에서 만들었거나 필립스에서 권장하지 않은 제품 액세서리 또는 부품은
절대 사용하지 마십시오. 이러한 액세서리나 부품을 사용했을 경우에는 품질 보증이
무효화됩니다.
- 항상 제품을 안정적이고 평평하며 수평인 곳에 두십시오.
- 야외에서는 사용하지 마십시오.
- 움직이는 부품에 닿지 않도록 하십시오.
- 전원을 켜기 전에 모든 부품이 제대로 장착되어 있는지 확인하십시오.
- 잠금 걸쇠가 잠금 상태에 있을 때에만 제품을 사용하십시오.
- 제품 전원을 끄고 주스 추출망이 더 이상 회전하지 않을 때에만 걸쇠를 여십시오.
- 제품이 작동 중일 때에는 과육 용기를 분리하지 마십시오.
- 큰 재료는 재료 투입구에 들어갈 정도로 자르십시오. 넣기 전에 씨나 속을 제거하거나
과일 또는 채소의 두꺼운 껍질을 벗기십시오.
- 손상 방지를 위해 누름봉에 너무 강한 압력을 가하지 마십시오.
- 강한 색상의 재료로 인해 부품이 변색될 수 있습니다. 이는 정상적인 현상이며 제품의
성능에는 영향을 주지 않습니다.
- 제품의 수명을 최적화하려면 30분 이상 연속으로 사용하지 마십시오.
내장된 안전 잠금 장치
이 제품에는 안전 잠금 장치가 내장되어 있습니다. 본체에 안전핀이 있어 주스 추출
유닛과 과육 용기가 본체에 올바르게 장착된 상태에서만 제품의 전원을 켤 수 있습니다.
EMF(전자기장)
이 제품은 EMF(전자기장)와 관련된 모든 기준 및 규정을 준수합니다.
처음 사용 전
제품을 처음 사용하기 전에 모든 부품은 깨끗이 세척하십시오(‘세척’란 참조).
참고: 제품을 사용하기 전에 모든 부품의 물기를 완전히 말리십시오.

20
한국어
사용 준비
주스 추출 유닛 조립
1 찌꺼기 배출구를 주스 추출 유닛에 부착하고 화살표(Á)가 ‘잠금’ 위치를 향할
때까지 시계 방향으로 돌립니다. (그림 2)
2 검정색 주스 추출 망을 과육 용기에 장착합니다 (그림 3).
참고: 주스 추출 망은 셔벗을 제조하기에 적합하지 않으며 셔벗 망은 주스를 추출하기에
적합하지 않습니다.
3 필터의 두 개 부품을 조립합니다 (그림 4).
4 주스용 필터를 주스 추출망 위에 놓습니다 (그림 5).
도움말: 맑은 주스를 원하는 경우 검정색 맑은 주스용 필터를 사용하십시오.
섬유질이 풍부한 주스를 만들고 싶다면 회색 섬유질 주스용 필터를 사용하십시오.
5 주스 추출구를 주스 추출 유닛에 부착하고 화살표(Á)가 ‘잠금’ 위치를 향할 때까지
시계 방향으로 돌립니다. (그림 6)
6 깔대기형 받침대를 투입구에 넣으십시오 (그림 7).
본체에 주스 추출 유닛 장착
1 찌꺼기 배출구를 본체의 입구에 맞게 넣고 조립한 주스 추출 유닛을 본체에
장착하십시오 (그림 8).
2 주스 추출 유닛의 돌출된 부분을 본체의 오목한 곳에 맞춥니다. 주스 추출 유닛의
본체로 밀어 넣어 제자리에 들어가도록 합니다. (그림 9)
3 주스 추출 유닛을 본체(1)에 밀어 넣은 다음 잠금 걸쇠(2)를 닫습니다. (그림 10)
참고: 잠금 걸쇠를 닫을 수 없다면 주스 추출 유닛이 제 위치에 있는지 확인하십시오.
주스 추출 유닛의 돌출된 부분이 본체의 오목한 부분과 맞아야 합니다.
4 과육 용기를 본체에 밀어 넣으십시오 (그림 11).
제품 사용
이 제품은 주스 추출 유닛과 찌꺼기 배출구가 정확하게 장착되고 잠금 걸쇠가 제대로
잠겼을 때만 작동합니다.
제품의 전원을 켜기 전에 전원 코드를 완전히 푸십시오.
1 과일이나 채소는 깨끗이 씻은 후 필요에 따라 재료 투입구에 들어갈 정도의 크기로
자르십시오.
참고: 오렌지, 석류 등과 같이 섭취하지 않는 씨나 두꺼운 껍질이 있는 경우 씨와 껍질을
제거한 후 사용하십시오.
2 배출구 밑에 용기나 컵을 놓으십시오 (그림 12).
3 전원 버튼을 눌러 제품을 켜십시오 (그림 13).
4 과일이나 채소를 재료 투입구에 넣고 누름봉을 이용해 주스 추출망을 향해
누르십시오 (그림 14).
재료 투입구나 주스 추출 유닛에 손가락이나 다른 물체를 넣지 마십시오.

21
한국어
5 더 이상 과즙이 나오지 않으면 제품 전원을 끄고 거름망이 회전을 멈출 때까지
기다리십시오.
6 사전 세척 버튼을 눌러 주스 추출 유닛에서 마지막 한 방울까지 추출합니다 (그림 15).
7 주스가 바닥에 튀는 것을 방지하려면 누수 방지를 누르십시오 (그림 16).
도움말
- 과즙이 많은 신선한 과일과 야채를 사용하십시오. 파인애플, 비트, 셀러리, 사과,
오이, 당근, 시금치, 멜론, 토마토, 석류와 포도는 주서기를 이용해 과즙을 추출하기에
매우 적합합니다.
- 얇은 껍질은 제거하지 않으셔도 됩니다. 오렌지, 파인애플, 키위, 메론 및 익히지 않은
비트 등과 같이 섭취하지 않을 껍질만 벗기십시오.
- 복숭아나 자두, 체리 등과 같이 씨가 있는 과일로 주스를 만들려는 경우 추출 전에 씨를
제거하십시오.
- 사과 주스를 만들 때 주스의 농도는 사용하는 사과에 따라 달라진다는 사실을
기억하십시오. 과즙이 많은 사과를 사용하면 묽은 주스가 추출됩니다. 취향에 맞게
사과를 선택하십시오.
- 사과 주스는 추출 즉시 갈색으로 바뀌는 현상이 있습니다. 레몬 주스를 몇 방울
떨어뜨려 주시면 황화 현상을 지연시킬 수 있습니다.
- 이 주서기는 바나나, 망고와 같이 전분이 많은 과일에도 사용할 수 있습니다. 투입구에
우유나 물을 직접 추가할 수 있습니다.
- 감귤류도 사용할 수 있으나 쓴맛이 나는 흰색 섬유소를 제거하시기 바랍니다.
셔벗 기능 사용
"사용 전 준비"의 설명에 따라 본체를 조립할 경우 검정색 주스 추출 망 대신 코랄 셔벗
망을 사용하고 주스용 필터를 장착하지 않습니다. 본체에 장착한 후 과육 용기를
조립합니다.
참고: 셔벗 망은 (껍질, 씨, 백피 없는) 냉동 과일에만 사용하십시오. 얼음은 사용하지
마십시오. 셔벗에 단맛을 첨가하려면 설탕, 꿀, 시럽을 재료 투입구에 직접 투입하지
마시고 만들어진 셔벗 위에 뿌리십시오.
재료 준비:
1 신선한 과일을 3x3cm 크기로 자릅니다.
2 냉동 가능 용기 또는 플라스틱 봉지에 과일이 붙지 않도록 놓습니다. 덩어리로 뭉쳐서
얼 수 있으므로 입구를 봉하지 않습니다.
팁: 과일 조각 사이에 제빵 시트를 놓으면 붙지 않으므로 입구를 봉해도 됩니다.
3 최소 12시간 동안 재료를 얼립니다 .
셔벗 만들기
1 사용하기 전 과일을 약 5~10분 동안 해동 시킵니다 .
2 제품의 전원을 켜고 "제품 사용"의 설명에 따라 재료를 가공합니다. 과육 용기에
셔벗이 담깁니다.
참고: 한 번에 소량씩 천천히 만드십시오.
중요 사항: 과육 용기에 셔벗을 한 번에 500g까지 제조할 수 있습니다.

22
한국어
세척 (그림 17)
- 제품은 사용 후 즉시 청소하는 것이 좋습니다. 모든 부품의 세척하는 방법은 세척 표를
확인하십시오.
제품을 세척할 때 수세미, 연마성 세제나 알콜, 휘발유, 아세톤과 같은 강력 세제를
사용하지 마십시오.
참고: 분리 가능한 모든 부품은 식기세척기로 세척할 수 있으며, 수돗물로 안전하게
세척할 수 있습니다.
1 제품 전원을 끄고 벽면 콘센트에서 플러그를 뽑으십시오.
2 잠금 걸쇠를 엽니다 (그림 18).
3 주스 추출 유닛을 밀어 본체에서 분리합니다 (그림 19).
4 과육 용기를 본체에서 분리합니다 (그림 20).
5 과육 용기를 비우고 수돗물로 헹굽니다.
주스 추출 유닛을 분리하여 세척합니다.
1 투입구에서 누름봉을 분리합니다 (그림 21).
2 투입구에서 깔대기형 받침대를 분리합니다 (그림 22).
3 주스받이를 화살표(Á)가 ‘열림’ 위치를 향할 때까지 시계 방향으로 돌려 주스 추출
유닛에서 분리합니다. (그림 23)
4 주스용 필터를 분리합니다 (그림 24).
5 주스 추출 망 또는 셔벗 망을 제거합니다 (그림 25).
6 찌꺼기 배출구를 화살표(Á)가 ‘열림’ 위치를 향할 때까지 시계 방향으로 돌려 주스
추출 유닛에서 분리합니다. (그림 26)
보관
1 본체의 하단에 코드를 감아 코드 보관함에 보관하십시오 (그림 27).
2 누름봉, 주스 용기와 뚜껑, 깔대기형 받침대는 과육 용기 안에 보관할 수 있습니다
(그림 28).
재활용
수명이 다 된 제품은 일반 가정용 쓰레기와 함께 버리지 말고 지정된 재활용품 수거
장소에 버리십시오. 이런 방법으로 환경 보호에 동참하실 수 있습니다.
액세서리 주문
액세서리나 교체 부품을 구입하려면 필립스 웹사이트(www.shop.philips.com/service)
또는 필립스 대리점을 방문하십시오. 해당 지역의 필립스 고객 상담실에 문의하셔도
됩니다.
보증 및 지원
보다 자세한 정보나 지원이 필요한 경우에는 필립스 웹 사이트
(www.philips.com/support)를 방문하시거나 제품 보증서를 참조하십시오.
ページが読み込まれています...
ページが読み込まれています...
ページが読み込まれています...
ページが読み込まれています...
ページが読み込まれています...
ページが読み込まれています...
ページが読み込まれています...
ページが読み込まれています...
ページが読み込まれています...
ページが読み込まれています...
ページが読み込まれています...
ページが読み込まれています...
ページが読み込まれています...
ページが読み込まれています...
ページが読み込まれています...
ページが読み込まれています...
ページが読み込まれています...
ページが読み込まれています...
ページが読み込まれています...
ページが読み込まれています...
ページが読み込まれています...
ページが読み込まれています...
ページが読み込まれています...
ページが読み込まれています...
ページが読み込まれています...
ページが読み込まれています...
ページが読み込まれています...
ページが読み込まれています...
ページが読み込まれています...
ページが読み込まれています...
ページが読み込まれています...
ページが読み込まれています...
ページが読み込まれています...
ページが読み込まれています...
ページが読み込まれています...
ページが読み込まれています...
ページが読み込まれています...
ページが読み込まれています...
-
 1
1
-
 2
2
-
 3
3
-
 4
4
-
 5
5
-
 6
6
-
 7
7
-
 8
8
-
 9
9
-
 10
10
-
 11
11
-
 12
12
-
 13
13
-
 14
14
-
 15
15
-
 16
16
-
 17
17
-
 18
18
-
 19
19
-
 20
20
-
 21
21
-
 22
22
-
 23
23
-
 24
24
-
 25
25
-
 26
26
-
 27
27
-
 28
28
-
 29
29
-
 30
30
-
 31
31
-
 32
32
-
 33
33
-
 34
34
-
 35
35
-
 36
36
-
 37
37
-
 38
38
-
 39
39
-
 40
40
-
 41
41
-
 42
42
-
 43
43
-
 44
44
-
 45
45
-
 46
46
-
 47
47
-
 48
48
-
 49
49
-
 50
50
-
 51
51
-
 52
52
-
 53
53
-
 54
54
-
 55
55
-
 56
56
-
 57
57
-
 58
58


