
TA-A1ES
Operating Instructions
使用说明书
Integrated Stereo Amplifier

2
GB
The unit is not disconnected from the mains as long as it is connected to
the AC outlet, even if the unit itself has been turned off.
To reduce the risk of fire, do not cover the ventilation opening of the
appliance with newspapers, tablecloths, curtains, etc.
Do not expose the appliance to naked flame sources (for example, lighted
candles).
To reduce the risk of fire or electric shock, do not expose this appliance to
dripping or splashing, and do not place objects filled with liquids, such as
vases, on the appliance.
As the main plug is used to disconnect the unit from the mains, connect
the unit to an easily accessible AC outlet. Should you notice an abnormality
in the unit, disconnect the main plug from the AC outlet immediately.
Do not install the appliance in a confined space, such as a bookcase or
built-in cabinet.
Do not expose batteries or appliances with battery-installed to excessive
heat, such as sunshine and fire.
Excessive sound pressure from earphones and headphones can cause
hearing loss.
Indoor use only.
This symbol is intended to alert the user to the presence
of the Hot Surface that may be hot if it is touched during
the normal operation.
WARNING

3
GB
Main features of the amplifier ...................................................4
Description and location of parts
Front panel ..................................................................................5
Rear panel ...................................................................................6
Remote control ...........................................................................7
Getting started
Connecting speakers ..................................................................8
Connecting audio equipment .................................................10
Preparing the amplifier and the remote control .................... 12
Listening to the audio
Enjoying the audio of the equipment connected .................. 14
Setting the headphones .......................................................... 15
Setting the auto standby function .......................................... 15
Others
Precautions ............................................................................... 16
Troubleshooting ....................................................................... 17
Initializing the amplifier ........................................................... 18
Specifications ............................................................................ 19
Table of contents

4
GB
Main features of the amplifier
This power amplifier achieves dynamic output by using a single push-
pull amplifier.
The power amplifying stage, which determines sound quality, consists
of a single pair of transistors, successfully eliminating the emitter
resistance used by conventional amplifiers to suppress overheating.
The transistor output drives the speaker directly, reproducing sound
with less undesired character.
A frame beam base chassis has been developed for the stereo
amplifier.
By combining a conventional frame beam chassis with a transformer
base, providing high accuracy and stiffness, the frame is more
stabilized, reproducing better sound with less overall distortion.
This amplifier employs a relay for signal switching to eliminate sound
loss, and discrete circuits for entire stages to optimize and upgrade
the circuits.
The terminals of this amplifier minimize sound quality deterioration.
Y-lugs and speaker wires can be tied securely.
This amplifier has a discrete amplifier used exclusively to drive
headphones. The impedance can be switched among LOW, MID, or HI
to match that of the headphones.
Power amplifier utilizing single push-pull output
Frame beam base chassis (FBB chassis)
A preamplifier constructed of completely discrete
stages
Newly-designed large speaker terminals
Discrete amplifier for exclusive use with
headphones

5
GB
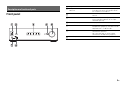
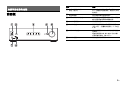
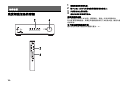
Front panel
Description and location of parts
Parts Functions
(On/Standby) button/
indicator
Turns on or off the amplifier (page 12).
The indicator lights up in green when
the amplifier is turned on.
Remote sensor Receives signals from the remote
control.
LINE 1/2/3/4/5 buttons Select an input source (page 14). The
circle around the button of an input
selected lights up.
VOLUME display Displays the volume level.
VOLUME dial Adjusts the volume level of speakers or
headphones (page 14). The level can be
adjusted from –∞ dB to 0 dB.
IMPEDANCE dial Set the dial to PHONES OFF to output
sound from speakers.
Set it to LOW, MID, or HI to output
sound from headphones (page 15).
PHONES jack Connects headphones.

6
GB
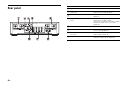
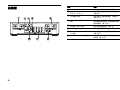
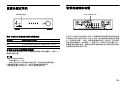
Rear panel
Parts Functions
SPEAKER (RIGHT) terminals Connect a right speaker (page 8).
SPEAKER IMPEDANCE switch
(4 Ω/8 Ω)
Set the switch to the impedance of the
speaker connected (page 8).
IR REMOTE jack Connects an IR repeater (not supplied)
(page 11).
AUTO STANDBY switch (ON/
OFF)
When it is set to ON, the amplifier
switches to standby mode
automatically when no sound has been
output for about 10 to 15 minutes
(page 15).
SPEAKER (LEFT) terminals Connect a left speaker (page 8).
AC IN terminal Connects the supplied AC power cord
(mains lead) (page 12).
UNBALANCED LINE 1/2/3/4
L/R jacks
Connect analog audio equipment with
audio cables (page 10).
BALANCED LINE 5 L/R jacks Connect analog audio equipment with
XLR (balanced) cables (page 10).

7
GB
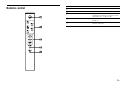
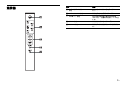
Remote control
Parts Functions
(On/Standby) button Turns on or off the amplifier (page 12).
LINE 1/2/3/4/5 buttons Select an input source (page 14).
VOLUME +/– buttons Adjust the volume level of speakers or
headphones (page 14). The level can be
adjusted from –∞ dB to 0 dB.
MUTING button Turns off the sound temporarily
(page 14).
DISPLAY button Turns on or off the indicators, except for
the indicator.

8
GB
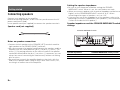
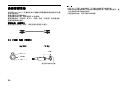
Connecting speakers
Connect your speakers to the amplifier.
Before connecting speakers, make sure that you disconnect the AC
power cord (mains lead).
Use a speaker cord (not supplied) to connect the speaker terminals.
Speaker cord (not supplied)
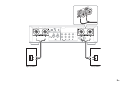
Notes on speaker connections
Connect the left speaker to the SPEAKER (LEFT) terminals and the
right speaker to the SPEAKER (RIGHT) terminals.
Be sure to connect the speaker cords between the speakers and the
amplifier with the same polarities (plus (+) to plus (+), minus (–) to
minus (–)). By paying attention to the color or mark of the speaker
cord to be connected to the plus (+) or minus (–) connector, you can
always be sure of connecting the cord correctly without mistaking
plus or minus.
Be careful not to touch the amplifier body or other jacks with the
ends of the speaker cable. Doing so may cause short circuits, etc.,
resulting in a malfunction of the amplifier.
Setting the speaker impedance
Be sure to turn the power off before setting the SPEAKER
IMPEDANCE switch. When it is on, the switch does not work.
When you connect speakers with a nominal impedance of 8 ohms or
higher, set the SPEAKER IMPEDANCE switch to “8 Ω.” When
connecting other types of speakers, set it to “4 Ω.”
If you are not sure of the impedances of the speakers, refer to the
operating instructions supplied with your speakers. (This information
is often on the back of the speaker.)
Speaker impedance and the SPEAKER IMPEDANCE switch
settings
Getting started
Speaker impedance SPEAKER IMPEDANCE switch position
from 4 ohms to less than 8 ohms 4 Ω
from 8 ohms to 16 ohms 8 Ω
SPEAKER IMPEDANCE switch

9
GB
Right speaker Left speaker

10
GB
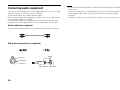
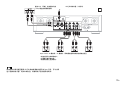
Connecting audio equipment
You can connect equipment with analog audio jacks, such as a Super
Audio CD player or CD player, to the amplifier.
The amplifier does not support phono inputs.
Before connecting audio equipment, make sure that you disconnect
the AC power cord (mains lead).
Use an audio cable (not supplied) or an XLR (balanced) cable (not
supplied) to connect equipment to the analog audio output jacks.
Audio cable (not supplied)
Connect the white plug to the L jack and the red plug to the R jack.
XLR (balanced) cable (not supplied)
Since the XLR (balanced) cable is locked, you cannot disconnect the cable
by pulling it.
If you carry the amplifier or audio equipment with the cable connected, it
might be damaged. Make sure that you disconnect the cables before
carrying it.
Connect the cables firmly and securely. Otherwise, noise may be result.
2: HOT (+)
1: GROUND
3: COLD (–)
Align.
Press here to disconnect.
Notes

11
GB
If you connect the amplifier to a Sony product with an IR repeater output
jack, you can operate the amplifier from the product connected. For details,
refer to the operating instructions of the product.
Equipment with XLR
(balanced) connectors (Sony
Hard Disk Audio Player, etc.)
IR repeater (not supplied)
Analog audio output jacks of Super Audio CD player, CD player, Network player, etc.
• This amplifier does not support phono inputs.
• It is not necessary to connect all the cables.
• Connect cables according to the jacks of your equipment.
Tip

12
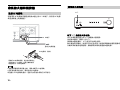
GB
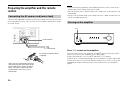
Preparing the amplifier and the remote
control
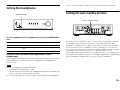
Connect the supplied AC power cord (mains lead) to the AC IN terminal
on the amplifier firmly, then connect the AC power cord (mains lead)
to a wall outlet.
Before connecting speakers and audio equipment, make sure that you
disconnect the AC power cord (mains lead).
Do not connect the AC power cord (mains lead) until all connections are
completed.
Plug in the AC power cord (mains lead) securely. A poor connection may
cause unstable operations.
Press to turn on the amplifier.
You can also turn on the amplifier using on the remote control.
When you turn off the amplifier, press again.
When the amplifier is on, the indicator is lit in green.
When there is something wrong with the amplifier, it lights up in red.
Check for a short circuit of the speaker output, or a short circuit of the
headphone output. Remove the causes and turn on the amplifier
again.
Connecting the AC power cord (mains lead)
AC IN terminal
To a wall outlet
AC power cord (mains lead)
(supplied)
Some space is left between the plug
and the rear panel even when the AC
power cord (mains lead) is inserted
firmly. The cord is supposed to be
connected this way. This is not a
malfunction.
Notes
Turning on the amplifier

13
GB
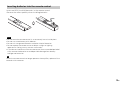
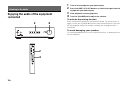
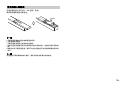
Insert two R03 (size AAA) batteries in the remote control.
Observe the correct polarity when installing batteries.
Do not leave the remote control in an extremely hot or humid place.
Do not use a new battery with old ones.
Do not mix manganese batteries and other kinds of batteries.
Do not expose the remote sensor to direct sunlight or lighting
apparatuses. Doing so may cause a malfunction.
If you do not intend to use the remote control for an extended period of
time, remove the batteries to avoid possible damage from battery
leakage and corrosion.
When the remote control no longer operates the amplifier, replace all the
batteries with new ones.
Inserting batteries into the remote control
Notes
Tip

14
GB
Enjoying the audio of the equipment
connected
1
Turn on the equipment you want to play.
2 Press the LINE 1/2/3/4/5 buttons to select the input from the
equipment you want to play.
3 Start playback on the equipment.
4 Turn the VOLUME dial to adjust the volume.
To activate the muting function
Press the MUTING button on the remote control. To cancel, press it
again, or turn the VOLUME dial to turn up the volume level. If you turn
off the amplifier while the sound is muted, the muting function is
cancelled.
To avoid damaging your speakers
It is recommended that you set the volume level to –∞ before you turn
off the amplifier.
Listening to the audio
2
4
24

15
GB
Setting the headphones
Set the impedance of the headphones by using the IMPEDANCE
dial.
If you are not sure about the impedance of your
headphones
Set the IMPEDANCE dial to LOW, then, while checking the volume from
the headphones, select a position that produces an appropriate
volume level.
When you operate the IMPEDANCE dial:
the sound volume becomes –∞ dB.
you will hear no sound from the headphones for about 8 seconds. Do
not turn up the volume during this period.
If it is set to PHONES OFF, you will hear no sound from the headphones.
If it is set to LOW/MID/HI, you will hear no sound from the speakers.
Setting the auto standby function
When the AUTO STANDBY switch is set to ON, the amplifier switches
to standby mode automatically when the output level from the
speaker or headphones has been lower than a certain level for about
10 to 15 minutes (Auto standby function). Therefore, if you listen to
music at a low volume for a while, the auto standby function may be
activated. In this case, set the AUTO STANDBY switch to OFF.
The output level at which the auto standby function is activated, or the
time when the amplifier switches to standby mode differs, depending
on the conditions under which you are using the amplifier.
Dial position Impedance of headphones supported
LOW from 8 ohms to less than 50 ohms
MID from 50 ohms to less than 300 ohms (+10 dB against
LOW)
HI 300 ohms or higher (+16 dB against LOW)
Notes
IMPEDANCE dial
AUTO STANDBY switch

16
GB
Precautions
On safety
Should any solid object or liquid fall into the cabinet, unplug the amplifier
and have it checked by qualified personnel before operating it any further.
On power sources
Before operating the amplifier, check that the operating voltage is
identical with your local power supply. The operating voltage is indicated
on the nameplate on the back of the amplifier.
If you are not going to use the amplifier for a long time, be sure to
disconnect the amplifier from the wall outlet. To disconnect the AC power
cord (mains lead), grasp the plug itself; never pull the cord.
AC power cord (mains lead) must be changed only at a qualified service
shop.
On heat buildup
Although the amplifier heats up during operation, this is not a malfunction.
If you continuously use the amplifier at a large volume, the cabinet
temperature of the top, sides and bottom rises considerably*. To avoid
burning yourself, do not touch the cabinet.
* The top of the cabinet may become too hot to touch.
On placement
Place the amplifier in a location with adequate ventilation to prevent heat
buildup and prolong the life of the amplifier.
Do not place the amplifier near heat sources, or in a place subject to direct
sunlight, excessive dust, or mechanical shock.
Do not place anything on top of the cabinet that might block the
ventilation holes and cause malfunctions.
On cleaning
Clean the cabinet, panel, and controls with soft dry cloth. Do not use any
type of abrasive pad, scouring powder, or solvent, such as alcohol or
benzine.
If you have any questions or problems concerning your amplifier, please
consult your nearest Sony dealer.
Others

17
GB
Troubleshooting
If you experience any of the following difficulties while using the
amplifier, use this troubleshooting guide to help you remedy the
problem. Should any problem persist, consult your nearest Sony
dealer.
General
The amplifier is not turned on.
Check that the AC power cord (mains lead) is connected securely.
The amplifier is turned off automatically.
The auto standby function is working. Set the AUTO STANDBY
switch on the rear panel to OFF.
The indicator is lit in red.
There is something wrong with the amplifier. It might be because of
a short circuit of the speaker output, a short circuit of the
headphones output, or because the ventilation holes on the top of
the amplifier are blocked. Resolve the problem, then turn on the
amplifier again. If the indicator still lights up in red, disconnect the
AC power cord (mains lead) and consult your nearest Sony dealer.
Audio
There is no sound, no matter which equipment is selected, or only
a very low-level sound is heard.
Check that the speakers and equipment are connected securely.
Check that all speaker cords are connected correctly.
Check that both the amplifier and equipment are turned on.
Check that the volume level is not set at –∞ dB.
Press MUTING to cancel the muting function.
Check that you have selected the correct equipment with the LINE
1/2/3/4/5 indicators on the amplifier.
Check the position of the IMPEDANCE dial.
Set the dial to PHONES OFF to listen to speakers, or other
appropriate positions according to the headphones you are using.
The protective device on the amplifier has been activated. Turn off
the amplifier, eliminate the short circuit problem, and turn on the
amplifier again.
There is no sound from specific equipment.
Check that the cables are fully inserted into the jacks on both the
amplifier and the equipment.
There is no sound from one of the speakers.
Connect a pair of headphones to the PHONES jack and set the
IMPEDANCE dial to LOW to verify that sound is output from the
headphones. If only one channel is output from the headphones,
the equipment may not be connected to the amplifier correctly.
Check that all the cables are fully inserted into the jacks on both the
amplifier and the equipment. If both channels are output from the
headphones, the speaker may not be connected to the amplifier
correctly. Check the connection of the speaker which is not
outputting any sound.
Make sure you have connected both the L and R jacks to analog
equipment and not just either the L or R jack. Use a monaural-stereo
cable (not supplied).
The left and right sounds are unbalanced or reversed.
Check that the speakers and equipment are connected correctly
and securely.
There is severe hum or noise.
Check that the speakers and equipment are connected securely.
Check that the connecting cables are away from a transformer or
motor, and at least 3 meters away from a TV set or fluorescent light.
Move your TV away from the audio equipment.
The plugs and jacks may be dirty. Wipe them with a cloth slightly
moistened with alcohol.
The volume from phonograph records is low.
The amplifier does not support phono inputs. Use a commercially
available phono-equalizer, and connect its analog output to the
amplifier.
continued

18
GB
Remote control
The remote control does not function.
Point the remote control at the remote sensor on the amplifier.
Remove any obstacles in the path between the remote control and
the amplifier.
Replace all the batteries in the remote control with new ones, if they
are weak.
Make sure you select the correct input on the remote control.
Initializing the amplifier
When the amplifier is turned off, hold down the button on the
amplifier for about 5 seconds. The amplifier is reset to the initial
setting.

19
GB
Specifications
Amplifier section
Rated Power Output*
60 W + 60 W
20 Hz to 20 kHz 0.15 % 8 ohms
* Measured under the following conditions (Area: Power requirements):
Malaysian model: 240 V AC, 50 Hz
Singaporean model: 230 V AC, 50 Hz
Supported impedance of speakers
4 ohms or higher
Distortion
0.008 %
1kHz 10W 8ohms
Frequency response
10 Hz to 100 kHz ±3 dB (8 ohms)
Input (UNBALANCED)
Sensitivity: 150 mV
Impedance: 47 kohms
S/N ratio: 96 dB (Input short, A, 20 kHz LPF)
Input (BALANCED)
Impedance: 20 kohms / 20 kohms
S/N ratio: 96 dB (Input short, A, 20 kHz LPF)
Headphones amplifier section
Supported impedance
LOW: from 8 ohms to less than 50 ohms
MID: from 50 ohms to less than 300 ohms (+10 dB against LOW)
HI: 300 ohms or higher (+16 dB against LOW)
Distortion
0.1 % or less
20 Hz to 20 kHz
LOW (8 ohms load impedance) 500 mW + 500 mW
MID (150 ohms load impedance) 500 mW + 500 mW
HI (300 ohms load impedance) 250 mW + 250 mW
Frequency response
10 Hz to 100 kHz +0.5/–3 dB (at LOW mode 8 ohms load impedance)
General
Power requirements
Malaysian model: 240 V AC, 50 Hz
Singaporean model: 230 V AC, 50 Hz
Power consumption
300 W
Power consumption (during standby mode)
0.4 W
Dimensions (Approx.)
430 mm × 130 mm × 420 mm, including projecting parts and controls
Mass (Approx.)
17.0 kg
Supplied accessories
AC power cord (mains lead) (1)
Remote control RM-AAU181 (1)
R03 (size AAA) batteries (2)
Operating Instructions (this manual) (1)
Design and specifications are subject to change without notice.

2
CS
只要本机仍然被连接至交流电插座,它仍然还没有切断主要电源,即使本机已
被关闭。
为减低火灾的风险,请不要让本装置的通风口被报章、桌布、窗帘等等掩盖。
不要将本装置暴露于明火(例如点燃的蜡烛)。
为减低火灾或电击的风险,请不要将本装置暴露在滴水或溅水下,并不要将盛
满液体的物体,例如花瓶放置在本装置上。
由于电源插头是用作切断本机的主要电源,请将本机连接至容易触及的交流
电插座。若您发现本机出现任何不寻常状况,请立刻将电源插头从交流电插座
拔出。
请不要将本装置安装在狭窄的空间,例如书架内或嵌入式的橱柜。
切勿将电池或安装了电池的装置暴露在太过热的情况下,例如阳光和火。
耳塞式耳机和头戴式耳机的声压过大会导致听力损失。
仅限室内使用。
此符号旨在提醒用户注意热表面,如果在正常操作期间接
触,可能很烫。
警告
ページが読み込まれています...
ページが読み込まれています...
ページが読み込まれています...
ページが読み込まれています...
ページが読み込まれています...
ページが読み込まれています...
ページが読み込まれています...
ページが読み込まれています...
ページが読み込まれています...
ページが読み込まれています...
ページが読み込まれています...
ページが読み込まれています...
ページが読み込まれています...
ページが読み込まれています...
ページが読み込まれています...
ページが読み込まれています...
ページが読み込まれています...
ページが読み込まれています...
ページが読み込まれています...
ページが読み込まれています...
-
 1
1
-
 2
2
-
 3
3
-
 4
4
-
 5
5
-
 6
6
-
 7
7
-
 8
8
-
 9
9
-
 10
10
-
 11
11
-
 12
12
-
 13
13
-
 14
14
-
 15
15
-
 16
16
-
 17
17
-
 18
18
-
 19
19
-
 20
20
-
 21
21
-
 22
22
-
 23
23
-
 24
24
-
 25
25
-
 26
26
-
 27
27
-
 28
28
-
 29
29
-
 30
30
-
 31
31
-
 32
32
-
 33
33
-
 34
34
-
 35
35
-
 36
36
-
 37
37
-
 38
38
-
 39
39
-
 40
40


