
Always there to help you
Register your product and get support at
www.philips.com/welcome
User manual
4240 002 00414
Specifications are subject to change without notice
© 2014 Koninklijke Philips N.V.
All rights reserved
发布日期:2014-11-11
保留备用
HR7950
HR7951
HR7954
HR7955
HR7958
HR7974
HR7978
1
2
3
2
1
2
5
3
1
2
4
1
4
6
1
2
2
3
1 2
3
5
6
HR7951, HR7954, HR7958, HR7974, HR7978
HR7950, HR7951, HR7954, HR7955,HR7958, HR7974, HR7978
2
1
2
1
2
1
2
3
1
3
4
2
5
4
5
1
54
3
1
1
2
3
2
2
1
6
HR7954, HR7958, HR7974, HR7978
HR7954, HR7958, HR7974, HR7978
1
2
6
1
bca
x
y
dfh
o
p
q
n
k
m
i
j
e
l
z
{
w
s
t
u
v
g
‚ ƒ …| } ~ „
r
€

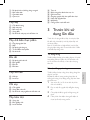
EN User manual 9
ID Buku Petunjuk Pengguna 18
KO 사용 설명서 28
MS Manual pengguna 37
TH คู่มือผู้ใช้ 47
VI Hướng dẫn sử dụng 56
ZH-S 用户手册 65
ZH-T 使用手冊 76
AR 84
FA 92
1
2
1
2
3
2
1
8
HR7958, HR7978
1 kg
500 g
500 g
500 g
50 g
250 g
250 g
200 g
500 g
2 pcs
P
P/7
2-3
2-3
P
7
7
5
4
4
2 min
2 min
5 x 1 sec
5 x 1 sec
30 sec
60 sec
45 sec
30 sec
30 sec
500 g430 sec
30 sec
(HR7951/HR7954/
HR7958/HR7974/HR7978)
(HR7954/HR7958/
HR7974/HR7978)
9 x
600 ml
400 g
P
7
1.25 L71 min
P x 20
2 min
9
(min: ٷ)
(min: ٷ)
X 8
750 ml
750 g
750 g
1.6 kg
750 g
2 kg
40 g
50 g
40 g
100 g+10 g
7
7
7
7
1-4
1-4
1-4
1-3
7
7
P
5 min
3 min
3 min
5 min
5 min
3 min
3 min
20 sec
30 sec
30 sec
85 gP3 sec
5 sec
(HR7958/HR7978)
(HR7958/HR7978)
(MAX: պ)
(MAX: պ)
(sec: )
(sec: )
1 kg
500 g
500 g
500 g
50 g
250 g
250 g
200 g
500 g
2 pcs
P
P/7
2-3
2-3
P
7
7
5
4
4
2 min
2 min
5 x 1 sec
5 x 1 sec
30 sec
60 sec
45 sec
30 sec
30 sec
500
g430 sec
30 sec
(HR7954/
HR7958/
HR7974/
HR7978)
(HR7954/HR7958/
HR7974/HR7978)
(HR7954/HR7958/
HR7974/HR7978)
(HR7954/HR7958/
HR7974/HR7978)
(HR7954/HR7958/
HR7974/HR7978)
1.25 L
9 x
600 ml
400 g
7
P
7
1 min
P x 20
2 min
9
X 8
750 ml
750 g
750 g
1.6 kg
750 g
2 kg
40 g
50 g
40 g
100 g+10 g
7
7
7
7
1-4
1-4
1-4
1-3
7
7
P
5 min
3 min
3 min
5 min
5 min
3 min
3 min
20 sec
30 sec
30 sec
85 gP3 sec
5 sec
(HR7958/HR7978)
(HR7958/HR7978)
(MAX: պ)
(MAX: պ)
(min: ٷ)
(min: ٷ)
(sec: )
(sec: )
1 kg
500 g
500 g
500 g
50 g
250 g
250 g
200 g
500 g
2 pcs
P
P/7
2-3
2-3
P
7
7
5
4
4
2 min
2 min
5 x 1 sec
5 x 1 sec
30 sec
60 sec
45 sec
30 sec
30 sec
500
g4
30 sec
30 sec
(HR7951/HR7954/
HR7958/HR7974/HR7978)
(HR7954/HR7958/
HR7974/HR7978)
9 x
600 ml
400 g
P
7
1.25
L7
1 min
P x 20
2 min
9
(min: ٷ)
(min: ٷ)
X 8
750 ml
750 g
750 g
1.6 kg
750 g
2 kg
40 g
50 g
40 g
100 g+10 g
7
7
7
7
1-4
1-4
1-4
1-3
7
7
P
5 min
3 min
3 min
5 min
5 min
3 min
3 min
20 sec
30 sec
30 sec
85
gP
3 sec
5 sec
(HR7958/HR7978)
(HR7958/HR7978)
(MAX: պ)
(MAX: պ)
(sec: )
(sec: )
32
1
7-2
2
1
65
2
1
4
1
3
4 5
2
3
2
6
7-1
1
HR7958, HR7978
HR7954, HR7958, HR7974, HR7978
21
11
10
3
HR7958, HR7978

9
English
EN
• Children shall not play with the
appliance.
• This appliance shall not be
used by children. Keep the
appliance and its cord out of
reach of children.
• Never let the appliance run
unattended.
• Be careful when you are
emptying the bowl, handle or
clean the discs, the blade, and
the juicer sieve. The cutting
edges are very sharp.
• Remove the beater, whisk or
dough hook from your kitchen
machine before washing.
• Do not touch the blades,
especially when the appliance
is plugged in. The blades are
very sharp.
• If the blades and bowl tools
get stuck, unplug the appliance
before you remove the
ingredients that block the
blades and bowl tools.
• If food sticks to the wall of the
blender jar, food processor
bowl, or mixing bowl, switch
off the appliance and unplug it.
Then use a spatula to remove
the food from the wall.
• Neverstickoruseyourngers
or an object (for example, a
spatula) into to the mixing bowl
when using any of the bowl tools
while the appliance is running.
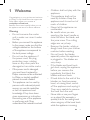
1 Welcome
Congratulations on your purchase and welcome
toPhilips!Tofullybenetfromthesupportthat
Philips offers, register your product at
www.philips.com/welcome.
Read this user manual carefully before you use
the appliance and save it for future reference.
Warning
• Do not immerse the motor
unit in water nor rinse it under
the tap.
• Before you connect the appliance
to the power, make sure that the
voltage indicated on the bottom
of the appliance corresponds to
the local power voltage.
• Do not use the appliance if
the power cord, the plug,
protecting cover, rotating
sieve or any other parts are
damaged or has visible cracks.
• If the power cord is damaged,
you must have it replaced by
Philips, a service center authorized
byPhilips,orsimilarlyqualied
persons to avoid a hazard.
• This appliance can be used by
persons with reduced physical,
sensory or mental capabilities
or lack of experience and
knowledge if they have been
given supervision or instruction
concerning use of the appliance
in a safe way and if they
understand the hazards involved.

10
EN
• In order to avoid a hazard due
to inadvertent resetting of the
thermal cut-out, this appliance
must not be supplied through an
external switching device, such
as a timer, or connected to a
circuit that is regularly switched
on and off by the utility.
• Always switch off the appliance
by turning the knob to 0
position.
• Always wait until the moving
parts stop running after
switching off, and then unplug
the appliance before lifting the
arm of the stand, or opening,
disassembling or removing the
parts of any of the accessories
from the stand.
• Do not exceed the maximum
capacity as indicated on the
accessories (bowl, jar, mill).
Follow the quantities, processing
time and speed when using
the kitchen machine tools, as
indicated in the user manual.
• Thoroughly clean the parts
that come into contact with
food before you use the
applianceforthersttime.
Refer to the instructions and
table for cleaning given in the
user manual.
• Neverstickoruseyourngers
or an object (for example, a
spatula) to push ingredients into
the feeding tube of the food
processor or the meat mincer
hopper while the appliance is
running. Use only the provided
pusher for the food processor
or meat mincer.
• Be careful if hot liquid is
poured into the bowl, food
processor or blender as it can
be ejected out of the appliance
due to a sudden steaming.
• Never unlock the kitchen
machine’s arm when other
accessories (such as food
processor, blender, mill or
meat mincer, etc) are attached.
• Never attach and use more
than one tool or accessory
on the kitchen machine at the
same time.
• This appliance is intended for
household use only.
Caution
• Always switch off and
unplug the appliance if it is
left unattended, and before
assembling, disassembling,
cleaning and changing
accessories, or approaching
parts that move in use.

11
English
EN
Recycling
Your product is designed and manufactured
with high quality materials and components,
which can be recycled and reused.
When you see the crossed-out wheel bin
symbol attached to a product, it means the
product is covered by the European Directive
2002/96/EC:
Never dispose of your product with other
household waste. Please inform yourself about
the local rules on the separate collection of
electrical and electronic products. The correct
disposal of your old product helps prevent
potentially negative consequences on the
environment and human health.
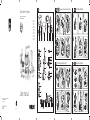
2 Overview
(Fig. 1)
Kitchen machine
a Tool connector
b Arm release button
c Speed selector (Rotary knob)
d Bowl
e Splash guard
f Dough hook
g Whisk
h Beater
• Never use any accessories or
parts from other manufacturers
thatPhilipsdoesnotspecically
recommend. If you use such
accessories or parts, your
guarantee becomes invalid.
• Let hot ingredients cool down
(< 80ºC) before processing
them.
• Always let the appliance cool
down to room temperature after
each batch that you process.
• Certain ingredients such
as carrots may cause
discolorations on the surface
of the parts. This does not
have a negative effect on the
parts. The discolorations usually
disappear after some time.
Noise level: Lc = 82 dB [A]
Electromagnetic elds (EMF)
This Philips appliance complies with all
standardsregardingelectromagneticelds
(EMF). If handled properly and according to the
instructions in this user manual, the appliance
issafetousebasedonscienticevidence
available today.

12
EN
„ Tray cover
… Innovative cleaning tool
3 Before first use
Before you use the kitchen machine and
accessoriesforthersttime,thoroughlyclean
the parts that come into contact with food.
You can only plug in and switch on the
appliance after you correctly assemble the
accessories. Refer to Fig. 2 to 8 for the proper
assembly.
Auto stop
Your kitchen machine will be automatically
turned off after 16 minutes of continuous
operation. This can avoid potential safety
problems due to prolonged usage.
Overload protection
Your kitchen machine will also automatically
stop working when overloaded.
To reset the appliance in case of overload and
auto stop protection, follow the steps below:
1 Turn the knob to 0 position and then
unplug it.
2 Remove some of the ingredients to reduce
the load.
3 Allow the appliance to cool down for a
few minutes.
4 Connect the power plug to the power
supply and reselect the desired speed.
Blender
i Measuring cup
j Blender lid
k Blender jar
l Sealing ring
m Detachable blender blade unit
Food processor
n Pusher
o Lid
p Tool holder
q Food Processor bowl
r Blade unit
Disc insert
s Insert holder
t Insert for granulating
u Insert for slicing
v Insert for shredding
Citrus press
w Press cone
x Sieve
Mill
y Mill jar
z Sealing ring for mill
{ Detachable mill blade unit
Meat mincer
| Screw ring
} Fine grinding disc
~ Cutter/Knife
Worm shaft
€ Extra gear for the worm shaft
Metal hopper
‚ Pusher for metal hopper
ƒ Feeding tray

13
English
EN
Tip
• To avoid splashing, always increase speed gradually.
• Splash guard:tthesplashguardontothestandbefore
using the bowl tools. You do not need to remove the
splash guard to change tools. You can add ingredients
through the spout of the splash guard.
• Whisking: before whisking egg whites or cream, make
sure that the bowl and the whisk are dry and free from
grease.
• Kneading: use the dough hook to knead yeast dough
for bread and pizzas. You need to adjust the amount of
liquid to form the dough according to the humidity and
temperature condition.
If you want to re-knead the dough with your kitchen
machine, press the dough down to the bottom of the
bowl to avoid the dough wrapping on the tool. Make
sure that you re-knead the dough within the
recommended speed.
Recipes: Bread dough
(maximum x1.5 quantity)
Ingredient:
• 500gour
• 50g olive oil
• 1 teaspoon salt
• 1 teaspoon sugar
• 7g yeast
• 260ml warm water
1 Add all the dry ingredients to the bowl and
turn the rotary knob to speed 1.
2 Pour in the water and then the oil.
3 Switch to speed 2-3 and continue kneading
until one smooth dough ball is formed.
4 Grease a bowl with vegetable oil.
5 Put the dough ball to this bowl and cover
itwithclinglm.
6 Let it rise for 1 hour until it is doubled in
size.
7 Remove the air from the raised dough.
8 Folditintoalogshapeandtitintoaloaf
pan.
9 Cover it and let it rise in the tray for 1 hour.
10 Bake at 180°C for 40 minutes.
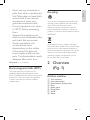
4 Use your
kitchen machine
Mixing bowl tools
Note
• Before switching on your kitchen machine, make sure
the knob is at 0 position and then attach the whisk,
beater or dough hook.
• Upto750gofourplusotheringredientscanbe
processed in the bowl.
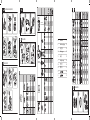
• Follow the recommended quantities, processing time
and speed as indicated in Fig. 9. Do not exceed the
suggested processing speed to avoid damage to the
machine.
• It is normal that the tool connector will rotate with the
gear cover, during the use of other accessories such as
blender, food Processor, etc.
• Make sure the outlet covers on the arm are well locked
before using your kitchen machine.
Before you start, make sure that you pick
the desired attachment from following and
assemble according to Fig. 2.
Name Purpose
Dough
hook
• For making bread and roll
• Suggested processing
speed: 1-3
Beater
• For making cakes, cookies,
pie, pastry, mashed
potato, pasta dough,
gluten free bread, and
cold butter
• Suggested processing
speed: 1-4
Whisk
• For making egg white,
cream, meringues,
mousses,andsoufes
• Suggested processing
speed: 7

14
EN
• If the dough doesn’t hold together,
add a little more water and mix it for
a longer time. Do not add too much
water. Otherwise, it will make the
crust tough.
4 Form the dough into the shape you want
and wrap it with plastic wrap.
5 Keep it in the refrigerator for at least
1 hour and up to 2 days.
6 Rest the dough in the room temperature
for a few minutes before rolling and baking.
Recipe: Meringue
Ingredient:
• 4 egg whites
• 1cup(200grams)superneorcaster
sugar
1 Whisk the egg whites with speed 7 until
soft peaks are formed.
2 Gradually add the sugar while processing
withspeed4untilrmpeaksareformed.
3 Spoon the meringue onto a baking tray
which is covered with baking paper.
4 Preheat your oven to 105 °C and place
the tray with the meringue in the center of
the oven.
5 Bake the meringues for approximately
1-1.5 hours until they are dry and crisp.
6 Turn off the oven and dry the meringues in
the oven for 1.5 hours.
Blender (HR7951/HR7954/
HR7958/HR7974/HR7978
only)
Before you start, make sure that you assemble
according to Fig. 3.
Blender: for blending smoothies, shakes, juices
and crushing ice
Follow the recommended quantities, processing
time and speed as indicated in Fig. 9.
Recipe: Cake batter
Ingredient:
• 3 eggs
• 150g butter
• 150 g castor sugar
• 150gour
• 3g baking powder
1 Cut the butter into cubes of 2 cm.
2 Put the cubes with sugar in the bowl and
mix them with speed 1.
3 Gradually increase the speed from 1 to 4.
4 Add the eggs one by one and keep mixing
with speed 4 until you receive a creamy
consistency.
5 Foldinbakingpowderandourtothe
mixture and mix with speed 1 until all the
ingredients are well mixed.
6 Put the batter into a 30 cm long aluminum
tin.
7 Place it in the middle of the oven.
8 Bake it for 30-40 minutes at the
temperature of 180°C.
Recipe: Pie pastry
Ingredient:
• 340gcupsall-purposeour,plusextra
for rolling
• 227g cold unsalted butter, cut into
2 cm inch cubes
• 1 teaspoon salt
• 1 teaspoon sugar
• 6 to 8 tablespoon ice water
1 Put all the dry ingredients to the bowl and
turn the rotary knob to speed 1.
2 Add the cold butter into the dry
ingredients and gradually increase the
speed from 1 to 3.
3 Add 1 tablespoon iced water at a time to
the mixture until it forms crumbly dough.

15
English
EN
Note
• Always put the blade unit in the bowl before you start
to add the ingredients.
• Do not use the blade unit to chop hard ingredients, like
coffee beans, turmeric, nutmeg, and ice cubes, as this
may cause the blade to get blunt.
• Do not let the appliance run too long when you chop
(hard) cheese or chocolate. Otherwise these ingredients
become too hot, start to melt, and turn lumpy.
Disc with inserts
Before you start, make sure you pick your
desired insert from following and assemble
according to Fig. 5.
Name Purpose
Granulating
insert
For granulating
ingredients to
small/nepieces
Slicing insert
For slicing
ingredients
Shredding
insert
For shredding
ingredients into
small strips
Caution
• Be careful when you handle the slicing blade of disc
insert. It has a very sharp cutting edge.
• Never use the disc insert to process hard ingredients,
like ice cubes.
• Do not exert too much pressure on the pusher when
you press ingredients into the feed tube.
Note
• Precutlargeingredientsintochunksthattinthe
feeding tube.
Follow the steps below to assemble the disc
inserts (Step 1 in Fig. 5).
1 Place the opening of the insert over the
shaft of the insert holder.
2 Push the opening of the insert over the
projection on the shaft.
For ice crushing, turn the knob to speed P
repeatedlyuntiltheiceisnelycrushed.
Note
• Never open the lid to put your hand or any object in
the jar while the blender is running.
• Always assemble the sealing ring onto the blade unit
before you attach the blade unit to the blender jar.
• To add liquid ingredients during blending, pour them
into the blender jar through the feeding hole by
removing the measuring cup.
• Precut ingredients into small pieces before you process
them.
• If you want to prepare a large quantity, process small
batches of ingredients instead of a large quantity at
once.
• To avoid spillage: When you process a liquid tends to
foam (for example, milk), do not put more than 1 liter
of liquid in the blender jar.
• Put the ingredients in the blender jar within the
maximum level indication.
• To achieve the best result when blending thick puree,
lltheblenderjarhalffullandprocesstheingredientsin
separate blending batches.
Food processor (HR7954/
HR7958/HR7974/HR7978
only)
Blade unit
Before you start, make sure that you assemble
according to Fig. 4.
Blade unit: for chopping, mixing and pureeing
ingredients
To remove the food that sticks to the blade or
bowl wall, stop processing and switch off the
appliancerst,andthenuseaspatula.

16
EN
Note
• Never grind bones, nuts, or other hard ingredients.
• Never use frozen meat! Before you grind the meat,
defrostitrst.
• Do not push too much meat or exert too much
pressure when pushing the meat into the hopper. This
can avoid overloading the appliance.
Tip
• Remove bones, gristle, and sinews out of the meat to
avoid blockage during grinding.
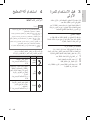
Mill (HR7958/HR7978 only)
Before you start, make sure that you assemble
according to Fig. 8.
You can use the mill to chop/grind coffee
beans, peppercorns, nuts, herbs, dried fruits etc.
Driedfruitssuchasgscanbechoppedand
use as toppings for yoghurt or spread for your
bread or biscuit.
For best results when processing dried black
Missiongs,usemaxof85gatspeedPfor
3 seconds.
Note
• Follow the recommended quantities, processing time
and speed for the ingredients as indicated in Fig 9.
• Do not exceed the maximum level of the mill jar.
• You can order a mill (under service code 96510070528
and 996510070501) from your Philips dealer or a
Philips service center as an extra accessory.
Tip
• Before opening the mill with processed ingredients
1. Hold the mill jar upside down.
2. Tap the mill jar a few times.
3. Remove the blade assembly slowly.
3 Press the insert onto the insert holder until
it locks in position with a click.
Citrus press
Before you start, make sure that you assemble
according to Fig. 6.
Note
• Put the sieve for citrus press on the shaft in the bowl.
Make sure that the projection on the sieve is locked
intheslotofthebowlhandle.Whenthesieveisxed
correctly, you hear a click.
• Press the citrus fruit onto the cone. Stop pressing to
remove the pulp from the sieve if necessary. When
younishpressingorwanttoremovethepulp,turn
the knob to 0 position and remove the bowl from the
appliance with the accessories on it.
Meat mincer (HR7958/
HR7978 only)
Before you start, make sure you assemble
according to Fig. 7-1.
The meat mincer is intended for mincing raw or
cooked meat.
When the meat gets stuck in the hopper, follow
the steps below to reset:
1 Switch off and unplug the appliance.
2 Detach the hopper assembly.
3 Clear the blockage.
4 Reassemble the hopper.
5 Connect the power plug to the power
supply and reselect the desired speed.
Replace the gear
When the gear for the worm shaft is damaged,
use the extra one to replace it according to
Fig. 7-2.

17
English
EN
5 Detach the blender jar or food processor
bowl and rinse it with clean water.
6 Guarantee and
service
If you have a problem, need service, or need
information, see www.philips.com/support
or contact the Philips Consumer Care Center
in your country. The phone number is in the
worldwideguaranteeleaet.Ifthereisno
Consumer Care Center in your country, go to
your local Philips dealer.
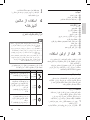
5 Cleaning
Warning
• Before you clean the appliance, unplug it.
• Refer to the table (Fig. 10) for information on cleaning
the parts with water, dishwashing machine and/or moist
cloth.
Caution
• Make sure that the cutting edges of the blades and discs
do not come into contact with hard objects. This may
cause the blade to get blunt.
• The cutting edges are sharp. Be careful when you clean
the disc inserts, and blade units of the food processor,
blender, and mill.
1 Clean the motor unit with a moist cloth.
2 Clean the other parts in hot water
(< 60ºC) with some washing-up liquid or
in a dishwasher.
3 Store the appliance and accessories in a
dry place after cleaning.
Quick cleaning
Follow the steps below to clean the food
processor bowl and blender jar easier.
(Make sure that the blade is assembled in the
bowl if you clean the food processor bowl.)
1 Pour lukewarm water (not more than
0.5 liters) and a few drops of washing-up
liquid into the food processor bowl or
blender jar.
2 Place the lid on the food processor bowl
or blender jar, and then turn it clockwise
toxit.
3 Turn the knob to speed P. Let the
appliance run for 30 seconds or until the
food processor bowl or blender jar is
clean.
4 After use, turn the knob to 0 position and
then unplug the appliance.

18
ID
pengetahuan jika mereka diberi
pengawasan atau petunjuk
mengenai cara penggunaan
alat yang aman dan mengerti
bahayanya.
• Anak-anak dilarang memainkan
alat ini.
• Alat ini tidak boleh digunakan
oleh anak-anak. Jauhkan alat
dan kabelnya dari jangkauan
anak-anak.
• Jangan sekali-kali meninggalkan
alat yang sedang bekerja tanpa
ditunggui.
• Berhati-hatilah saat
mengosongkan mangkuk,
memegang atau membersihkan
cakram, unit pisau, dan saringan
juicer. Tepi pemotong sangat
tajam.
• Lepaskan pengaduk, kocokan,
atau kaitan adonan dari alat
dapur sebelum dicuci.
• Jangan sentuh pisau-pisau,
terutama ketika alat terhubung
ke stopkontak. Pisau-pisau
sangat tajam.
• Jika pisau dan alat mangkuk
macet, cabut alat dari
stopkontak sebelum
mengeluarkan bahan yang
menghambat pisau, dan alat
mangkuk.
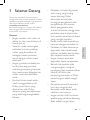
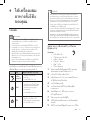
1 Selamat datang
Selamat atas pembelian Anda dan selamat datang
di Philips! Untuk memanfaatkan sepenuhnya
dukungan yang ditawarkan Philips, daftarkan
produk Anda di www.philips.com/welcome.
Bacalah petunjuk penggunaan ini dengan
saksama sebelum Anda menggunakan alat dan
simpanlah sebagai referensi di masa mendatang.
Peringatan
• Jangan merendam unit motor
di dalam air atau membilasnya
di bawah keran.
• Sebelum menghubungkan
alat ke stopkontak, pastikan
tegangan yang ditunjukkan
di bagian bawah alat sesuai
dengan tegangan daya
setempat.
• Jangan gunakan alat apabila
kabel listrik, steker, tutup
pelindung, saringan putar, atau
komponen lainnya rusak atau
terlihat ada retakan.
• Jika kabel listrik rusak, maka
harus diganti oleh Philips, pusat
servis resmi Philips, atau orang
yang mempunyai keahlian
sejenis agar terhindar dari
bahaya.
• Alat ini dapat digunakan oleh
orang dengan keterbatasan
sik,indera,ataukecakapan
mental yang kurang atau
kurang pengalaman dan

Indonesia
19
ID
• Jangan pernah membuka kunci
lengan mesin dapur ini saat
aksesori lain (seperti pengolah
makanan, blender, gilingan
atau pencincang daging, dll)
terpasang.
• Jangan pernah memasang dan
menggunakan lebih dari satu
alat atau aksesori pada alat
dapur secara bersamaan.
• Alat ini hanya untuk keperluan
rumah tangga.
Perhatian
• Selalu matikan dan cabut alat
dari stopkontak jika Anda
akan meninggalkannya tanpa
pengawasan, dan sebelum
memasang, melepaskan,
membersihkan, dan mengganti
aksesorinya, atau berusaha
menyentuh komponen
yang bergerak saat sedang
digunakan.
• Selalu matikan alat dengan
memutar kenop ke 0.
• Selalu tunggu hingga bagian
yang bergerak benar-benar
berhenti setelah dimatikan,
lalu cabut alat dari stopkontak
sebelum mengangkat lengan
dudukan, atau membuka,
mencopot atau melepas
bagian aksesori mana pun dari
dudukannya.
• Jika makanan menempel
di dinding tabung blender,
mangkuk pengolah makanan,
atau mangkuk pencampur,
matikan alat dan cabut dari
stopkontak. Kemudian gunakan
spatula untuk membersihkan
makanan dari dinding tabung.
• Jangan menggunakan jari
atau memasukkan benda lain
(misalnya spatula) ke dalam
mangkuk pencampur saat
menggunakan alat mangkuk
apa saja ketika alat sedang
bekerja.
• Jangan menggunakan jari atau
memasukkan benda (misalnya
spatula) untuk menekan
bahan-bahan ke dalam tabung
pengisi di pengolah makanan
atau corong pencincang
daging ketika alat sedang
bekerja. Hanya gunakan
pendorong yang disediakan
untuk pengolah makanan atau
pencincang daging.
• Berhati-hatilah saat
menuangkan cairan panas ke
dalam mangkuk, pengolah
makanan, atau blender karena
bisa terciprat keluar dari alat
akibat panas yang tiba-tiba.

20
ID
• Bahan tertentu seperti
wortel dapat menyebabkan
perubahan warna pada
permukaan bagian-bagian alat.
Hal ini tidak berpengaruh
negatif pada bagian tersebut.
Setelah beberapa lama
biasanya perubahan warna
akan menghilang.
• Untuk mencegah bahaya
akibat kecerobohan dalam
melakukan reset pengaman
termal, pasokan listrik alat ini
tidak boleh melalui perangkat
penghubung eksternal, seperti
timer, atau terhubung ke sirkuit
yang secara teratur dihidupkan
dan dimatikan melalui suatu
alat.
Tingkat kebisingan: Lc= 82 dB(A).
Medan elektromagnet (EMF)
Alat Phillips ini mematuhi semua standar yang
terkait dengan medan elektromagnet (EMF).
Jika ditangani dengan benar dan sesuai dengan
petunjuk dalam petunjuk pengguna ini, alat
tersebut aman digunakan menurut bukti ilmiah
yang kini tersedia.
• Jangan melebihi batas
maksimum seperti yang tertera
pada aksesori (mangkuk,
tabung, penggiling). Ikuti
takaran, waktu pengolahan, dan
kecepatan saat menggunakan
alat dapur, seperti yang tertera
di buku petunjuk pengguna.
• Bersihkan secara cermat
bagian-bagian yang
bersentuhan dengan makanan
sebelum menggunakan alat
ini untuk pertama kali. Lihat
petunjuk dan tabel cara
membersihkan yang terdapat
di buku petunjuk pengguna ini.
• Jangan sekali-kali menggunakan
aksesori atau komponen apa
pun dari produsen lain yang
tidak direkomendasikan secara
khusus oleh Philips. Jika Anda
menggunakan aksesori atau
komponen tersebut, garansi
Anda menjadi batal.
• Biarkan bahan yang panas
mendingin (< 80ºC) sebelum
diolah.
• Selalu biarkan alat mendingin
hingga suhu kamar setelah
setiap takaran yang Anda olah.

Indonesia
21
ID
Pengolah makanan
n Pendorong
o Tutup
p Penahan alat
q Mangkuk pengolah makanan
r Unit pisau
Sisipan cakram
s Pegangan sisipan
t Sisipan untuk granulasi
u Sisipan untuk mengiris
v Sisipan untuk mencacah
Perasan jeruk
w Kerucut peras
x Saringan
Penggiling
y Tabung penggiling
z Gelang penyegel untuk penggiling
{ Unit pisau penggiling lepas-pasang
Pencincang daging
| Cincin sekrup
} Cakram penggiling halus
~ Pemotong/Pisau
Poros spiral
€ Roda gigi ekstra untuk poros spiral
Hopper logam
‚ Pendorong untuk hoper logam
ƒ Wadah pengisi
„ Tutup wadah
… Alat pembersih inovatif
Mendaur ulang
Produk Anda dirancang dan diproduksi dengan
bahan dan komponen berkualitas tinggi, yang
dapat didaur ulang dan digunakan kembali.
Bila melihat simbol tempat sampah yang disilang
pada produk, berarti produk tersebut tercakup
dalam Petunjuk Eropa 2002/96/EC:
Jangan buang produk ini dengan limbah rumah
tangga lainnya. Ketahui peraturan setempat
tentang pengumpulan terpisah untuk produk
listrik dan elektronik. Pembuangan produk
usang yang benar akan membantu mencegah
kemungkinan dampak negatif terhadap
lingkungan dan kesehatan manusia.
2 Tinjauan (Gbr. 1)
Alat dapur
a Konektor alat
b Tombol pelepas lengan
c Pemilih kecepatan (Kenop putar)
d Mangkuk
e Pelindung percikan
f Kait adonan
g Kocokan
h Pengaduk
Blender
i Cangkir takaran
j Tutup blender
k Tabung blender
l Gelang penyegel
m Unit pisau blender lepas-pasang

22
ID
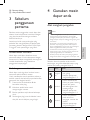
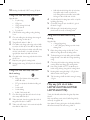
4 Menggunakan
alat dapur Anda
Alat mangkuk pencampur
Catatan
• Sebelum menghidupkan alat dapur, pastikan kenop
berada di posisi 0 lalu pasang kocokan, pengaduk, atau
kaitan adonan.
• Hingga 750g tepung beserta bahan-bahan lain dapat
diolah di mangkuk.
• Ikuti takaran, waktu pengolahan, dan kecepatan yang
disarankan seperti yang ditunjukkan pada Gbr. 9. Jangan
melebihi kecepatan pengolahan yang disarankan untuk
menghindari kerusakan pada alat dapur.
• Adalah hal yang normal jika konektor alat ikut berputar
dengan pelindung gir selama penggunaan aksesori lain
seperti blender, Pengolah makanan, dll.
• Pastikan penutup saluran keluar pada lengan terkunci
dengan baik sebelum Anda menggunakan alat dapur.
Sebelum memulai, pastikan Anda memilih
perlengkapan yang diinginkan dari yang berikut
dan pasang sesuai dengan Gbr. 2.
Nama Kegunaan
Kaitan
adonan
• Untuk membuat roti
dan roll
• Kecepatan pengolahan
yang disarankan: 1-3
Pengaduk
• Untuk membuat cake,
kue, pie, kue kering,
kentang tumbuk, adonan
pasta, roti bebas gluten,
dan mentega dingin
• Kecepatan pengolahan
yang disarankan: 1-4
Kocokan
• Untuk mengolah putih
telur, krim, meringue,
mousse,dansoufe
• Kecepatan pengolahan
yang disarankan: 7
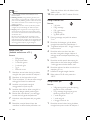
3 Sebelum
menggunakan
pertama kali
Sebelum menggunakan alat dapur dan aksesori
untuk pertama kalinya, bersihkan sampai tuntas
semua bagian yang menyentuh makanan.
Anda hanya dapat memasang steker dan
menghidupkan alat setelah memasang aksesori
dengan benar. Lihat Gbr. 2 sampai 8 untuk
pemasangan yang benar.
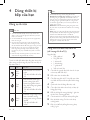
Berhenti otomatis
Alat dapur Anda akan mati secara otomatis
setelah 16 menit beroperasi terus-menerus. Ini
dapat menghindari potensi masalah keselamatan
akibat penggunaan dalam waktu lama.
Perlindungan kelebihan beban
Alat dapur Anda juga akan berhenti beroperasi
saat kelebihan beban.
Untuk menyetel ulang alat jika kelebihan beban
dan perlindungan berhenti otomatis, ikuti
langkah-langkah berikut:
1 Putar kenop ke posisi 0 lalu cabut alat dari
stopkontak.
2 Keluarkan beberapa bahan untuk
mengurangi beban.
3 Biarkan alat mendingin selama beberapa
menit.
4 Colokkan steker ke stopkontak dan pilih
kembali kecepatan yang diinginkan.

Indonesia
23
ID
8 Gulung menjadi bentuk batang dengan
ukuran yang sesuai dengan loyang roti.
9 Tutup dan biarkan mengembang di baki
selama 1 jam.
10 Panggang pada suhu 180°C selama
40 menit.
Resep: Adonan cake
Bahan-bahan:
• 3 butir telur
• 150 g mentega
• 150 g gula kastor
• 150 g tepung
• 3 g baking powder
1 Mentega dipotong berbentuk dadu, kurang-
lebih 2 cm.
2 Taruh potongan mentega dengan gula
ke dalam mangkuk dan aduk dengan
kecepatan 1.
3 Tambah kecepatan dari 1 sampai 4 secara
bertahap.
4 Masukkan telur satu per satu dan terus
aduk dengan kecepatan 4 sampai menjadi
krim.
5 Tuang baking powder dan tepung dan aduk
dengan kecepatan 1 hingga semua bahan
tercampur rata.
6 Letakkan adonan di loyang aluminium 30 cm.
7 Taruh di tengah-tengah oven.
8 Panggang selama 30-40 menit pada suhu
180°C.
Resep: Kue pie
Bahan-bahan:
• 340 g cangkir tepung serba guna, plus
tambahan untuk penggulungan
• 227 g mentega tawar dingin, potong
menjadi berbentuk dadu berukuran
2 cm
• 1 sendok teh garam
• 1 sendok teh gula
Kiat
• Untuk mencegah percikan, naikkan kecepatan setahap
demi setahap.
• Pelindung percikan: pasang pelindung percikan
ke dudukan sebelum menggunakan alat mangkuk.
Anda tidak perlu melepas pelindung percikan untuk
mengganti alat. Anda dapat menambah bahan-bahan
melalui cerat pelindung percikan.
• Pengocokan: sebelum mengocok putih telur atau krim,
pastikan mangkuk dan kocokan kering dan bersih dari
minyak.
• Pengadukan: gunakan kaitan adonan untuk mengaduk
tepung ragi untuk roti dan pizza. Anda perlu
menyesuaikan takaran cairan untuk menguleni adonan
sesuai dengan kondisi kelembaban dan suhu.
Jika Anda ingin mengaduk adonan kembali dengan alat
dapur, tekan adonan hingga ke dasar mangkuk untuk
menghindari adonan naik mengembang memenuhi alat.
Pastikan Anda mengaduk adonan kembali sesuai dengan
kecepatan yang disarankan.
Resep: Adonan roti
(maksimum x1,5 takaran)
Bahan-bahan:
• 500 g tepung
• 50 g minyak zaitun
• 1 sendok teh garam
• 1 sendok teh gula
• 7 g ragi
• 260 ml air hangat
1 Masukkan semua bahan-bahan kering
ke mangkuk dan putar kenop putar ke
kecepatan 1.
2 Tuangkan air lalu minyak.
3 Ganti ke kecepatan 2-3 dan terus aduk
hingga terbentuk bola adonan halus.
4 Lapisi mangkuk dengan minyak sayur.
5 Letakkan bola adonan ke dalam mangkuk
ini dan tutupi dengan plastik pelapis.
6 Biarkan mengembang selama 1 jam hingga
berbentuk dua kali lebih besar.
7 Keluarkan udara dari adonan yang
mengembang.

24
ID
6 Matikan oven dan keringkan meringue di
oven selama 1,5 jam.
Blender (hanya HR7951/
HR7954/HR7958/HR7974/
HR7978)
Sebelum Anda mulai, pastikan Anda memasang
sesuai Gbr. 3.
Blender: untuk memblender smoothie, shake,
jus, dan menghancurkan es
Ikuti takaran, waktu pengolahan, dan kecepatan
yang disarankan seperti yang ditunjukkan pada
Gbr. 9.
Untuk menghancurkan es, putar kenop kecepatan
ke P secara berulang hingga es benar-benar hancur.
Catatan
• Jangan sekali-kali membuka tutup untuk memasukkan
jari atau benda apa pun ke dalam tabung ketika blender
sedang bekerja.
• Selalu pasang gelang penyegel pada unit pisau sebelum
dipasang ke tabung blender.
• Untuk menambahkan bahan cair sewaktu memblender,
tuangkan ke dalam tabung blender melalui lubang
masukan dengan melepas cangkir takaran.
• Potong terlebih dahulu bahan-bahan menjadi potongan
kecil sebelum diolah.
• Jika Anda ingin mengolah dalam jumlah banyak, olahlah
bahan sedikit-sedikit, jangan diolah sekaligus.
• Agar tidak tumpah: Saat mengolah cairan yang
cenderung berbusa (misalnya, susu), jangan tuangkan
lebih dari 1 liter cairan ke dalam tabung blender.
• Masukkan bahan ke dalam tabung blender di bawah
indikator ketinggian maksimum.
• Untuk memperoleh hasil terbaik pada saat memblender
bahan kental, isi tabung blender setengah penuh dan
olah bahan-bahan tersebut dalam blender secara
bergantian.
• 6 sampai 8 sendok makan air es
1 Masukkan semua bahan-bahan kering
ke mangkuk dan putar kenop putar ke
kecepatan 1.
2 Tambahkan mentega dingin ke dalam
bahan-bahan kering dan tambah kecepatan
secara bertahap dari 1 sampai 3.
3 Tambah 1 sendok makan air es secara
bertahap ke adonan hingga membentuk
adonan yang gembur.
• Jika adonan tidak menyatu, tambah
sedikit air lagi dan aduk lebih lama.
Jangan menambahkan air terlalu banyak.
Terlalu banyak air akan mengeraskan
kerak.
4 Buat adonan menjadi bentuk yang
diinginkan dan bungkus dengan plastik
pembungkus.
5 Simpan di kulkas selama sekurangnya
selama 1 jam sampai 2 hari.
6 Istirahatkan adonan pada suhu kamar
selama beberapa menit sebelum
menggulung dan memanggang.
Resep: Meringue
Bahan-bahan:
• 4 putih telur
• 1 cangkir (200 gram) gula bubuk atau
gula kastor
1 Kocok putih telur dengan kecepatan
7 hingga terbentuk permukaan halus.
2 Tambah gula secara bertahap sambil
mengolah dengan kecepatan 4 hingga
permukaan solid terbentuk.
3 Letakkan meringue ke baki pemanggang
yang sudah dilapisi dengan kertas panggang.
4 Panaskan oven sebelumnya pada suhu
105 °C dan letakkan baki dengan meringue
di tengah oven.
5 Panggang meringue selama kira-kira 1-1,5
jam hingga kering dan renyah.

Indonesia
25
ID
Perhatian
• Berhati-hatilah saat memegang pisau pengiris sisipan
cakram. Pisau pengiris sisipan memiliki tepi pemotong
yang sangat tajam.
• Jangan sekali-kali menggunakan sisipan cakram untuk
mengolah bahan keras, seperti es batu.
• Jangan menekan pendorong terlalu kuat sewaktu
menekan bahan ke dalam tabung pengisi.
Catatan
• Potong bahan yang besar terlebih dahulu agar dapat
masuk ke dalam tabung pengisi.
Ikuti langkah di bawah untuk memasang sisipan
cakram (Langkah 1 pada Gbr. 5).
1 Masukkan lubang sisipan pada poros
pegangan sisipan.
2 Dorong lubang sisipan pada tonjolan di
batang poros.
3 Tekan sisipan ke pegangan sisipan sampai
terkunci di tempatnya dan berbunyi klik.
Perasan jeruk
Sebelum Anda mulai, pastikan Anda memasang
sesuai Gbr. 6.
Catatan
• Pasang saringan untuk perasan jeruk pada poros di
dalam mangkuk. Pastikan tonjolan pada saringan telah
terkunci pada lubang di gagang mangkuk. Apabila saringan
terpasang dengan benar, akan terdengar bunyi klik.
• Tekanlah buah jeruk pada kerucut. Hentikan penekanan
untuk mengeluarkan ampas dari saringan jika perlu.
Setelah selesai menekan atau bila Anda ingin membuang
ampas, putar kenop ke 0 dan lepas mangkuk dari alat
dengan aksesori di dalamnya.
Pengolah makanan (hanya
HR7954/HR7958/HR7974/
HR7978)
Unit pisau
Sebelum Anda mulai, pastikan Anda memasang
sesuai Gbr. 4.
Unit pisau: untuk memotong, mencampur, dan
menghaluskan bahan-bahan
Untuk menghilangkan makanan yang menempel
pada pisau atau dinding mangkuk, hentikan
pengolahan dan matikan alat terlebih dahulu,
lalu gunakan spatula.
Catatan
• Selalu taruh unit pisau di dalam mangkuk sebelum Anda
mulai menambahkan bahan-bahan.
• Jangan gunakan unit pisau untuk merajang bahan yang
keras, seperti biji kopi, kunyit, biji pala, dan es batu,
karena dapat menyebabkan pisau tumpul.
• Jangan biarkan alat bekerja terlalu lama ketika merajang
keju atau cokelat (keras). Jika tidak, bahan ini akan
menjadi terlalu panas, mulai meleleh, kemudian
menggumpal.
Cakram dengan sisipan
Sebelum Anda mulai, pastikan Anda memilih
sisipan yang diinginkan dari yang berikut dan
pasang sesuai dengan Gbr. 5.
Nama Kegunaan
Sisipan
granulasi
Untuk memotong
bahan-bahan
menjadi potongan
kecil/halus
Sisipan
pengiris
Untuk mengiris
bahan-bahan
Sisipan
pencacah
Untuk mencacah
bahan-bahan
menjadi potongan
kecil

26
ID
Penggiling (hanya HR7958/
HR7978)
Sebelum Anda mulai, pastikan Anda memasang
sesuai Gbr. 8.
Anda dapat menggunakan penggiling untuk
mencacah/menggiling biji kopi, biji merica, kacang-
kacangan, rempah-rempah, buah kering, dll.
Buah kering seperti buah ara dapat dirajang
dan digunakan sebagai taburan untuk yoghurt
atau untuk roti atau biskuit.
Untuk hasil terbaik saat menggiling buah ara
Mission hitam kering, giling maksimal 85g pada
kecepatan P selama 3 detik.
Catatan
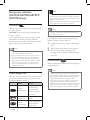
• Ikuti takaran, waktu pengolahan, dan kecepatan yang
direkomendasikan untuk bahan-bahan seperti yang
ditunjukkan pada Gambar 9.
• Jangan melebihi batas maksimum pada gelas penggiling.
• Anda dapat memesan blender (dengan kode servis
96510070528 dan 996510070501) dari dealer Philips
atau pusat servis Philips sebagai aksesori tambahan.
Kiat
• Sebelum membuka gilingan dengan bahan yang diolah.
1. Balikkan tabung penggiling.
2. Ketuk tabung penggiling beberapa kali.
3. Lepaskan unit pisau secara perlahan.
5 Membersihkan
Peringatan
• Sebelum membersihkan alat, cabut dari stopkontak.
• Lihat tabel (Gbr. 10) untuk informasi mengenai cara
membersihkan komponen dengan air, mesin pencuci
piring, dan/atau kain lembap.
Pencincang daging (hanya
HR7958/HR7978)
Sebelum Anda mulai, pastikan Anda memasang
sesuai Gbr. 7-1.
Pencincang daging ditujukan untuk mencincang
daging mentah atau matang.
Jika daging menempel pada hoper, ikuti langkah-
langkah berikut untuk menyetel ulang:
1 Matikan dan cabut alat dari stopkontak.
2 Lepaskan hoper.
3 Singkirkan daging yang menyumbat.
4 Pasang hoper kembali.
5 Colokkan steker ke stopkontak dan pilih
kembali kecepatan yang diinginkan.
Mengganti roda gigi
Jika roda gigi poros spiral rusak, gunakan roda
gigi ekstra untuk menggantinya sesuai dengan
Gbr. 7-2
Catatan
• Jangan pernah menggiling tulang, kacang, atau bahan-
bahan keras lainnya.
• Jangan sekali-kali gunakan daging beku! Sebelum menggiling
daging, pulihkan daging terlebih dahulu dari kondisi beku.
• Jangan tekan daging terlalu banyak atau terlalu kuat
saat memasukkan daging ke dalam hoper. Hal ini dapat
menghindari kelebihan beban pada alat.
Kiat
• Singkirkan tulang, tulang rawan, urat dari daging untuk
menghindari penyumbatan saat penggilingan.
ページが読み込まれています...
ページが読み込まれています...
ページが読み込まれています...
ページが読み込まれています...
ページが読み込まれています...
ページが読み込まれています...
ページが読み込まれています...
ページが読み込まれています...
ページが読み込まれています...
ページが読み込まれています...
ページが読み込まれています...
ページが読み込まれています...
ページが読み込まれています...
ページが読み込まれています...
ページが読み込まれています...
ページが読み込まれています...
ページが読み込まれています...
ページが読み込まれています...
ページが読み込まれています...
ページが読み込まれています...
ページが読み込まれています...
ページが読み込まれています...
ページが読み込まれています...
ページが読み込まれています...
ページが読み込まれています...
ページが読み込まれています...
ページが読み込まれています...
ページが読み込まれています...
ページが読み込まれています...
ページが読み込まれています...
ページが読み込まれています...
ページが読み込まれています...
ページが読み込まれています...
ページが読み込まれています...
ページが読み込まれています...
ページが読み込まれています...
ページが読み込まれています...
ページが読み込まれています...
ページが読み込まれています...
ページが読み込まれています...
ページが読み込まれています...
ページが読み込まれています...
ページが読み込まれています...
ページが読み込まれています...
ページが読み込まれています...
ページが読み込まれています...
ページが読み込まれています...
ページが読み込まれています...
ページが読み込まれています...
ページが読み込まれています...
ページが読み込まれています...
ページが読み込まれています...
ページが読み込まれています...
ページが読み込まれています...
ページが読み込まれています...
ページが読み込まれています...
ページが読み込まれています...
ページが読み込まれています...
ページが読み込まれています...
ページが読み込まれています...
ページが読み込まれています...
ページが読み込まれています...
ページが読み込まれています...
ページが読み込まれています...
ページが読み込まれています...
ページが読み込まれています...
ページが読み込まれています...
ページが読み込まれています...
ページが読み込まれています...
ページが読み込まれています...
ページが読み込まれています...
ページが読み込まれています...
ページが読み込まれています...
ページが読み込まれています...
-
 1
1
-
 2
2
-
 3
3
-
 4
4
-
 5
5
-
 6
6
-
 7
7
-
 8
8
-
 9
9
-
 10
10
-
 11
11
-
 12
12
-
 13
13
-
 14
14
-
 15
15
-
 16
16
-
 17
17
-
 18
18
-
 19
19
-
 20
20
-
 21
21
-
 22
22
-
 23
23
-
 24
24
-
 25
25
-
 26
26
-
 27
27
-
 28
28
-
 29
29
-
 30
30
-
 31
31
-
 32
32
-
 33
33
-
 34
34
-
 35
35
-
 36
36
-
 37
37
-
 38
38
-
 39
39
-
 40
40
-
 41
41
-
 42
42
-
 43
43
-
 44
44
-
 45
45
-
 46
46
-
 47
47
-
 48
48
-
 49
49
-
 50
50
-
 51
51
-
 52
52
-
 53
53
-
 54
54
-
 55
55
-
 56
56
-
 57
57
-
 58
58
-
 59
59
-
 60
60
-
 61
61
-
 62
62
-
 63
63
-
 64
64
-
 65
65
-
 66
66
-
 67
67
-
 68
68
-
 69
69
-
 70
70
-
 71
71
-
 72
72
-
 73
73
-
 74
74
-
 75
75
-
 76
76
-
 77
77
-
 78
78
-
 79
79
-
 80
80
-
 81
81
-
 82
82
-
 83
83
-
 84
84
-
 85
85
-
 86
86
-
 87
87
-
 88
88
-
 89
89
-
 90
90
-
 91
91
-
 92
92
-
 93
93
-
 94
94


関連論文
その他のドキュメント
-
Siemens MW67440GB ユーザーマニュアル
-
KitchenAid 5K5SSCWH0 取扱説明書
-
MK BML-150 Operating Instructions Manual
-
Bosch MMB6174SG 取扱説明書
-
-
IKEA AA-2352789-2-100 Spice Mill Glass Brown 19 Cm 取扱説明書
-
IKEA VARDAGEN ユーザーマニュアル
-
-
-