
TT
TV
BOX
4X CPU Cortex-A5
4X GPU Mali-450
User Manual
Android 4.4
KitKat
H.264
1080P Encoder
MXQ is the new generation of MX OTT TV BOX

Preface
Thanks very much for choosing our TV Box. In order to make it more convenient for you
to use proficiently, we provide you with a user manual. Please read it carefully before
using and properly keep it for reference.
Statements
We have made every effort to provide the most current information about the product.
We do not grant any guarantees as to the contents of the present instruction manual
and disclaim any implied guarantees concerning market value or suitability for specific
purposes.
The information contained here is an instruction intended to enable the correct usage
and maintenance of the receiver.
We reserve the right to introduce amendments, changes or translations of the user
manual without prior notification thereof. For this reason, we recommend you regularly
visit our website in order to obtain the latest information.

1
1
01
TT TV BOX
02
TT
TV BOX
02
02
02
03
04
04
05
06
07
07
08
08
09
09
10
11
12
13
14
14
Chapter 1 System Introduction
1. 1 Key Features
1. 2 Environment for System
1. 3 Package Contents
Chapter 2 Remote Controller
2. 1 Introduction of Remote
Chapter 3 System Connection
3. 1 AV Connection
3. 2 HDMI Connection
3. 3 Startup
Chapter 4 Home
Chapter 5 Apps
5.1 PPPoE
5.2 Browser
5.3 Media Centre
5.4 Samba
5.5 File Browser
5.6 Download
5.7 App Installer
5.8 Muti-interaction (Airplay/Miracast)
5.9 OTA update
Chapter 6 Settings
6.1 Network
6.2 Display
6.3 Advanced
6.4 Other
Chapter 7 Upgrade Steps
Chapter 8 Trouble Shotting
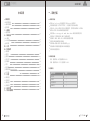
Contents
Chapter 1 System Introduction
1. 1 Key Features
Support many kinds of IPTV and OTT TV programmes.
Support FHD H.265, VC-1, H.264, MPEG-2 and many other formats such as MPEG-1,
MPEG-2, MPEG-4, DIVX, REALMEDIA and so on.
Video formats include hevc, avi, mpg, vob, rmvb, mkv, m2ts, ts and so on.
Photo formats include JPEG, BMP and PNG up to 80M pixels.
Audio formats include MP3,WMA,WAV,AC3, AAC and so on.
Support SD/SDHC/MMC cards.
Support four USB 2.0 host connectors with maximum output current of 1.5A/5V.
Support standard RJ45 cable network connection and wireless network connection.
Support infrared remote controller operation.
Operation : Temperature limitation: 0--40℃; Humidity limitation: 20--80%.
Storage: Temperature limitation: -20--50℃; Humidity limitation: 10--90%.
1. 2 Environment for System
1. 3 Package Contents
Accessories Quantity
Power adaptor
Remote control
1
1
HDMI cable
User manual

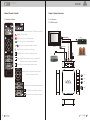
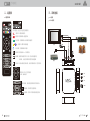
MUTE:Press to turn down the volume.
SETUP: Fast key to go to system setup.
POWER: Press to standby.
APP: Fast key to go to android application.
MENU: Press to choose function menu of corresponding
application in video, music, photo and website.
Navigation:Press to navigate left/right/up/down.
Press OK to confirm your choice.
Number keypad 0-9:Press to input Arabic number.
RETURN: Press to return back to previous menu.
HOME: Fast key to go back to main menu.
VOL: Press to increase/decrease the volume.
Cursor:Press to use the navigation button as cursor.
Backspace:Press to backspace the input.
TT TV BOX
03
Chapter 2 Remote Controller
2. 1 Introduction of Remote
04
TT
TV BOX
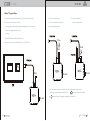
Chapter 3 System Connection
3. 1 AV Connection
3. 2 HDMI Connection
USB -4
AV cable
Router
Adaptor cable
Amplifier
USB-3
USB-2
USB-1
SD/MMC
Network cable
Television
SD/MMC
USB-1 USB-2
USB-3
USB-4
SPDIF
AV
HDMI ETHERNET
5V DC
Spdif
Coaxial cable
HDMI cable
Home Theater Speaker 5.1 Channel
SETUP
APP
SETUP
APP
TV CONTROL AREA: Press to learn from the TV IR remote to control TV.

05
TT TV BOX
06
TT
TV BOX
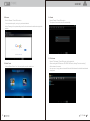
3.3 Startup
Turn on the TV box while indicator light is blue. Enter into main menu at about 30 seconds.
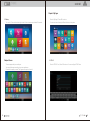
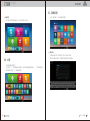
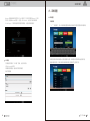
Chapter 4 Home
There are apps which you usually use.
You can add the apps according to your own preference.
Please tick the apps you need. Tick it again when you don’t need it.
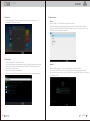
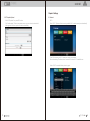
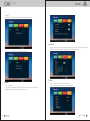
Chapter 5 My Apps
Move to “My Apps”, Press OK to enter in.
You can see icons referring to different function on the picture.
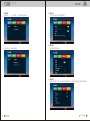
5.1 PPPoE
Move to “PPPoE” icon, Press OK to enter in. You can configure PPPoE here.

5.3 Media Center
Move to “Media Center ” icon, You can play all your prefer media here.
07
TT TV BOX
08
TT
TV BOX
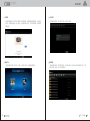
5.2 Browser
Move to “Browser”. Press OK to enter in.
It is a convenient way for you to go to your desired website.
Notice: Please go to the system setting to set the internet connection before entering into the
website.
5.4 Samba
Move to “Samba”. Press OK to enter in.
The system will search the share files automatically.
5.5 File Browser
Move to “File browser”. Press OK to enter into the device list.
When inserting with USB device or SD/ SDHC/ MMC cards, the sign “Device is mounting”
will be shown on the screen.
Here you can cut, copy, paste and move the files and folder between the local disk and external
storage card.

Miracast: Please make sure TV box and mobile phone under the same WI-FI
environment .Press “Miracast” on TV box. It will find peers automatically, and click “setting”
on your mobile phone, enter into “WLAN”, Click “Menu” to choose “WLAN Display” on your phone.
Choose to share files.
Miracast
5.8 Muti-interaction
Move to “Airplay” icon or “Miracast” icon, Press OK to enter in.
Airplay: Download airplay application according to the model of the mobile phone. Enter into
Airplay, connect with the same WI-FI hotspot. Play video, picture, or music on your phone. Click
the “airplay” icon on the phone to share files.
Airplay
09
TT TV BOX
10
TT
TV BOX
5.6 Download
Move to “Downloads”. Press OK to enter in. You can check the status here when
downloading APKs from the internet.
5.7 App Installer
Move to “App Installer”. Press OK to enter in.
You can install software by this app installer function. Please first download your desired
software by apk formats from the computer to the USB. You will choose your desired
device in order to scan the apks.
Press OK to install your desired software.
After the installation finished, the software icon will be shown on the applications menu.

5.9 OTA update Optional
Move “OTA update” icon, press OK to enter.
Click “online update” If there is an update in server, you can choose to download it.
After upgrade is finished, system will restart automatically.
11
TT TV BOX
12
TT
TV BOX
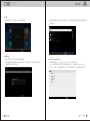
Chapter 6 Settings
6.1 Network
Wi-Fi
Select “Wi-Fi”, System will start scanning available Wi-Fi networks around you automatically.
Press OK to choose your Wi-Fi network and enter your password.
After authenticating IP address, when “connected” is shown, Wi-Fi is available now.
Notice: If Wi-Fi connection failed, please try again.

13
TT TV BOX
14
TT
TV BOX
Ethernet:
Select “Ethernet” System will start scanning Ethernet automatically.
When the IP address appears, the Ethernet connected.
6.2 Display
Move to “Display”.
Here you can set wallpaper, HDMI audio output mode, turn on/off hide status bar,
display position, choose the time of start screen saver.
6.3 Advanced
Move to “Advanced” to choose advanced settings. Here you can set Miracast, remote control,
CEC control, location, orientation, home screen and digital audio output.
6.4 Other
Move to “Other” to see more TV Box information.
You can do system update and adjust more settings here.

15
TT TV BOX
16
TT
TV BOX
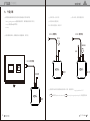
7.1 Please unzip the upgrade package to the SD card .There will be three
files in the root of the SD card as follow,
factory_update_param.aml (Some upgrade packages don’t have this file)
xxx.zip (the upgrade package zip file)
recovery
7.2 Insert HDMI cable and SD card with the box.
(connect the other side of the HDMI cable to the TV HDMI port.
7.3 Insert a stick into AV port.
There is a reset button inside AV port.
7.4 Insert power adaptor.
7.5 You can stop pressing the reset button until you see the android robot. And use
Press
Press
And keep pressing the button.
(still pressing the button)
the remote to choose apply update from EXT" "
choose Update from sdcard" "
choose xxx.zip (the upgrade package file) and press OK. " "
Chapter 7 Upgrade Steps
Stick
SD card
SD card
Stick
SD card

17
TT TV BOX
18
TT
TV BOX
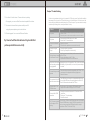
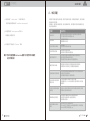
Chapter 7 Trouble Shotting
Under no circumstances should you try to repair the TV Box by yourself, as this will invalidate
the warranty. Do not open the TV Box as there is a risk of electric shock. If a fault occurs, first
check with points listed below before taking the TV Box for repair. If you are unable to remedy
a problem by following hints, consult your dealer for help.
Problem
Solution
No power
-Check if the power adaptor is properly connected to the power
and the TV Box.
-Press the power on the remote controller to turn on the power.
No picture
-Reconnect with HDMI cable or AV cable.
-Check if the TV is switched on.
No sound or distorted
sound
-Adjust the volume.
-Check that the speakers are connected correctly.
No audio or digital
output
-Check the digital connections.
-Check if your amplifier is set correctly.
The box does not respond
to the Remote Control
-Aim the remote control directly at the sensor on the front
of the TV Box.
-Reduce the distance to the TV Box.
-Replace the batteries in the remote control.
Player does not respond to
some operating commands
during playback
-Operations may not be permitted. Refer to the user manual.
-Possibility of system halted, re-insert with power adaptor
to restart.
No sound during movies
playback
-The audio codec may not be supported by the TV Box. You
can change to the supported audio on playing menu.
-Check the volume.
The contents of the USB
flash drive cannot be read
-The USB flash drive format is not compatible with the box.
-If one of the USB can not be read, please turn off the TV
Box for 30seconds and restart the TV Box.
Slow operation of the
USB flash drive
-Big file size or high resolution USB flash drive takes
longer time to read and display on the TV screen.
No sound with HDMI
connection
-Check the connection between the TV and the HDMI
jack of box.
-Check your TV system setup.
-Check the volume.
The TV screen is blank
and the player LED is
blinking
-Turn off your TV Box, wait 30 seconds, turn it on again.
-If under HDMI status, check if HDMI connection is cor-
-rect or change another HDMI cable set the output
resolution of this TV Box into 720p.
7.6 You will see --Install / sdcard... It means the box is updating." "
After upgrade, you can see Install from sdcard complete at the bottom." "
7.8 Finished upgrade. You can see the Welcome interface." "
7. 7 Use remote to choose reboot system now and press OK" "
or plug the power adaptor again to reboot the box.
Tips:Youcancheckthebuildnumberinsettingtoconfirmthat
youhaveupdatedtheboxsuccessfully.

TT TV BOX
⾮常感谢您选择安卓多媒体播放器,为了⽅便您尽快熟悉使⽤,我们为您配备了⽤户使⽤
说明书,在使⽤前请认真阅读并妥善保存,以备参考。
序⾔
本产品内含⾃动联⽹功能该功能可帮助⽤户⾃⾏联接指定⽹站服务器并按⽤户选定的内
容进⾏下载播放,本功能旨在简化客户上⽹登陆⽹站使⽤⽹站提供的搜索服务时间,⽤户
所下载播放内容及来源均来⾃互联⽹,本产品不对内容的正确性、合法性及存在的稳定性
负责,希望⽤户遵守国家相关法律法规,不得下载播放任何反动、⾊情及暴⼒等不健康内
容,本产品亦不能因为⽤户在⽹络⽆法联接、联接不稳定及⽹站服务器停机、关闭所造
成的损失⽽负责;同时,安卓作为⼀个开放式的平台,应⽤软件数量庞⼤,来源不同开发团队,
因此存在软件和机器不兼容的问题,⼀些应⽤软件在本机中不能正常安装或使⽤,不属
本机质量问题。当以上情况发⽣时,本产品依然可作为多媒体播放器使⽤。
本公司已经对本说明书进⾏了严格仔细的校勘和核对,我们不能保证完全没有任何错误
和疏漏。同时因为产品更新升级较快,本说明书的内容可能与实际产品存在不相符的情况,
恕不另⾏通知,请访问本公司⽹站查询。
说明书中的图⽚仅供参考,如果有少数图⽚与产品的实际显⽰不符,请以产品实际显⽰为
准。
声明

⼀系统介绍
1.1 系统主要特点
1.2 系统适应环境
1.3 基本配件
⼆、遥控器
2.1 遥控器说明
三、系统连接
3.1 AV 连接
3.2 HDMI 连接
3.3 系统开机
四、主页
五、我的应⽤
5.1 宽带拨号
5.2 浏览器
5.3 媒体中⼼
5.4 ⽹上邻居
5.5⽂件管理
5.6 下载
5.7 应⽤安装
5.8 多媒体互动(Airplay/Miracast)
5.9 OTA升级
六、设置
6.1 ⽹络设置
6.2 显⽰设置
6.3 ⾼级设置
6.4 其他设置
七、升级步骤
⼋、常见问题解答
中⽂⽬录 ⼀、系统介绍
1.1 系统主要特点
采⽤Quad-Core Cortex-A5中央处理器,应⽤Android 4.4操作系统。。
⽀持⽹络在线视频(IPTV/OTTTV节⽬),可连接⽤户⾃⼰的后台⽹站。
⽀持H.265、H.264、MPEG-2等三⼤主流⾼清格式,并同时⽀持MPEG-1、MPEG-2、
MPEG-4、DIVX、REALMEDIA等其他常⽤格式。
⽀持⽀持hevc、avi、mpg、vob、rmvb、mkv、m2ts、ts等多种视频类型⽂件。
⽀持⾼达⼋千万像素的JPG、BMP、PNG图⽚格式。
⽀持MP3、WMA、WAV、AC3、ACC等多种⾳频格式播放。
⽀持SD/SDHC/MMC存储卡的读取。
⽀持四路2.0⾼速USB接⼝,最⼤输出电源1.5A/5V。
⽀持标准RJ45有线⽹络连接和Wi-Fi⽆线⽹络连接。
⽀持红外线遥控器操作。
1.2系统适应环境
操作:温度限制:0--40℃,湿度限制:20--80%。
存储:温度限制:-20--50℃,湿度限制:10--90%。
1.3基本配件
配件名称
遥控器
说明书
电源适配器
数量
1
1
1
1
HDMI线
01
TT TV BOX
02
TT
TV BOX
02
02
02
03
04
04
05
06
07
07
08
08
09
09
10
11
14
12
14
14

路由器
网线
电视机
USB -4
AV 线
电源
功放
USB-3
USB-2
USB-1
SD/MMC
SD/MMC
USB-1 USB-2
USB-3
USB-4
SPDIF
AV
HDMI ETHERNET
5V DC
同轴线
HDMI 线
待机键:选择按键待机。
静⾳键:关闭或打开全部声⾳。
设置键:快捷键进⼊设置界⾯。
安卓应⽤:快捷键进⼊安卓系统应⽤程序。
菜单键:播放本地视频⽂件、⾳乐、图⽚的设置选项
菜单键,以及在浏览⽹站时的功能设置键。
返回键:选择返回上⼀个菜单页⾯。
主菜单键:快捷键回到主菜单。
⾳量键:调⾼与调低⾳量。
导航键:进⾏上下左右操作。
OK键:确认操作。
光标键:长按此键变成光标功能,通过导航键进⾏上下左右操作。
数字字母键:选择阿拉伯数字或英⽂字母输⼊。
空格键:在输⼊⽂字的时候选择空格键.
03
TT TV BOX
⼆、遥控器
2.1 遥控器说明
3.1 AV 连接
3.2 HDMI 连接
04
TT
TV BOX
三、系统连接
家庭影院
SETUP
APP
SETUP
APP
学习功能区:通过学习后可控制电视机。

05
TT TV BOX
06
TT
TV BOX
五、我的应⽤
点击“我的应⽤”,进⼊我的应⽤界⾯。
3.3 系统开机
插上电源,机器亮蓝⾊指⽰灯,约30秒左右进⼊主页⾯。
四、主页
主页显⽰常⽤应⽤程序。
点击右下⾓“+”号可以根据⾃⼰的喜好,在主页添加或删除应⽤程序。“√”选择所要添加
的应⽤程序,取消“√”删除应⽤程序。
5.1 宽带拨号
在应⽤程序中选择“宽带拨号”图标,点击进⼊界⾯。
输⼊帐号密码进⾏拨号。根据喜好选择是否开机⾃动拨号。

07
TT TV BOX
08
TT
TV BOX
5.2 浏览器
5.4 ⽹上邻居
在应⽤程序中选择“⽹上邻居”图标,点击进⼊界⾯。
在多媒体界⾯选择“浏览器”图标进⼊⽹页浏览界⾯。请先确保⽹络连接正常,点击⽹址
输⼊栏,⽹络键盘会弹出,输⼊⽹址,点击确认键进⼊⽹页。可浏览各种⽹站,在线观看
⽹络电影。
5.3 媒体中⼼
在应⽤程序中选择“媒体中⼼”图标,点击进⼊界⾯。可以播放各种媒体。
5.5⽂件管理
在应⽤程序中选择“⽂件管理”图标,点击进⼊界⾯。进⼊后可以点击选择栏第⼆项,对⽂
件进⾏选择、复制、剪切、粘贴等操作。

11
TT TV BOX
12
TT
TV BOX
5.6 下载
在应⽤中选择“下载”图标,进⼊下载内容进程界⾯。
5.7 应⽤安装
选择“应⽤安装”图标,进⼊应⽤安装程序界⾯
您可以通过应⽤安装选项进⾏安装apk应⽤软件。请将事先存有APK⽂件的U盘或SD卡插⼊
相应接⼝,系统会⾃动扫描设备。
选择您想安装的应⽤软件,点击安装该应⽤软件。安装完成后,该软件的图标将会显⽰在应⽤程
序的主界⾯。
5.8 媒体互动(Airplay/Miracast)
在应⽤程序中选择“Airplay”或者“Miracast”图标,点击进⼊界⾯
Airplay:按照⼿机型号在⼿机⾥下载并安装适⽤的Airplay,点击设备中的Airplay,连接
同⼀个WI-FI热点。在⼿机⾥播放视频,图⽚,⾳乐下有软件图标,点击即可进⾏多屏互动。

09
TT TV BOX
10
TT
TV BOX
Miracast:请确保设备与⼿机在同⼀个WiFi环境下,在“应⽤”中选择“Miracast”,然后
打⼿机(能使⽤Miracast的⼿机)“设置”,进⼊“WLAN”,点击⼿机“菜单”键选择
“WLAN Display”,在可⽤设备中选择您所要的设备,点击检测到设备即可。
5.9 OTA升级
在应⽤程序中选择“OTA升级”图标,点击进⼊界⾯。
点击online update按钮。
如果服务器有更新,就会弹出下载的对话框
提⽰下载更新
六、系统设置
“√”“⽆线⽹络”,进⼊⽆线⽹络设置界⾯系统会开始⾃动扫描您周围的可⽤⽆线⽹络。
6.1 ⽹络设置
⽆线⽹络
选择连接到您的⽆线⽹络接⼊点,然后直接输⼊密码。系统显⽰正在获取IP地址,⽹络已经
连接,⽆线⽹络可⽤。提⽰:有时候⽆线⽹络不稳定,连接失败了,请多试⼏次。

13
TT TV BOX
14
TT
TV BOX
连接⽹线,“√”“有线⽹络”,系统会⾃动连接以太⽹。
当显⽰IP地址,以太⽹连接成功。
有线⽹络
6.4 其他设置
6.2 显⽰设置
6.3 ⾼级设置
选择“显⽰设置”根据偏好设置显⽰。
选择图标进⾏⾼级设置。
选择“其他设置”图标,进⼊媒体盒版本信息界⾯。这⾥您可以进⾏系统升级和更多的设置。

15
TT TV BOX
16
TT
TV BOX
7.1 请把升级包解压到SD卡根⽬录,SD卡⾥⾯会有以下的三种⽂件。
factory_update_param.aml (根据升级包不同,有的升级包没有这个⽂件。)
xxx.zip (升级包的zip格式⽂件)
recovery
7.2 插⼊⾼清线和SD卡。
(⾼清线的另⼀端连接电视,如下图。)
7.3 在AV⼝插⼊⼀根⼩⽊棍。
(AV⼝⾥⾯有⼀根复位键)
7. 4 插上电源。
7.5 看到机器⼈出现在升级界⾯就可以松开⼩⽊棍,⽤遥控选择
⽤⼩⽊棍去按复位键,保持不动。
(依然按着复位键)
“ apply update from EXT ”
再选择“Update from sdcard”
“ xxx.zip (the upgrade package fle)” ⽤遥控器按OK.
七、升级步骤
HDMI ⾼清线
⼩⽊棍
SD卡
HDMI ⾼清线
SD卡
按下去
保持按着
SD卡
HDMI ⾼清线
电源
ページが読み込まれています...
-
 1
1
-
 2
2
-
 3
3
-
 4
4
-
 5
5
-
 6
6
-
 7
7
-
 8
8
-
 9
9
-
 10
10
-
 11
11
-
 12
12
-
 13
13
-
 14
14
-
 15
15
-
 16
16
-
 17
17
-
 18
18
-
 19
19
-
 20
20
-
 21
21


